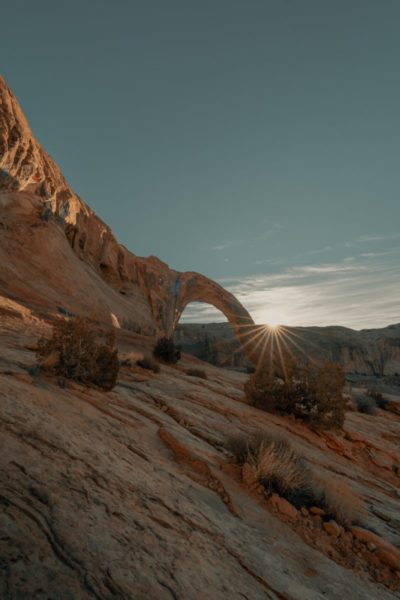
The starburst effect, which essentially looks like streaks of light radiating from a light source, is one of the coolest effects you can add to your otherwise mundane and regular images to give it a creative twist.
And introducing it into your photos is easier than you think.
All you need is a small aperture opening. That’s it. Seriously!
Just use a small aperture opening (large aperture value), anything between f/11 to f/22, to record the image and it would give you the star effect you want.
Getting the sun star effect in your images is the easy part. Anybody could do it.
The hard part, however, is to be able to control this effect to exactly match the look and feel of the image you are trying to create. So that the effect adds to the image rather than taking away from it.
To gain this control, you need to know a little more about how this effect is generated and what are the factors which influence its properties.
Want in?
The Basics
At the heart of any starburst effect is a small, bright source of light which is surrounded by a relatively dark area. Like, say a light bulb, surrounded by darkness at night.
Each of the factors mentioned above is really important for creating a good starburst effect in the image.

The smaller and brighter the light source, ringed by a relatively dim field, better the effect.
One thing that should be mentioned here is that you MAY have more than one such light source in the same image. In that case, each origin of light will produce one such star effect. I will show you an example of this in just a minute.
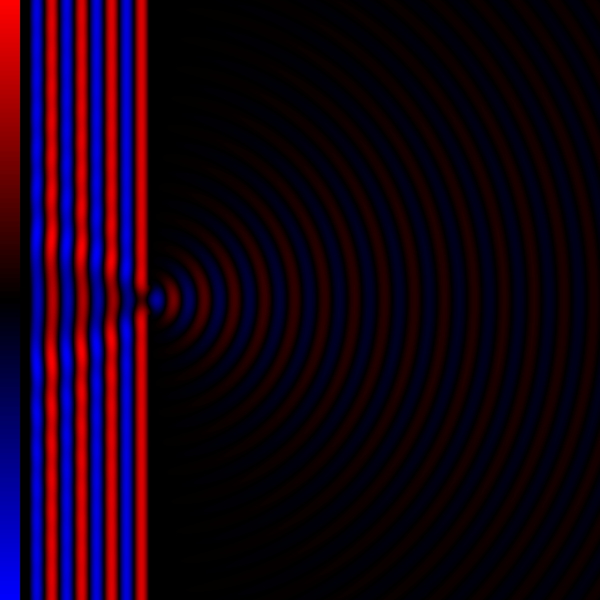
As far as the physics behind the phenomenon goes, the sun star effect is caused due to diffraction of light. Don’t worry, I won’t bore you with a physics lecture now. In simple words, all you need to know is this:
Diffraction of light occurs when light travels through a very small opening /slit. The light when encounters such an obstacle, while passing through it bends around the edges of the opening. The rainbow pattern created on a DVD or CD, the hologram mark on a credit card, are all caused due to the diffraction of light.
In our case, the small aperture I asked you to use, serves as the small opening and the blades of the aperture act as the edges over which the light “bleeds” into the camera.
Here is a short video, which explains how the blades inside your lens move around to adjust the size of the aperture opening.
In case you are wondering, no the number of blades and their shape are NOT the same for every lens. They vary a lot depending on the make, model, and time period of the production of the lens.
The number of blades and their shape does affect the amount of starburst effect the lens can produce.
Daytime Starburst
The most intense and dominant source of light during the day is obviously the Sun.
To make the Sun’s rays project out like a star, first and foremost dial down a really large aperture value. Any aperture value between f/11 and f/22 should be just fine.
But don’t go overboard and choose something really large like f/32. This might produce counterproductive results and give you an inferior quality image.
Just to remind you, a large aperture value represents a smaller aperture opening and vice versa. f/1.8 is a large opening, f/22 is a small one.
Safety First
Because you are shooting right into the Sun, you need to incorporate some safeguards. Some for your wellbeing and some for your camera.
Remember how a magnifying glass was used to set things on fire? The magnifying glass, basically when exposed to sunlight, gathers all the light falling on its large surface and focuses it on a tiny point.
Something very similar happens inside your camera too. The camera lens focuses light falling on it, onto the imaging sensor.
So, unless you want your camera’s sensor to be burnt to a crisp, DO NOT let your camera look at the Sun for very long periods of time.
And this advice goes for you too.
When trying to create a star effect, do not look through the viewfinder of the camera. Use the Live View instead.
As soon as you are done taking the shot, replace the lens cap back on the lens.
The safest time to shoot the Sun is early during the day or late afternoon. During these periods, the Sun is low on the horizon and the light produced is really soft and easy to work with.
The low relative altitude of the Sun also allows for much better composition. You could easily place your subject in front of the Sun and create a beautiful sun star effect. This is hard to do at noon when the Sun is just above your head.
The Sun star effect does not look very good on its own. It only works great when incorporated as a part of a good composition.
Overexposure Control
In our day-to-day shooting, we almost never shoot into the light. Any light.
The only light we capture using our cameras is the light reflected off of the subjects we photograph. Think about this.
This is because shooting into the light causes a lot of exposure problems. The light enters the camera directly through the lens, without being reflected off the subject. This “excess” light when hits the TTL light meter of the camera, makes the meter overestimate the amount of light in the scene, which many times, finally results in the image being underexposed with dark, unrecognizable subjects.

This situation is called Backlighting.
Technically you could use Backlighting situations to create some really appealing and interesting images. But that is not the topic we discuss here. If you are really interested, read: Backlighting Photography | How To Do It Right The First Time
So, in short, we have a situation with a lot of excess light and an overexposure problem looming over our head. Here is how to handle it.
First, you need to take control of the exposure settings. You cannot let the camera expose the image for you. To do this, you can use either Exposure compensation or use the Manual mode.
Keep a close eye on your image histogram. If you find the graph touching the right wall, cut down on the light you allow inside the camera immediately.
With the Sun in the image, you wouldn’t face a low-light situation. So keep the ISO value to a minimum (ISO50 or ISO100). Now choose a small aperture value as I asked you and then choose a shutter speed that exposes the image properly.
Pro Tip: Since there is a fair chance of overexposing the image, try and underexpose the image by a stop or two deliberately. It is a lot easier to bring back details from underexposed parts of the image in post-production than it is from overexposed areas.
Night Star Effect
At night, naturally, any source of light would be artificial in nature. Hence there is no need to adhere to the safety guidelines we talked about earlier. You can shoot the lights anyways you want.
Just one small adjustment in the shooting procedure.
Since the amount of light at night would be a lot less as compared to the day, the shutter speed required to expose an image properly may be very slow (30 seconds or more). This is while we still maintain the minimum amount of ISO value.
To counter this, you only need a tripod.
Keep all the settings exactly the same as we discussed earlier and just adjust the shutter speed to allow more time for the light to enter the camera.
For some added insurance, you can even use a remote trigger to fire the shutter. This would protect you from any unintentional camera shake that might be caused while trying to physically press the shutter down.
If you do everything right, each light source in your scene would create some beautiful diffraction spikes which would add a lot of character to your images.
Reflective Starburst
Using the technique I just showed you, you can transform any form of light into the spectacular effect we are after. Even when the light is merely reflecting off of a surface.
So even when you do not have the actual source of the light in the image composition, you can still integrate the star effect if you want.
Lens Recommendation
To produce the starburst effect, you could use ANY lens you want.
However, the problem of lens flare arises when a particular lens has quite a number of elements in it.
In general, higher the number of elements in the lens, greater the chance of introducing lens flares in the image. Although professional-grade lenses do come with advanced lens coatings which should minimize the problem of lens flares; for our case, it is best to use a lens with the least amount of lens elements.
If you have a prime lens (50mm or a 35mm), try to use that.
Focal Length
This section is way too nerdy. You may skip to the next one if you want.
F-number is denoted by the following formula:
Focal length / Aperture diameter = F-number
This means that for any particular f-number, say f/10, as the focal length decreases the aperture diameter should also fall by the same proportion.
If initially, the focal length was 100mm, the aperture diameter has to be 10mm to translate to f/10.

Now if the focal length drops to say 50mm, the aperture diameter also has to come down to 5mm to maintain the same f-number (f/10).
Therefore, for a constant f-number, the lower the focal length, smaller the physical size of the aperture diameter.
Since we are trying to get a small aperture here, this knowledge might come in handy.
I should, however, mention here that the difference focal length creates in producing sun star effects is extremely small and almost negligible. This is just in theory.
Finish
That is all you need to know.
Creating a starburst effect is pretty easy and straight forward like I told you in the beginning. All you need is a small enough opening to make the light diffract.
Before I finish, here are a few things that you should keep in mind to make the most of the effect you create:
- The star effect is created due to diffraction. The same diffraction causes images to be much softer and unsharp if allowed to dominate the photograph. So don’t go overboard and start using crazy large aperture values. You want to reach a good balance between image quality and the starry effect and stop there.
- If the Sun’s light seems too much to handle, sidestep a little and see if you can use your subject to guard some of the light. This should create an intrinsic naturalness in the image while also protecting you from clipping your highlights.

- Use your starburst effects only to enhance your present composition. In no way is it supposed to make up for a badly composed image. It simply can’t.
- A large aperture value should technically have a lot of the scene in focus but even then punch in and make sure that the subject you are shooting is sharp before you take the image. Do not be complacent.
- To further reduce the chance of lens flares, make sure that the lens is clean. Also, take off any additional filters (Neutral density, Polarizing filters) that you may have on.
Keep shooting beautiful.
Hand Picked For You
- You are shooting backlit when the primary source of your light is directly facin...
- People live in fear of the Manual Mode all their life, never looking at it close...
- No need to buy any additional gear. All you need is a bunch of images and an ima...
- Stop motion photography is one of the most satisfying and creative endeavors a c...
- The 35mm lens is undoubtedly a great contender for your travels photography need...
- Do your images often turn out to be dark or simply washed out? Here is how to be...


