Like it or not, automation is where the world is heading towards these days.
There is a very diligent and healthy amount of effort put into automating anything that a regular person has to do more than a couple of times each day. From simple message prompters and autocorrect on your cell phone to virtually the entire air traffic control, with the advent of the Internet along with long, steady strides of technology, there has been a good number of decisions that have been transferred to the machines to decide on our behalf in the last decade.
The picture is quite similar in the world of photography too.
Exposure compensation for me is one of the giant hooks that pulls (or at least tries to) the decision-making capabilities from the camera’s processors back to the photographer.
How so?
Well, this would need some explanation for you to understand the concept really well. It’s simple nevertheless.
So let’s begin.
What Is Exposure Compensation?
Applying exposure compensation is very simply the process of remapping the internal scale of exposure every camera is equipped with, to help make a creative change in the exposure of the final image.
The definition above may seem a little vague at this point but I can assure you that by the time you finish this article, you will have developed a very clear idea of what the concept actually is.
From The Top
So let me just explain to you first how the process of exposure works by default and WITHOUT the injection of exposure compensation in the equation.

It’s very simple actually.
Any exposure equation ALWAYS consists of three variables, Aperture, Shutter speed, and ISO. Just three. Together they make the exposure triangle, which determines how dark or bright the image turns out to be.
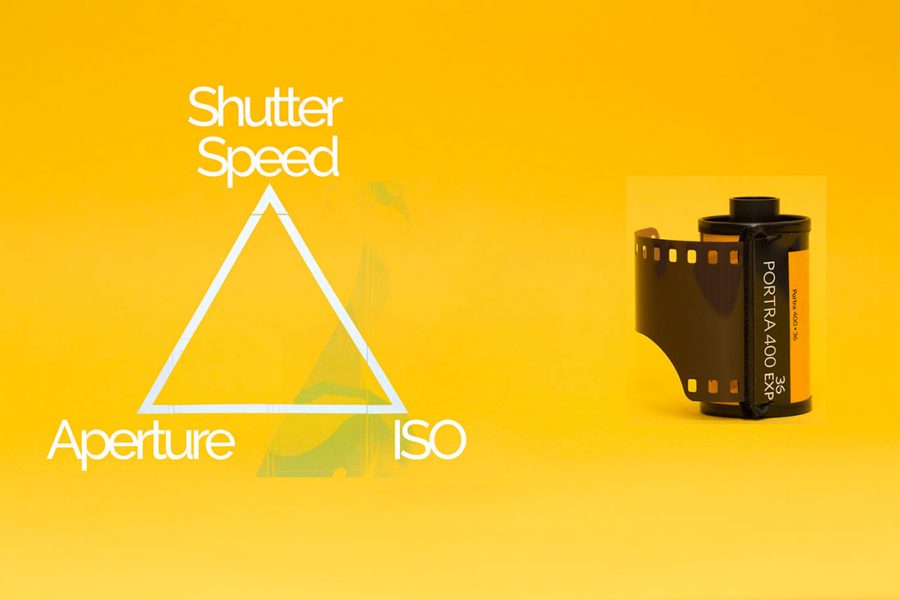
This is true for ALL cameras and yes, even the one on your phone.
Now depending on the type of camera you use to photograph the scene, it may or may not allow you to control these three variables of the exposure triangle. Point and shoots and cell phone cameras offer limited controls whereas dedicated DSLR and Mirrorless cameras offer control at a much more granular level.
Enter Automation
Unless you are on full Manual Mode, the camera always gets to decide the magnitude of one or more variables. For example, if you are on Shutter Priority mode, you control the shutter speed and the ISO value while the camera controls the aperture. The aperture value is what is automated here.
Taking into account the shutter speed and ISO value you select, the camera chooses an aperture value such that the camera is able to gather a certain amount of light required to build an image.
For an elaborate explanation of what I mean by “gathering a certain amount of light”, read the ‘Introduction’ section of this article.
Have you ever wondered though how does the camera know which aperture to use?
All modern cameras come with some form of in-built light meters. They are basically light sensitive sensors which measure the amount of available light and help the processors of the camera calculate the ‘correct exposure’.
Like all things which are measurable, light too has a unit which is used to quantify it. In the world of photography, this unit is called a stop.
Step By Step
Let just give you a brief overview of the entire process that culminates into an image.
Say you are on a semi-automatic mode, like shutter priority.
- You being the photographer chose the shutter speed the camera is supposed to use.
- Then you also dial in the ISO value.
- The camera then uses the light meters to gauge the amount of light available in the scene.
- Depending on the reading of the meter, the camera decides on the value of the aperture so as to be able to expose the image properly.
So you see that the reading of the light meter is the most crucial part of the entire process from the perspective of the camera. The camera solely relies on the reading to determine the aperture required. As the reading changes, the aperture selected will also change affecting the change in the exposure of the image.
Light Meters See No Color
Yeah, that’s a shock. It’s, however, true.
No light meter can perceive color or tonal values. All it can register is light intensities. So, basically, understand if the areas in the scene are dark or bright. I have discussed this at length in this article about histograms, you should definitely give it a read.

18% Grey
No, don’t freak out yet. This isn’t some maths problem here. It is just what all cameras use as a standard to base their exposure off of.
Let me explain.
Like I said, the light meter evaluates the scene based on the intensity distribution of light. Some parts of the images may be dark; some parts bright. Once all the data about the scene is collected, the camera then compares it with the value which it treats as standard, which is 18% grey.

Now how this exact value of 18% came into being is a very long and tedious story with excruciating details. For now, just know that the camera manufacturers examined a lot of images once and after a lot of calculations arrived at this value. It is supposed to expose properly most of the images, most of the time.
We here are dealing with all the instances when the camera fails to get it correct.
So when on the shutter priority mode you give the camera a specific shutter speed and ISO value to start with, the camera takes them into account and then evaluates the given scene using its light meters. The aperture is then selected by the camera in such a way so that the resulting image has the properties of an 18% grey image.
Comprende?
All About The Reading
It should be abundantly clear now that no matter what you shoot and how you want your final image to look like, the camera always follows the same procedures to get to the result that it thinks is the best.
Well, that may NOT be very good news for you.
Some images you may want to be a little darker. Some may be a little brighter.
What do you do then?
And the problem doesn’t stop there. Due to this tendency of the camera to expose for the template 18% grey, sometimes it makes some major systematic mistakes.
There are three particular instances where it is most visible:
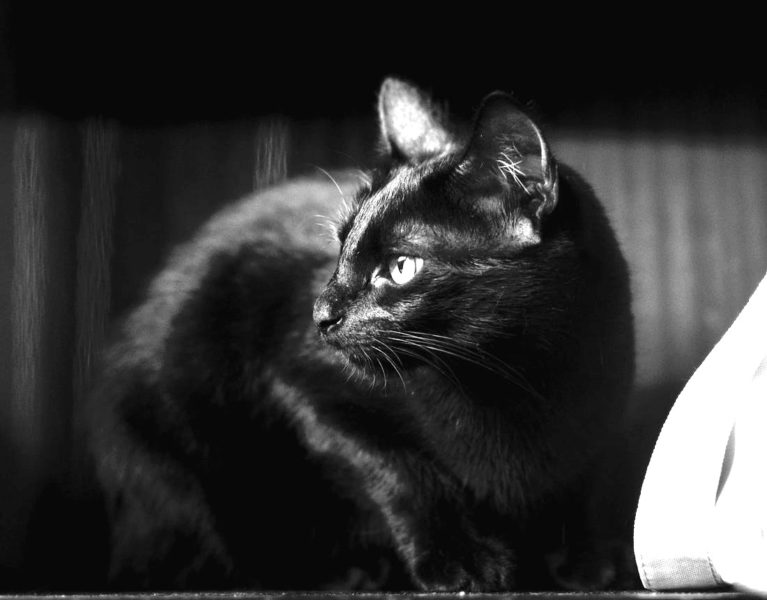
- When elements in the scene are really dark. A black cat at night.
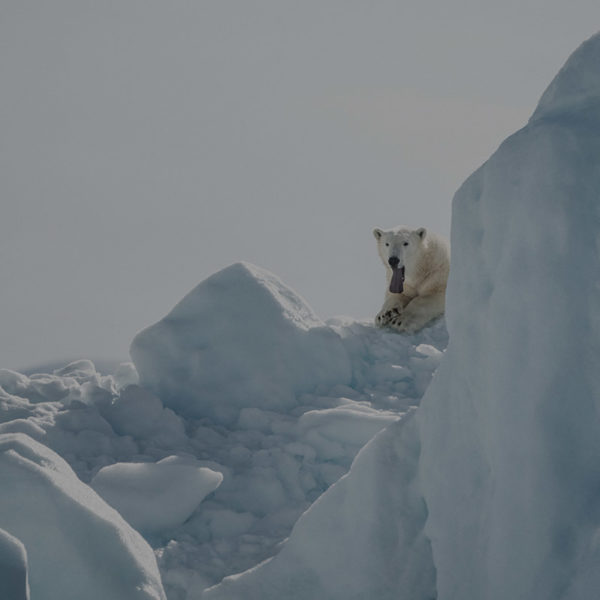
- When elements in the scene are really bright. A polar bear in the snow.
- High contrast image. Images with very bright and dark areas.
In all the cases above, in the quest to reach a middle ground, the camera inevitably either under or overexposes the image.
How The Camera Thinks
Let me explain to you how a typical scene could be misinterpreted and exposed wrongly by the camera’s automated systems.
Say you want to shoot a polar bear standing on the snow.
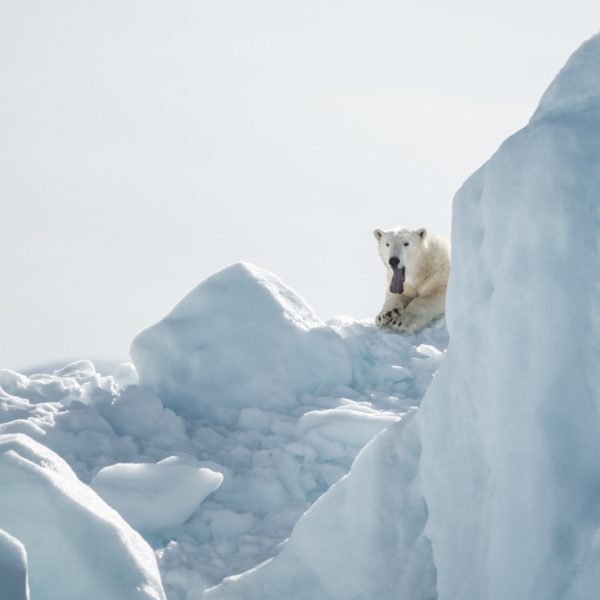
As you can imagine, there is a LOT of white in the scene. Which in turn reflects a lot of light back to the camera.
The camera measures light using what is called a TTL (Through The Lens) meter. It is not as complicated as it sounds. It simply means that the camera only meters the light that enters through the lens into the camera.
Owing to everything being so white, the camera is simply overwhelmed by the amount of light reflected back at it. Since the exposure it is trying to get at is 18% grey, the camera underexposes the image by a couple of stops. This makes the bright white image look darker and greyish.
The exact opposite happens when, say, you want to shoot a black cat on a dark night.
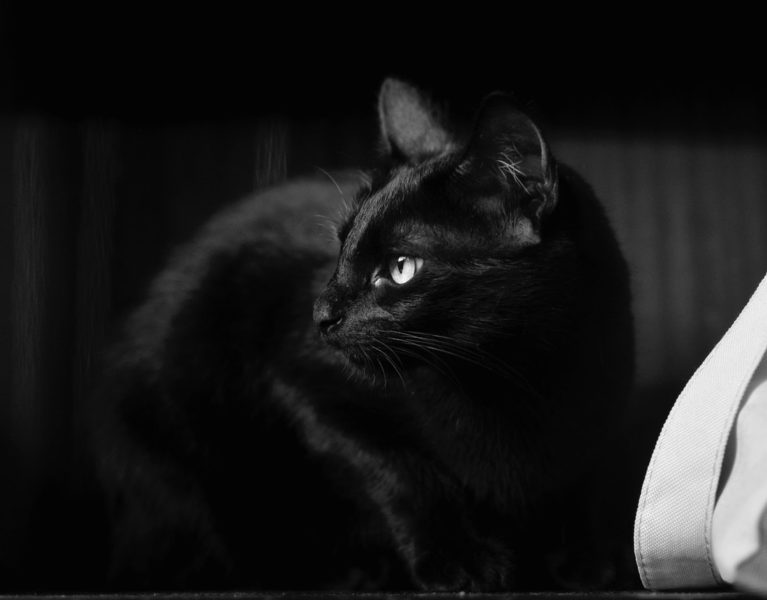
Since most of the elements in the scene are so black, a very small amount of light is actually reflected back to the camera. This makes the camera misinterpret the scene. Now to get the image to the 18% grey level it overcompensates by overexposing the shot. What was supposed to look black and dark, now again resembles something which is greyish.
In short, the camera always tries to reach the middle ground (grey) when left to expose on its own. It is because of this tendency, this that shades which are on the extremes (bright/white and dark/black) suffer and are under and overexposed respectively.
So how do you correct for this?
By compensating the exposure, i.e., making a manual interference to override the default automated behavior of the camera.
Compensating For The Anomaly
The idea is pretty simple. Since the camera tends to go a little haywire when exposing for extremely bright or dark subjects, we step in and make some manual corrections.
Remember I said that applying exposure compensation is nothing but remapping the internal scale of the camera? That is what we are here to do.
Using the exposure compensation button, we communicate to the camera and ask it to readjust its internal scale. It looks something like this.
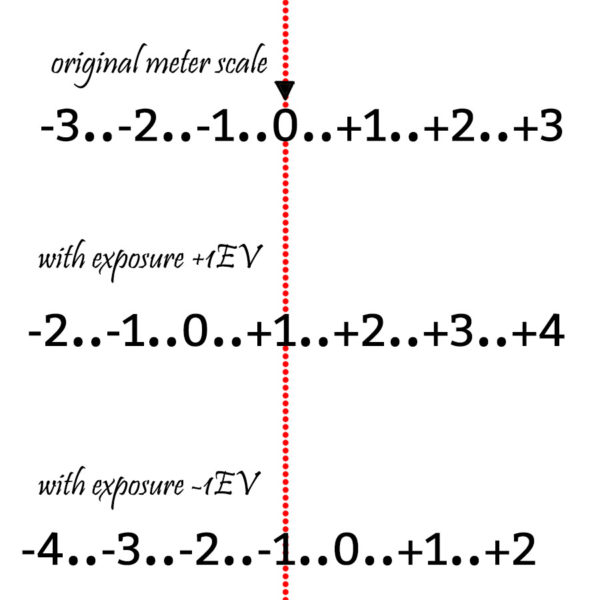
So basically we ask the camera to recalibrate its internal scale by the amount we specify. In the image above after the exposure compensation adjustments, the camera treats +1 and -1 as the new ‘0’ or “correct exposure” respectively.
Practical Examples
- Polar Bear on Snow: The story was as follows. Lots of white in the image reflecting a huge amount of light back to the camera. Camera overcompensates and underexposes the image making it darker than it should be.To correct for the camera’s misjudgment, we add light (use +EV) using the exposure compensation dial. So, now the image is exposed properly.
- Black Cat at Night: This is just the opposite of the story above. This time the camera receives very little light from the scene and tries to bring it up to the 18% grey level by overexposing the image making it brighter than it should be.To adjust for the error in exposure, we reduce the amount of light (use -EV) using the exposure compensation dial.
There still looms a question in the background.
How much +/- EV do we use?
Now this question does NOT have a single right answer. It all depends on the scene, the camera you use and the way your camera analyzes the given scene and the elements within.
It is fairly obvious that all major camera manufacturers use their proprietary method and algorithms to evaluate a given scene. If the initial reading is good, you would be required to make ever so slight changes. If, however, the light meter in your camera is not of very good quality, you may have to adjust the exposure using a lot of +/- EV units.
The BEST way to figure out if your camera is actually under or overexposing your images is by looking at the image histogram. It is the most accurate and foolproof way of looking at an image.
Here is how you do it.
I have already stated when your camera has the highest chances of going astray. Whenever photographing such scenes, you should be very mindful of the histogram and monitor it closely.
A bright scene like the polar bear on snow is expected to have most of the histogram on the right side, almost touching the right wall. If this is not what you see, you need to make some adjustments. You need to add in some light by using some +EV units.
There is no standardized way of figuring out how much EV units you need to add or deduct (otherwise the camera would have done it itself). It is strictly based on the subjective opinion of the photographer. Just keep on adjusting the exposure compensation until the image looks good to your eye and the histogram matches your expectation.
It is very critical here that you know what the histogram actually represents and how your image data is reflected in it. If you do not have a very sound understanding of the image histogram, I highly suggest you read: How To Leverage Histogram Explained | Plain & Simple.
Behind The Scenes
At this point, I guess it is very natural to ask how does the exposure compensation actually work?
Yeah, you dial in the +/- EV units and your image goes brighter or darker. But how is it actually happening?
It’s really no secret and is indeed very straightforward. By using one of the three variables of the exposure triangle.
Here is how…
The first thing that you need to know here is that the camera can only control and manipulate the setting that the photographer has allowed it to automate. This is different for all the different shooting modes the camera uses.
Let me discuss the shooting modes in a little detail and I am sure you will get it right away.
Shutter Priority(Nikon)/Time Value (Tv, Canon)
I am pretty sure you already know the workings of this mode.
The control of the shutter speed and the ISO value lies with the photographer, while the camera adjusts the aperture value so as to attain a correct exposure.
So by the very definition of the shooting mode, the camera cannot manipulate the Shutter speed and the ISO. The only change it can effect is through the selection of aperture value (this is the only variable which is automated).
So the story goes on like this.
You have no exposure compensation dialed in, and you want to shoot an image using the shutter priority mode. You point the camera towards the scene, frame your shot and take it. The image turns out to be darker than you anticipated.
All you have to do now is dial in a +EV value and try again. And keep repeating it till you find your histogram in the right place.
Say you select a +1 EV unit. The camera uses the aperture to factor it in the exposure equation. The +1 is nothing but an EXTRA stop of light. A ‘stop’ is a unit using which we photographers measure light.
So if initially, the camera used an aperture value of f/4 for the first image which turned out to be darker, after making the adjustment with +1 EV, the aperture value would change to f/2.8 (1 extra stop of light added).
Nothing fancy is happening here.
The camera is just accepting the amount of adjustment you want it to make and then using the aperture to add light. The process would just be opposite if you had dialed in a negative EV value. If you had used a -1EV, the camera would have just changed the aperture to f/5.6.
Simple, right?
Aperture Priority (Nikon)/ Aperture Vale (Av, Canon)
Here too the camera adjusts the exposure of the image in exactly the same way. The only difference is that this time the camera uses the shutter speed to bring about the change since it no longer has the control over the aperture value.
So initially if the camera used a shutter speed of 1/500th of a second as the shutter speed which resulted in a darker image. After using a +1EV, the adjusted shutter speed would be 1/250th of a second (1 extra stop of light added).
Full Manual
When using the Full Manual shooting mode, the exposure compensation dial ceases to function. You may rotate it or dial in as much +/- EV units as you like, but it will have NO effect on the final image.
Since FULL control by definition means that the camera has NO variable at its disposal which it can affect, the EV values become redundant.

Note: The only way the exposure compensation can function is when the camera can influence at least one of the three variables which together build the exposure for the image. Although the compensation doesn’t work when using the default Manual mode, it does come into existence if the photographer allows the use of Auto ISO. This basically gives the camera back the control over ISO which it can then again use to make any necessary changes.
Auto ISO can indeed be used with any other shooting modes. It is a very interesting way of controlling the camera on the fly. You can read more about it here: Auto ISO | Everything You Need To Know
If you find calculating exposure values in your mind difficult. Or if you do not know at all how to do it, read How To Be An Exposure Calculating Ninja Right Now. For using the exposure compensation effectively, it is imperative that you have a good command over the calculations in the background. Or you would be just guessing.
The Side Effects
Yes, there are some side effects of using exposure compensation.
To be more accurate I should probably call them just effects. See, the reason is very simple. The exposure compensation affects the exposure only by making a change to the variable which is automated. This change may sometimes affect the final image in certain ways.
Example
When using the Shutter Priority/ Tv mode, the camera uses aperture value to make changes.

Now as you already know, changing the aperture also changes the depth of field. So, axiomatically, a change in the compensation value may result in the depth of field of the image.
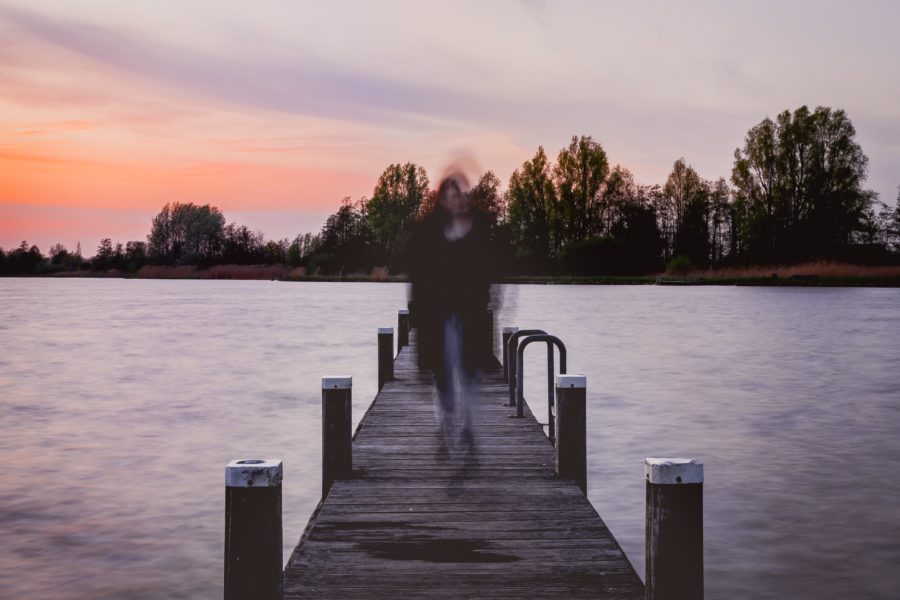
If you use the exposure compensation when on the Aperture Priority/ Av mode, the camera uses the shutter speed handle to bring about a change in the exposure.
Again, using say a +2EV unit may drop the shutter speed so much that the image draws in motion blur. I am sure you wouldn’t want that to happen.
If you are a beginner and do not know how much shutter speed you absolutely need to maintain. Reciprocal rule is a good starting guide which can help you benchmark the shutter value which you require so as to be able to keep your images sharp and blur-free.
In Conclusion
- No matter what, always remember there is no “correct exposure”. You are the photographer and only you decide how dark or bright you want your images to be.
 Of course, for normal images, you probably wouldn’t want it to be so dark that barely anything is visible or so bright that it looks like a giant blob of white. A lot of photographers take high/low key images which are anything but “correctly” exposed according to the camera’s meters and they are extremely beautiful. If you think the image looks good, don’t care about anything else.
 - Exposure compensation can also be used as insurance when you are unsure about the exposure. The process is called bracketing where you take multiple images with different exposure settings. The idea is to get at least one of them right.
- Whatever you do, do not FORGET to turn off exposure compensation once you are done with it. It is extremely easy and VERY likely to completely put it off your mind. And once you do that, all your images hence are going to be either under/overexposed. Good luck ripping your hair apart trying to figure out what the problem is. In this respect it is very much like the Camera Diopter; it simply doesn’t reset on its own. Be mindful and return the value to zero once you are done with a specific image.
That is all folks. I hope you now have a pretty clear idea about what exposure compensation is and how you can use it to create great images.
However, if you still have some questions, feel free to post them below and I will get back to you as soon as possible.
Keep shooting amazing.
Hand Picked For You
- People live in fear of the Manual Mode all their life, never looking at it close...
- Blurry images, photographs coming out too dark or too bright, inaccurate colors,...
- Understanding image exposure and the maths behind it is the bedrock of photograp...
- The histogram is the most efficient and reliable way of evaluating exposure in p...
- ISO is actually NOT an acronym. It is a word which is pronounced "Eye-So". It is...
- Auto exposure bracketing is the process of taking multiple images of the same sc...


