There seems to be a lot of confusion and misinformation about camera exposure and the way it is calculated. For people who generally rely on automatic modes to figure out their aperture, shutter speed, and the ISOs, the problem seems to be even more rampant and for obvious reasons.
Mirrorless cameras and the luxury of Electronic Viewfinders (EVF) have really made it as easy as just looking and making adjustments.
My stance is very clear in all of this.
As long as you just want a clear, sharp and well-exposed image, you seriously do NOT need to learn any of the intricate mechanism of how a camera works. Just use the Auto mode and it would work wonders for you.
If, however, you want more creative control over the images you take, you will need a good understanding of what goes on behind the scenes, inside the camera.
Today we are going to discuss one of the most important aspects of photography, image exposure. More specifically about how to do the exposure calculations in our mind and come up with the settings ourselves without needing an external calculator.
You will be surprised how easy it actually is.
Fundamentals
Before I start, I would like to mention that I am assuming here that you have a good understanding of the Exposure triangle and the three pillars of exposure: Aperture, Shutter speed, and ISO.
If you think you do not have a strong enough grip on the topics I just mentioned, please give these a quick read. It will get you up to speed. Here they are:
- Exposure Triangle Understanding Aperture, Shutter Speed & ISO
- Camera Aperture | A Comprehensive Guide For Beginners
- Understanding Shutter Speed | How It Works And Affects Your Images.
- The Last Guide About ISO You Will Ever Need
Ready?
Let’s begin then, shall we?
Base Line
Calculating exposure settings in your mind is easier than you think.
What you don’t believe me?
Let me just show you how and then you can judge for yourself. And once you are proficient in it, shooting images and making changes on the fly will be easy as pie.
For simplicity, let us assume that the following is an exposure setting for a camera which would give us a properly exposed image.
- Aperture: f/5.6
- Shutter speed: 1/200th of a second
- ISO: 100
As I explained in some of my other articles, camera exposure is nothing but about collecting light through different channels. The channels, in case you are wondering, are the paths through which light enters the camera. As you regulate and control the amount of light that each channel allows into the camera, the characteristics of the image changes.
For example, if you change the aperture and make it larger (smaller aperture value), the image will have a shallow depth of field. Using a slower shutter speed may cause blur and if you use too much ISO, the resulting image may be a little noisy.
But for all intended purposes, as long as you are able to gather a certain amount of light you will have a well-exposed image. For a further detailed explanation read the ‘Introduction’ section of this post about ISO.
For now, we just assume that the settings above lets in the exact amount of light that is required to make a good looking image (not too bright, not too dark).
Let us now see how the equation changes when we exercise a bit of creative control.
Need More Depth Of Field
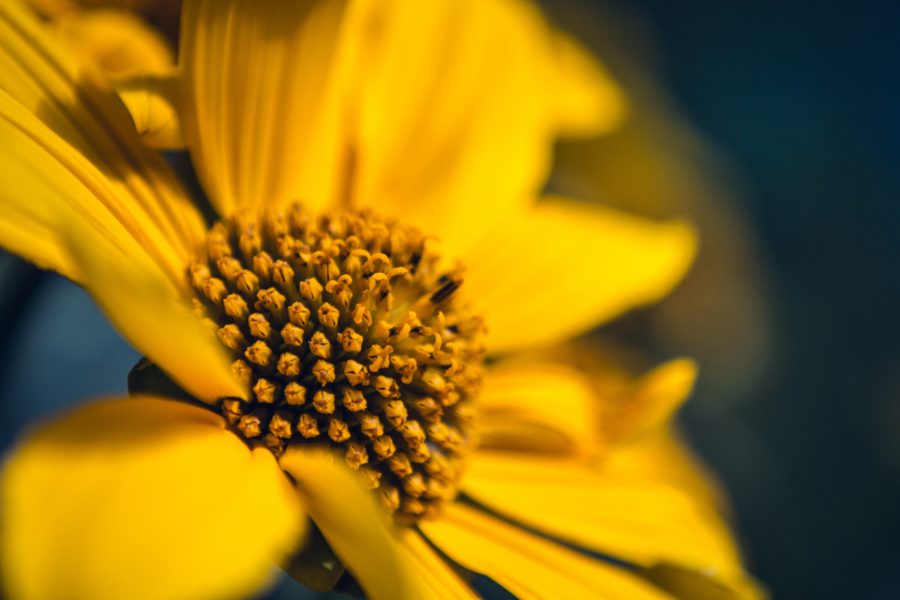
If you are experienced in macro photography, you will know that since the subjects are shot so close to the camera itself, it requires the use of very high aperture values (f/32, f/45 are common).
Let us take an easy example where you are required to shoot a macro image of a flower.
Remember that the settings we had assumed earlier are the ones which produce a well-exposed image.
There is just one problem.
The aperture value (f/5.6) is really small to be able to cover the entire flower. Only a small amount of the flower is in focus and hence we want to increase the depth of field by using a larger aperture value, say f/22.
Now dialing in f/22 is easy enough. The problem is readjusting the two other channels in such a way so that the total amount of light entering the camera remains unchanged.
It is imperative that you understand this part, really well. Re-read the last sentence one more time if needed.
So, how do we actually go about it?
Here is how.
Units Of Light
The amount of light entering the camera can actually be measured.
Whenever you change the exposure equation, all you have to do is make changes such that the total change adds up to a big fat zero.
Say if you add light using a particular channel, you have to restrict light of equal amount coming in through some other channel.
Similarly, if you restrict light by changing a specific setting of the camera, to keep the exposure constant you have to add light of equal amount through either of the other two channels.
The unit which is used to measure light in photography is called an f-stop, or just a stop.
Adding a stop of light means doubling the amount of light and reducing the light by a stop means halving the amount of light.
To understand the basics of f-stops and how they operate, read F-stops Vs T-Stops | Which One Should You Use?
Just to remind you, you have at your disposal, a sum total of three channels to control exposure. They are aperture, shutter speed, and ISO.
Changing The Values
Enough said. Let’s explain how the exposure equation actually needs to change.
The original settings were:
- Aperture: f/5.6
- Shutter speed: 1/200th of a second
- ISO: 100
Now we need to modify them so as to allow for a greater depth of field. We want to use an aperture value of f/22.
Here is how we change it.
Whenever making changes in the exposure equation, always think in terms of stops of light.
Like I said earlier, the total change in the amount of light after making the changes and the readjustments should be zero. So if you add 2stops of light, the readjustments should be such that you also remove 2stops of light using some other channel(s) making the total change come up to zero.
Easy right?
Now have a look at the image below:
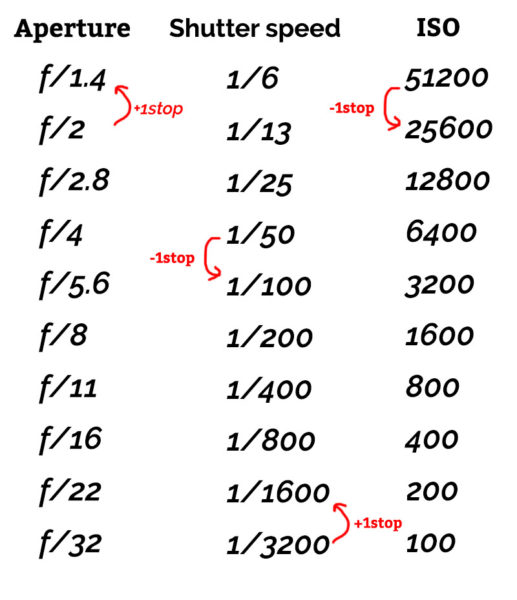
The image depicts the change in light in terms of f-stops.
Here is how to read it.
There are three columns dedicated to Aperture, Shutter speed, and ISO values. If you go down one row on any of the channels you reduce the light by a stop. If you go up a row, you double the amount of light that gets in the camera, i.e., you add a stop of light.
Just one thing to remember here. Each channel is independent of the other. As you go up or down each channel, the amount of light is doubled or halved respectively.
The Shuffle
Each channel is measured and marked using the unit of light called stops. Whenever you have a proper exposure reading what you have to do is align all those numbers together in any one row. It should look something like below for the settings we have.
 *The ISO values below ISO100 all show a constant value of 64 since that is the lowest ISO value is most cameras.
Now think about the change intuitively.
From f/5.6 to f/22 there is a jump by 4stops of light (it comes down 4 steps). As we already know, increase in the aperture value equals a smaller aperture diameter and reduction in the amount of light entering the camera.
So now we are short 4stops of light. If you take an image now, changing just the aperture to f/22 and NOT making any other readjustments, the image is going to be horribly dark.
Hence we have to find a way to add 4stops of light somehow.
We could use either the Shutter speed or the ISO channel, or both for it.
How do we do that?
Like I said, going down any of the columns reduces the amount of light. So to add a light we have to go up.
- We could add light using just the shutter speed channel. Going up 4rows on the shutter speed channel gets us to 1/13th of a second.
- We could also use just the ISO to add 4stops of light. As you can see, 4rows above our initial point is the aperture value of ISO1600.
- We could also use any combination of both the shutter speed and ISO to add light. For example add 2stops of light using each channel, i.e., using a shutter speed of 1/50th of a second and an ISO value of ISO400.
The total number of steps traveled is all that matters. This is universal. Whenever you make a change to the initial setting, adding or reducing light, you have to make a readjustment of equal proportions to negate the effects.
Here is the best video that I could find which explains all of this beautifully.
Closing In
The method of calculating an exposure that I outlined in this post is the way it is always done. But in your camera, it may look a bit different. The most common reason could be because your camera uses 1/2stops or 1/3rd stops to break down the units of light further. It is exactly the same thing; just that the units are broken down further.
Most cameras use 1/3rd stop method. So to add a stop of light you have to turn the dial on your camera three clicks. Please check the settings on your camera after consulting your camera manual to be absolutely sure.
The same rules and logic still apply. All changes, in the end, should round up to zero.
Knowing the math behind the exposure equation will not only help you figure out our correct settings and make your shoots a lot smoother and faster, but it would also be crucial when say using a Neutral Density (ND) filter or dropping the shutter speed low enough to take a panning shot.
I would like to draw your attention to the initial settings that we assumed here. These settings are NOT optimal by any chance. We had to start somewhere and I just used some random numbers. They will be different for different images and different amount of available light.
Lastly, the way we calculated the readjustments only applies when the amount of light available is constant.
Understand this very clearly.
If the light available changes, the readjustments will NOT be effective anymore. You don’t have to bother with this too much. This is just to make you aware of the situation.
For most scenarios, you should be absolutely fine.
Well, unless there is a strong reason for some rapid change in the light, like sunrise, sunset, a fast approaching storm or someone with his finger on the switch of your only light source.
That is all guys. Hope you have a much better understanding of how your camera calculates its exposure and how you can easily take charge whenever you need to. And by the way this is universally true for ANY camera, even the one on your cell phone.
Keeping shooting amazing.
This is now a teeny tiny blog trying to compete with the big guys. If you liked what you read, please take a second to share it. It would help me a lot. Thank you.

Hai Aperturebuzz.
This very good explanation together with example.
Im really well understood your content, and this information definitely will help me in actual shooting days.
Thank you.