If you are here looking for the meaning of the strange abbreviation, ISO, that you just happened to stumble upon on your camera and have no clue so as to how to use it or what to make of it, you are in the right place.
Just sit back and relax, and I will explain it all to you.
A small caution. This is going to be a long and descriptive article but if you can stay till the end, I promise you will gain an extremely detailed understanding of ISO and all the things it pertains to in photography. In essence, master it.
So shall we start?
Definition
First and foremost ISO is NOT an abbreviation!
Yeah, shocker…..right?
It is actually a word which, for reasons unknown to me, is written in capital letters. An apparent case of Lost In Translation.
It is actually pronounced as “Eye-So”. One word, not I.S.O. More on this later…
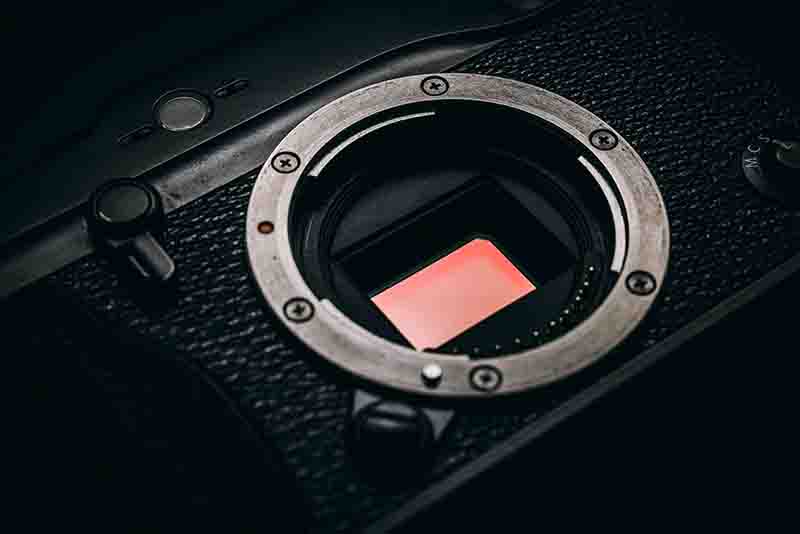
ISO in a digital camera is a measure of light sensitiveness of the image sensor.
Understanding this is of utmost importance. Read that last sentence one more time.
ISO determines how sensitive the image sensor is to light. Greater the sensitivity, lower the amount of light the sensor would need to create an image. The concept of ISO cannot, however, be understood in isolation. You need to have at least a basic understanding of the other two pillars of the Exposure Triangle, namely, Aperture and Shutter Speed.
I highly encourage you to read the following articles, in the order specified, to develop a gradual and systematic understanding of the most important aspect of photography, Exposure.
- Exposure Triangle | Understanding Aperture, Shutter Speed & ISO
- Camera Aperture | A Comprehensive Guide For Beginners
- Understanding Shutter Speed | How It Works And Affects Your Images.
ISO is the third and the last pillar which completes the exposure triangle. If you are a beginner, I would suggest you spend some time understanding these three key concepts of photography before you move on to anything else.
Brief History
I promise I won’t bore you with the details.
Just the bit you need to know to formulate a better understanding.
ISO is actually a modern rendition of the previously used standard ASA (American Standard Association) and DIN (Deutsches Institut für Normung), the German version of the same thing. Both ASA and DIN were standards used to measure how sensitive a film was to light. Exactly what ISO does today for digital cameras/sensors.
ASA and DIN were used until late 1979 when the International Organization for Standardization (ISO) took it up and renamed it with their own acronym. God knows why!
The idea was pretty simple. Creating a single yardstick or unit for ALL to measure with, which would reduce time spent in conversions and completely eliminate confusion.
Film To Sensors
A photographic film is basically just a combination of photoreactive chemicals on a thin veneer of plastic. That is, chemicals which react in a certain way when exposed to light.
Now how reactive these chemicals are to light is what ASA and DIN measured.
More reactive the chemicals used, faster the reaction and less time it would take to make an image. Less reactive the chemicals and longer it would take you to make an image. You get it by now right?
The International Organization for Standardization just took it up from the film sensitivity metrics and made a new metric for digital cameras which had image sensors instead of films. This is what we know as ISO today.
That is plenty much for you to know right now.
Let’s continue.
Introduction
Now that we have a clear idea about the genesis of ISO, let’s talk about how it lends itself to photography.
If I had to frame the essence of ISO in a sentence I would say, ISO is nothing but digital amplification of the captured light.

What does that mean?
If you have already read the article about Exposure Triangle I suggested earlier, I think you will be able to follow perfectly what I am about to explain.
Simulation
Every photograph needs a certain amount of light.
Let’s, for simplicity’s sake, say its 10kgs of photons. This is a totally made up example that I am using to make you understand the underlying principle of exposure. Exposure is certainly not measured in kilograms.
But it is true that every camera needs a certain amount of light to be able to build a photograph out of it.
Now according to our example, we need 10kgs of photons or light to make an image. If we get anything less than that we will have an underexposed image and anything more will cause the image to be overexposed.
The camera simply doesn’t care how you accrue the required 10kilograms of photons. Beg, borrow or steal. All it cares about is whether or not it gets the 10kgs.
How we disburse the role of collecting these 10kgs of photons is the choice we make as photographers. We have three main channels to use. Aperture, Shutter speed, and ISO.
- Aperture: Increasing the aperture value causes the aperture diameter to reduce and let less light inside the camera and vice-versa.
- Shutter speed: Increasing the shutter speed reduces the time period for which the shutter is kept open, thereby limiting the amount of light that comes into the camera. Faster the shutter speed, lesser the light and vice-versa.
- ISO: Higher the ISO, more sensitive is the image sensor to light.
Focus Focus
Now pay careful attention. This is important.
The first two avenues you have available to get photons from, Aperture and Shutter Speed, are physical channels. This means that these two channels actually collect more/less light when you change a setting.
Let me explain this in a little more detail.
Let us take up shutter speed.
Say, initially you want to use a shutter speed of 1 second. Suppose that helps the camera collect 2kgs of photons. If you decide to increase the duration of the shutter and to say 2seconds, the camera will actually collect double of what it did previously, i.e, it would now amass 4kgs of photons.
It is a simple equation to follow. Double the period the camera can keep the shutter open and it would collect double the amount of light.
Simple, eh?
It is exactly the same with Aperture. Whenever you reduce the aperture value by an f-stop, it helps the sensor gather double the amount of light it did previously.
So like in the case of shutter speed, if a camera collected 4kgs of light previously when the aperture was f/2.8, it would collect 8kgs of light when the aperture value is reduced by an f-stop to f/2.
If you do not know what a stop of light means, read F-stops Vs T-Stops | Which One Should You Use?
For now, just know that it is the unit we photographers use to measure light. It isn’t really kilograms of photons like I am doing here 😉
Point To Note
Yeah, I explained all that to make this distinction as clear as possible.
Unlike Aperture and Shutter speed which actually collect more or less light as the settings are changed, ISO does NOT change the amount of light captured.
This is crucial for you to understand now.
So what is the hullabaloo all about?
It is simply this.
ISO digitally amplifies the amount of captured light. Through the channels of Aperture and Shutter speed, the camera captures physical light. ISO just helps amplify the light.
As the ISO value is increased in the camera settings, the ISO amplifies more and more the light that enters the camera.
Is this good…..bad? What ISO value should I use?
Hold onto your horses a bit. Just keep going. I will clear all your doubts.
Or you get to punch me!
The ‘Best’ ISO Setting
Now it is pretty natural to wonder what is the ‘best ISO’ that you should always use.
Just one question.

Have you ever seen a piano? Noticed that it has many black and white keys? Ever imagined what they are all for?
They are all there to be used under different scenarios. To produce different types and notes of music. Is there any best piano key?
Nope!
Similarly, there are many ISO values created by your camera manufacturers because you might and will need them for different lighting situations. Trust me if it didn’t have a use, it wouldn’t be on your camera.
This case is very similar to ‘the memory cards conundrum’. When people simply overlook all the letters and numbers written on SD Memory cards and never think about them twice before buying, they end up getting a completely wrong card for themselves.
All those numbers and information are printed for a reason. Just because you don’t know what they mean doesn’t mean that they are useless.
Keep learning a little every day, and one day you shall have gathered a lot.
So coming back to ISO now, the story is pretty similar. There are many ISO values meant to be used in various scenarios. There is no one best ISO that would cover it all.
It all depends on the subject that you are trying to photograph, the depth of field that you want, and most importantly the amount of available light.
Trade Off
Since bumping up the ISO physically doesn’t help the camera record any more light, the act of increasing the ISO always turns out to be a trade off of a kind.
The trade off is primarily between motion blur and image quality.
As you learn more about photography in the years to come, you will realize that the ISO is bumped up ONLY when there is no other means available.
There are some prime situations which would prompt you to increase your ISO:
- Low light situation
- No way to add natural or artificial light
- No way to use a flash as it may ruin the mood or may be insufficient to cover the subject
Nobody who understands photography and exposure punches up the ISO level if there is any other way available to get some more light into the camera.
You should by default always probe Aperture and Shutter Speed before you turn to ISO to save the day.
Reality Hit
Let me give you an example you can relate to.
Say you are photographing a band or a concert. Now, most of the concerts play at night and have flashy erratic strobes going all over. There is no constant source of light that you can bank on.
But you need your 10kgs of photons, remember?
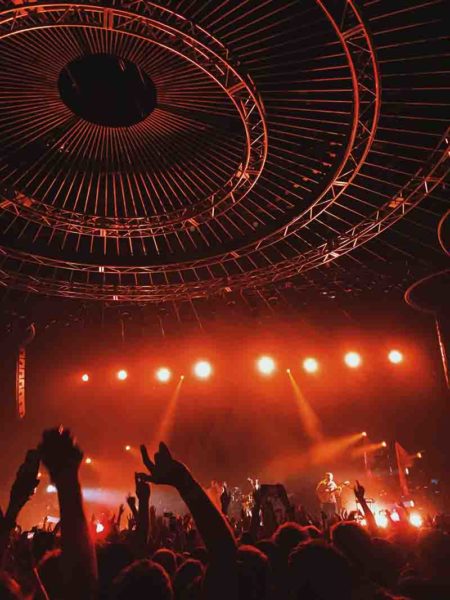
The amount of available light is low. Your flash is too far to reach your subjects and there is NO way that you can add light to the scene. You are already on an aperture value which would barely cover the subject. You simply can’t dip it any further.
Dropping the shutter speed isn’t an option too since the main vocalist of the band is jumping all over the stage. The drummer’s hands are moving pretty fast too. You use any shutter speed below 1/1000 of a second you are sure to get some motion blur.
The only way out now is to increase your ISO.
This is the last resort. You are trading an image with a slightly lower image quality for a blur-free image.
It is mostly because of the reasons I just mentioned or something similar that one thinks of using a higher ISO value.
Digital Noise
So what exactly do you lose when you decide to pump up the ISO?
The answer to this is going to vary a lot from one camera to the next. It largely depends on how your camera handles a high ISO value. And more importantly what it sacrifices to create the digital gain.
The most common sacrifice that cameras make to get the extra bit of brightness is to introduce a bit of grain/speckles into the image. Especially in the darker parts of the image. This is what is known as digital noise or just noise.
It looks something like this.
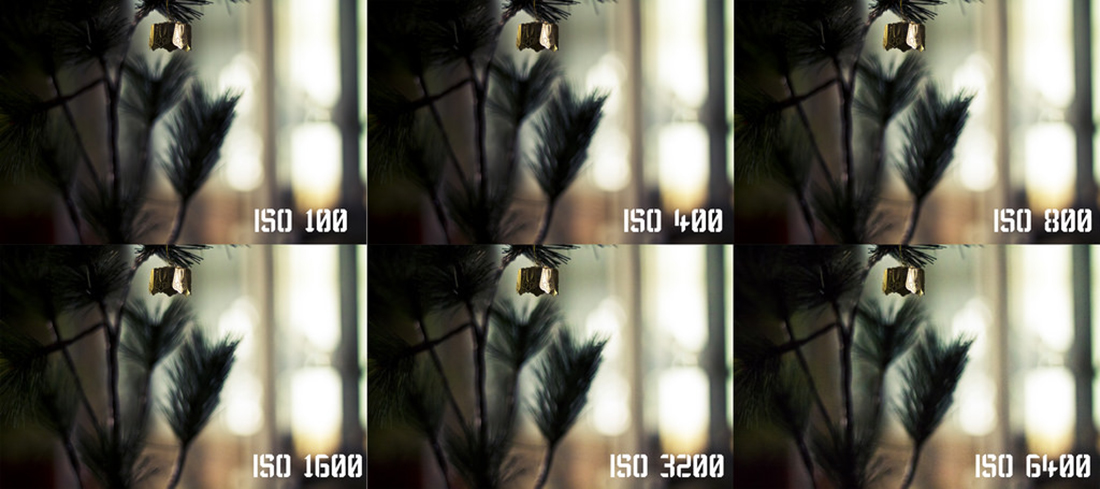
The amount of noise is pretty much proportional to the ISO value used. Higher the ISO, more is the tendency of the sensor to introduce noise.
This should be clearly stated that all cameras do NOT produce the same amount of noise at the same ISO value.
Some cameras are extremely resilient and produce nearly no visible noise at insane ISOs. Others start filling up the dark regions of the images with grainy mush for any ISO value above, say, ISO1000.
It all depends from one camera to the other.
Other Compromises
The grainy interference in the darker regions of the image is NOT the only thing you lose, in terms of image quality. Every time you increase the ISO on your camera, you also lose a bit of color range, tonal values, and possibly a little dynamic range.
All of them do get a little off as you increase the ISO. This means that the colors, tones, and the details (in the highlights and shadows) of the image are not going to be as consistent and accurate as they could be if a high ISO value is used.
For me, this is a much higher price to pay for using a high ISO value than just noise.
In today’s world, if the amount of noise is not extremely heavy, there are ways to reduce them significantly without losing much details. I will tell you what they are in just a bit.
The color and tonal values are a lot more difficult (and sometimes impossible) to bring back once they go astray.
The mantra hence is, always use the lowest ISO possible.
There simply is no second opinion about this.
Alternatives To Using High ISO
The BEST way to improve your image quality and decrease the ISO that you need to use is to bring in more light into the camera. As simple as that.
Find ways to get in more light and you can merrily improve your ISO and the improve the quality of your image.
How do you do that?
Aperture and Shutter Speed
The obvious place to look first is the other two channels which determine the actual amount of light that enters the camera and hits the image sensor.
Does your image really need so much depth of field? Can you not just barter some depth for half a stop of light maybe?
How about your shutter speed?
If you do not have a subject which is in motion, dropping the shutter speed could buy you some copious amounts of light.
The best candidate for dropping shutter speeds are landscape and architecture images. If you have a tripod, even better. There is virtually no limit to which you can drop the shutter speed. Considering you do not need the speed to capture something else.
The times when you should actually use a high shutter speed are:
- When the subject has too much motion to contain with a slow shutter speed
- You have to shoot handheld and have no access to a tripod
- There is no way to use some external light source such as a flash or a strobe
Using A Faster Lens
This is an excellent way to go.
If your present kit lens only goes down to aperture value f/3.5 then an extremely easy way to get some more light into the camera is to just get a lens with a larger aperture.
Prime lenses such as the 50mm Nifty Fifty f/1.8 and the classic 35m f/1.8 are dirt cheap and produce FANTASTIC results. If all you have is a kit lens, consider investing in any prime lens. They not only have wider apertures but are also razor sharp.
Trust me, you will be blown away at how amazing these lenses are. They are equally good at videos, should you be interested.
Read: 6 Reasons Why The Nifty Fifty Should Be The Next Upgrade From Your Kit Lens
Get A Bigger Sensor (Costly Method)
This does not mean anything in itself. You cannot swap a sensor of a camera of course!
This simply means get a camera with a larger sensor.
If we cannot influence the amount of light that enters the camera, the best course to follow is to gather as much of the light that actually enters.
Let’s compare a cropped sensor (APS-C sized) and a full-frame camera.
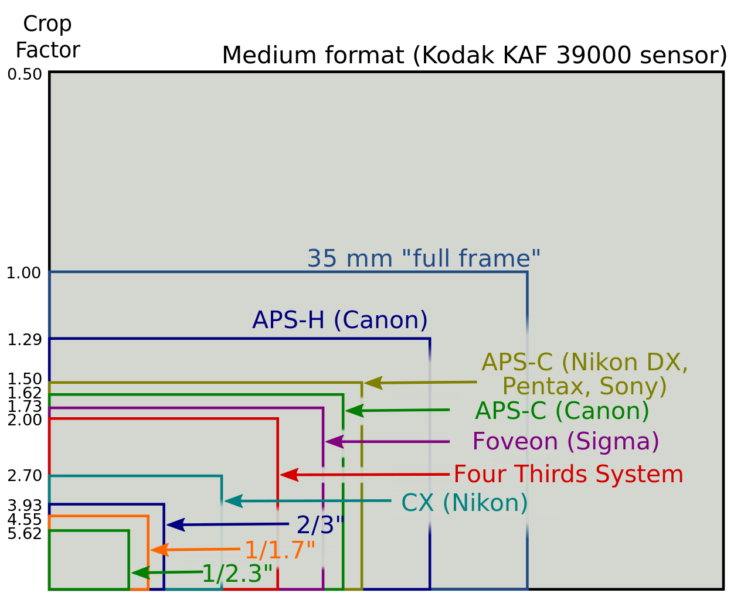
A full-frame sensor has dimensions of 36mm x 24mm, whereas the APS-C is only 23.6mm x 15.6mm. Significantly smaller.
But why is a larger sensor good for me?
Think of it this way.
Let’s say that you have two bowls of two different sizes. One is smaller and the other is a large one. You need to collect rainwater with it.
So when it is raining you go out and place the two bowls side by side. After say suppose an hour, you go out and measure the amount of water each bowl has collected.
Which bowl do you think will collect more?
The larger bowl…right?
The reason is pretty simple because it has a larger surface area.
The two bowls were placed in exactly the same place in the same rain, for the same duration of time. The only difference in them was the area they had covered.
The story is pretty similar for sensor sizes. By the virtue of only having a larger area, a large sensor always collects more light than a smaller one.
Light Gathered = Light Intensity x Area Of The Sensor
This is a very crude way of defining it and is definitely oversimplifying but you do get the idea.
By this logic, you can compare any two sensors of two different sizes. Doesn’t necessarily have to be just an APS-C and full-frame lens.
The rest is pretty straightforward. More light captured needs less of an ISO bump. It leads to cleaner noise-free images.
Remember, it is always about the amount of light that you manage to capture through your sensor.
Stop Gap
After reading till this point, it should be very clear in your mind that using ISO is not something very advisable to do.
You should always think of using it only when there are no other options available. No way to add more light. No way to manage to capture more light.
This is the simple reason I think of it last.
ISO is the last thing that I consider when setting up my exposure. Depending upon the scene, the subject and the type of image I want, I always determine my Aperture and Shutter Speed first and only use ISO to fill in the void if any.
If there is sufficient light outside, like outdoors on a sunny day, I don’t even bother checking the ISO. Just set it on the lowest value your camera offers and keep shooting.
It is only in low-light conditions that you would ever need to amplify the light already captured. If you have means to add more light anyways why would you even need to amplify anything? You get me on this?
Use it for the reason it is meant to be. As an insurance policy should everything else fail. If the alternative ever is to take a noisy image or not take an image at all. Always get the shot. ALWAYS!
There are plenty of places on the Internet where the images used are so small (like Instagram on a mobile phone) that it wouldn’t even show.
Get the shot.
How To Change ISO
Almost forgot.
Depending on the type of camera you have, there can be many different ways to do it.
The most common way to change it for point and shoot cameras and entry-level DSLR and Mirrorless cameras is through the menu. It is generally listed in the Shooting Menu.
For higher-end professional level cameras, there is a dedicated button on the camera which provides a quick way to change ISO on the fly. All you have to do is press the button and then turn the main command dial on your camera.
Easy peasy!
Even if your camera doesn’t have a button dedicated to ISO, look through your camera manual and find out if you can reprogram some other button. Reprogramming a button would effectively create your own dedicated button for ISO just like the high-end pro bodies.
Changing ISO is a pretty regular thing to do. Hopping into the menu tabs for every third shot is going to be a major time suck.
If possible just reprogram some other button. You will be able to shoot through much faster.
Increments
Juxtaposed to popular opinion, ISO is not a logarithmic scale. It is purely an arithmetic scale.
If you don’t understand what they are, just forget I ever said that.
Just know that ISO increases and decreases in linear amounts. Exactly like our very own Shutter speed.
When you use an ISO value of 200, you are actually using double the amplification than what it would be at ISO100.
Doubling the ISO value ‘adds’ an extra stop of light. Everything in the frame would be double as bright.
Similarly, the opposite is also true.
When you reduce the ISO value by half (say ISO800 to ISO400) you also remove half the amount of light from the exposure.
You need to keep this in mind so that you are aware of what is happening with the exposure and can adjust it accordingly.
Auto ISO
I would absolutely get it if you do not want to worry about the ISO very much and focus on stuff which are much more important, like composition.
Remember, ISO becomes a factor to consider and to adjust only when the light is really low. In situations when there is an abundance of light, ISO simply doesn’t play a part.
So there is an easy way to handle this situation.
Set the ISO on automatic. NO, not totally auto but…
Let me explain.
What you essentially do when setting up the Auto ISO feature is specifying a minimum shutter speed and the maximum ISO value you want the camera to adjust to.
The job of the camera now is to not let the shutter speed to fall below the minimum shutter speed. Thus always guaranteeing you the shutter speed you specified no matter what.
If you are using a semi-automatic mode such as the Aperture Priority. You already specify the aperture value. So now on Auto ISO, the camera has a minimum shutter speed it has to maintain. If ever the light falls, the camera boosts the shutter speed using a higher ISO value.
You get to choose the highest ISO value the camera gets to play with. This should essentially be the value till which the images still remain usable for the purpose you are shooting for. It would largely depend on the camera manufacturer, model, and quality required of the final images.
For a more in-depth view on Auto ISO, read: Auto ISO | Everything You Need To Know
Extended ISO
Extension of ISO values could be on either side, higher and lower.
But why are they called Extended?
Every image sensor is built to capture light and amplify it digitally, while still maintaining a certain image quality. This range of digital amplification is what is known as the native ISO.
Any ISO which is either lower or higher than the native ISO range is achieved digitally through software manipulations. This is known as the extended ISO.
If told straight, the higher extended ISOs are simply brownie points used by the camera manufacturer’s marketing team. A large number printed on the box or brochure certainly looks impressive. Hence!
Although the camera can technically pump up the ISO to the mentioned astronomical value which can supposedly penetrate through the darkness on Pluto, the image definitely wouldn’t be good enough to be even used on a coffee coaster.
At this point, you will probably be taking a full-blown portrait of noise itself.
The lower extended ISO value, however, could be used but only under certain given conditions.
Here is a detailed overview of Extended ISO that should answer all your doubts, The Truth About Extended ISO
Post Post Processing
Sometimes even as you take the best possible steps to add as much light to the scene and reduce any possible noise, you might fail.
But don’t worry too much.
If you haven’t crossed into some insane ISO value range, your photograph should still be salvageable.
There are myriad ways to recover details and reduce digital noise from images. Two very popular choices are:
- Noise sampling: You choose small parts of the image where there are uniform amount and pattern of noise. The computer/editing program then analyses those selected parts and makes the best possible adjustments to reduce noise. Now, remember that is reduce not remove!
- Stacking Images: Stacking images is another popular way to significantly reduce noise and also possibly add details. It is exactly as it sounds. You take a bunch of images in quick succession and then later in post processing, stack them all up. This time the computer analyses all the images and uses the least noisy parts of each image to create one composite image which should, in theory, have very little noise.
One thing that you must keep in mind that most software (in-camera or computer versions) blur out the images a bit to reduce noise. This means that for every session of post-production noise reduction you lose a certain portion of the details in the image.
It is a Blur-for-Less noise trade.
Conclusion
That is all you need to know about ISO guys. If you have survived till here I seriously do applaud you. You do seem eager enough to know more about photography and do the hard work to be a better photographer.
I think I have answered any questions you may potentially have.  But if you still got some, shoot them down in the comments below and I will clear them out for you.
Just to iterate one more time.
Use ISO only when there is no other method available to buy you some light. And always use the lowest ISO possible. Even if you have the latest and the greatest camera.
Edit: Especially if you have the latest and the greatest camera. Don’t grow complacent.
I hope you have lots of fun shooting and make some amazing images. I would be very happy if you share some of them with me.
Keep shooting amazing.
This is now a teeny tiny blog trying to compete with the big guys. If you liked what you read, please take a second to share it. It would help me a lot. Thank you.
