Exposure Triangle, you may have heard photographers use this phrase many times and wondered… What on earth is it? Yes, in the first instance, it might sound like another dreadful geometry lesson in store, but trust me it is not. This is photography guys, it is fun!
Before we begin deconstructing the phrase, do you remember what I said earlier about a photograph?
No?
Nevermind, I will say it once again. A photograph is nothing but a visual recording of light. Nothing more, nothing less. It is just a way to capture light in an artistic way so that it conveys a story or a message. Now this story or message may be about anything depending on the particular field you are in. However, largely this is what photography is at its core.
Let’s now get back to Exposure Triangle.
Breaking Down The Exposure Triangle

Exposure
When you press the shutter button on your camera/cell phone, what you are essentially doing is recording light. The light that the camera ‘sees’ at that particular moment. Think about it, isn’t it what you actually do?
Setting the exposure is basically determining the amount of light that you let inside the camera to properly ‘build’ an image.
You let light inside the camera, expose the camera sensor to this light and help it build an image out of this light.
If you let less light in than is needed, you under-expose the photograph. And your images come out dark.
If you let more light in than is needed, you over-expose the photograph. And your images come out too bright and washed up.
Triangle
Now to determine the amount of light that enters the camera, we have three elements/settings at our disposal that we can control. They are primarily:
Do not worry; I will explain what they are in just a minute.
Just remember that using various combinations of these three elements, you as the photographer can exactly determine the amount of light that you let inside your camera and in the process ‘build’ the image that you want to make.
There are three elements/settings that you can play with to determine the exposure; hence, called the triangle.
Recap
So we learnt, until this point, that photographers use the phrase Exposure Triangle to refer to these three main elements, namely:
- Aperture
- Shutter Speed
- ISO
to specify the amount of light that they let inside the camera to make an image.
Let’s define these elements now.
Aperture
The Aperture is a hole at the back of the lens that allows the light to enter the shutter chamber. This hole is adjustable, i.e. you can change the size of it and, in the process, regulate the amount of light that enters the camera.
It looks something like this
What you see above is a lens detached from a camera. The blades of the lens (which are present at the back of the lens) are then adjusted to control the size of the aperture.
A large aperture lets in more amount of light.
Similarly, a small aperture allows less light to enter the camera.
The Big Question
When do you want a large aperture and when do you want a small aperture?
This part is important. So, pay attention and read it a few times if you need to.
The Aperture controls two very important aspects of an image simultaneously:
- Amount of light that enters the camera
- Depth of Field
You already know the first use of the Aperture. Regulate the amount of light that enters the camera. The second one is a little harder to understand but it won’t be so, after you read this.
Depth of Field
Depth of Field (DoF) is essentially how much of the image is reasonably sharp. That is all. Seriously!
Let’s cement the understanding a bit more. Look at these two images below.
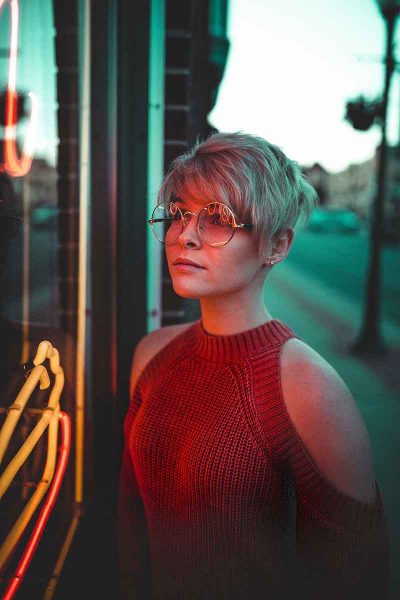
This image has what we call a ‘shallow depth of field’.
Why?
Because shallow means less and so, little of the image is sharp (just the woman in the foreground), while the rest of the image is ‘unsharp’ and hard to distinguish. What I mean when I say ‘unsharp’ is that you can make out the road, the car and the lamp post behind her but you cannot make out details in them. On the other hand, her glasses have so much sharpness. Hence, we may call this image to have a shallow depth of field.
Most portraits have a shallow depth of field so that the main subject of the image is isolated from the background or the foreground. This brings a good feel to any portrait.
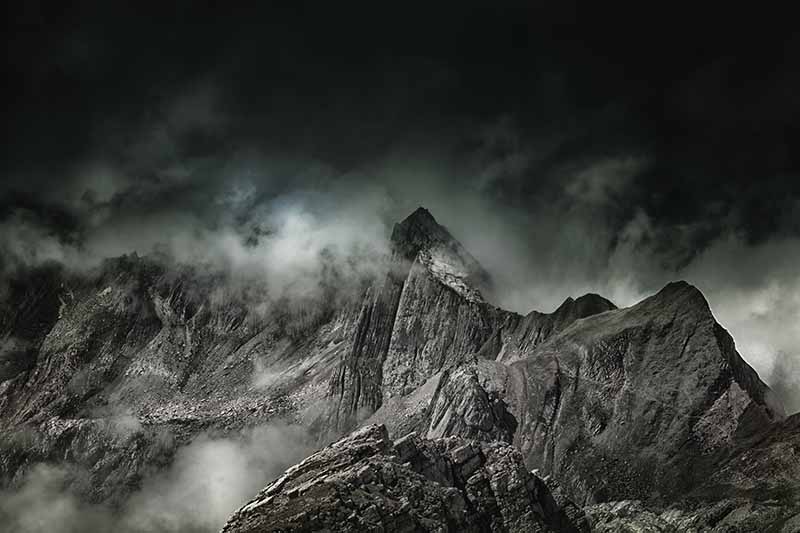
Now, look at this image.
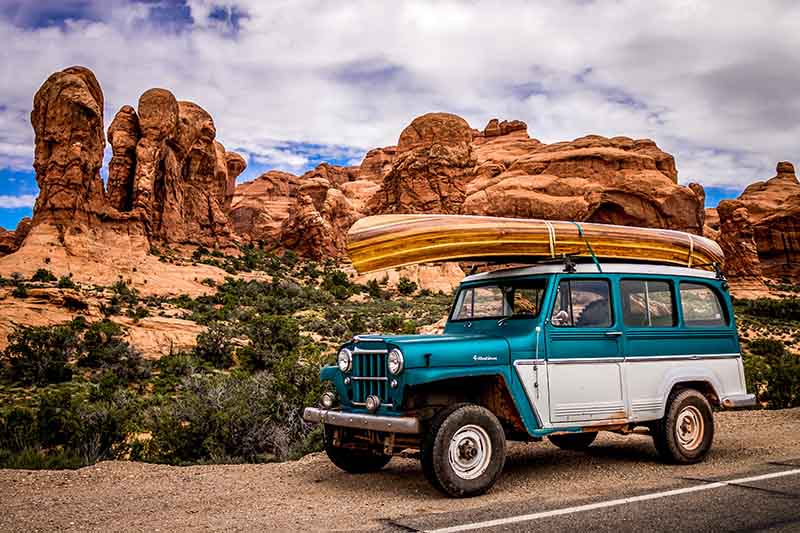
The image above, however, has a ‘Large/Deep depth of field’ as most of the image is fairly sharp, and all the details from the foreground to the background is easily discernible. The truck in the foreground to the mountains which are way back are all sharp.
You get the point now?
If you think about it, most of the landscape images you ever saw had a larger/deep depth of field. Photographers do tend to shoot landscapes with deeper depth of field, more often than not.
No Rules

Judging from the examples above, do not think that this is some kind of ‘rule’ and you have to always shoot landscapes with a deep/large depth of field. Absolutely NOT. Photography is an art form and like every other art form, there are NO RULES. You, the artist, determine what is right and what is not and shoot whatever you want, however you want. Remember this for as long as you shall take images. There are no rules in photography, don’t let anyone tell you anything different.
Circling back to Exposure Triangle now.
The next element of the exposure triangle is called Shutter Speed.
Shutter Speed
Shutter Speed is the measure of how long the shutter remains open and allows the image sensor to be exposed to light. It is a measure of duration of time and is generally measured in fractions of seconds. Fiesty!
A shutter in a point and shoot camera/DSLR looks something like this
As you can see the shutter has two curtains. The first curtain and the second one. When you press the shutter button on your camera, the first curtain opens up and the second curtain follows it to just let the image sensor at the back to be exposed to the light for the duration you specified earlier.
Shutter Speeds are usually represented by numbers like 50, 250, 1000, 2000, etc. What they actually mean is, the shutter is going to expose the image sensor for 1/50th of a second, 1/250th of a second, 1/1000th of a second and 1/2000th of a second respectively. It may seem that these are incredibly small duration of time but light travels fast (it is the FASTEST thing in the universe) so that the time frame is good enough to allow adequate light into the camera to make an image.
Like Aperture, Shutter Speed also affects two aspects of photography:
- Amount of light that enters the camera
- Freeze Motion or Show Motion in the images
The first aspect is pretty self-explanatory. The longer the duration of time for which the shutter is kept open, more is the amount of light that pours in and vice-versa.
A one-second long Shutter Speed lets in more light than a Shutter Speed which is just 1/250th of a second.
Freeze Motion or Show Motion
Shutter Speed can also be used to aesthetically enhance the images that you take. You can choose to freeze motion or show motion by choosing a certain Shutter Speed. The fundamental principle of Shutter Speed is very simple. When you press the shutter button and open the shutter of the camera, the camera records everything that it looks at, till the point the second curtain closes up. If the subject moves within that period, the final image shows motion. If however the subject does not move within that period, the final image looks to have frozen motion.
Two very popular techniques of introducing motion into the images and making the images come alive are:
For example
At this point, it is sufficient to understand that a specific Shutter Speed may show or freeze motion depending on the relative speed of the subject that it is trying to capture. There is no need to understand any more than this now. We will discuss it at length in our discussion of Shutter Speed.
Last jigsaw of the Exposure Triangle, ISO.
ISO
ISO simply is the sensitivity of the image sensor of the camera to light. Higher the ISO, higher is the sensitivity and similarly lower the ISO, lower is the image sensor’s sensitivity to light. That is it.
Now, to understand why you need ISO, just think about all the places that you may want to take an image at. Indoor, outdoor, dark concert hall, well-lit studio, on a sunny day, on an overcast rainy day and the list goes on. ISO simply is a way or a measure to adjust your camera to all the different types and intensities of light found in these places.
Increasing the ISO, the image sensor of the camera becomes more sensitive to light thereby letting us use a high Shutter Speed which may reduce the chances of a blur. You might think now that if high ISO is such a good idea, why do we not always bump up the ISO and keep it there?
The reason is digital image noise.
Digital noise is nothing but minuscule grains that appear on the images when we use a high ISO like say 6400 or 12800 (these numbers just represent ISO values; don’t get intimidated by them). The higher the ISO we use, higher are the chances that our images will show grain-like spots that we photographers call noise .
.
Do you see the tiny little grains on the image? They are called noise. Noise tends to creep up on our images in low-light situations when we are forced to use a high ISO like ISO 6400 or ISO 12800, etc.
As a beginner, a general rule of thumb is set your Aperture and Shutter Speed first and then select the lowest possible ISO value that lets you get the image you want. You will get a better understanding of it the more you use it.
A Little Down The Road
After you have taken your first few hundred images, you will understand that ISO is a buffer that modern digital cameras offer allowing the photographer to use the two relatively more important elements of the Exposure Triangle, Aperture and Shutter speed, to be used more independently. I say relatively more important elements of the Exposure Triangle since the aesthetic impact of either Aperture or Shutter Speed is far more than ISO on a given image. You may not understand the last part right now but try and remember it; I am sure after taking a few images in various light conditions yourself, you will get it for sure.
Moving on.
Conclusion
Exposure Triangle is just a mix of Aperture, Shutter Speed and ISO that a photographer uses to make an image. It is how you use all these elements of photography in conjunction to make aesthetically pleasing and wonderful images that you want to.
In case you are wondering, I should let you know that, like I said previously, there are NO RULES for a correct exposure as well. There is no such thing as a correct and a wrong exposure. It all depends on how you, the photographer, want your image to look like.
Your camera however when used in ‘Auto’ mode has an algorithm that it follows to determine the ‘correct’ exposure and selects a specific setting for Aperture, Shutter Speed and ISO. But your camera doesn’t know what type of image you want to take….right? It is a machine…it cannot read your mind! All it does is follow a predetermined algorithm that gives you an image that your camera thinks is best. You are better than that. Do NOT let your camera take such decisions for you.
The best way to understand the Exposure Triangle is to use it as much as possible. You can read about it all you want but you can never master it till you have used it enough number of times. Like all things in life, this comes with practice. Since you are just starting up, get out of the ‘Auto’ mode and use either of the Semi-automatic modes like Shutter Priority ( ‘S’ on Nikon ‘TV’ on Canon) or Aperture Priority (‘A’ on Nikon ‘SV’ on Canon). They are called Semi-Automatic since on these modes, the camera lets you select an element of the Exposure Triangle and selects the rest using the algorithm that I talked about before.
Say if you start with the Aperture Priority mode. Whenever you find an opportunity to take an image, select an Aperture value and take an image. The camera will fill in the Shutter Value and the ISO (if you are on auto ISO) for you every time you take an image. After you take an image, review it and try to understand why your camera selected that specific value as your Shutter Speed or ISO. Just try and remember the type and intensity of light that was there when you took the image. Is this the image that you wanted to make? If yes..then great. If not, then try and select a different Aperture Value and try again.
Finally
The more you do the above exercise, the more you will find a pattern between the intensity of light and the Shutter Value. More light (bright sunlight, perfectly lit studio) will make the camera select a high Shutter Speed like 1/250 or 1/500th of a second or higher. Low-light conditions (poorly lit restaurant, dark concert hall) will make the camera select a longer Shutter Speed like 1/8th of a second or maybe 1 full second or even more.
After you have practiced Aperture Priority mode for some time, switch to Shutter Priority mode and repeat the process. This time you get to choose the Shutter Speed, while the camera selects an appropriate Aperture Value for you.
I am sure after this you will have an extremely good idea about the Exposure Triangle and how it functions. The Exposure Triangle is indeed the MOST important and the absolute basic, building block of photography. If you get the hang of this well enough, you are in for a wonderful treat.
Enough theory.
Now go out there and create beautiful images.
If you have any questions or difficulties, post a comment below and I will be more than happy to help you. There are no bad questions, shoot me anything you like.
