After investing a significant amount of money and time in what seemed like a pretty decent camera at that time, the last thing you would probably want out of it is blurry, unsharp images. You would think that the pricey new camera would be intelligent enough to avoid these hazy, wild mess but unfortunately, it is not.
Make no mistake, the cameras these days are absolutely packed with features up to the brim. Features which were simply unthinkable even a decade ago but you have to understand one simple thing here.
Cameras can be used creatively, they cannot create creativity on their own.
With all their modern bells and whistles, they still are little black boxes which have a very rudimentary understanding of what it is actually looking at. You the photographer are supposed to step in here and guide the camera so that it does a good job and captures a good image.
All the features and functionalities that a camera comes with are supposed to give the photographer a helping hand. It might even do the heavy lifting for you in certain cases but you have to give it direction first.
Enough said then.
Let’s tackle this pesky little problem of blurry images, once and for all.
Anatomy Of Blurry Images
This article is NOT going to be one where I tell you an easy, quick fix for a problem that you might think you have.
What I want to do here is discuss the fundamental reasons why some images do come out blurry. It’s the principles that I am more interested in discussing here, which would enable you to tackle ANY blurriness that might ever creep into your photos for as long as you shall shoot.
So let’s begin then.
The Basics
Images turn out to be unsharp or totally blurry for three primary reasons:
- Camera shake
- Subject motion
- Subject out of focus
Let’s investigate these causes one by one and understand why the blurriness actually occurs and what you can do as photographers to counteract them.
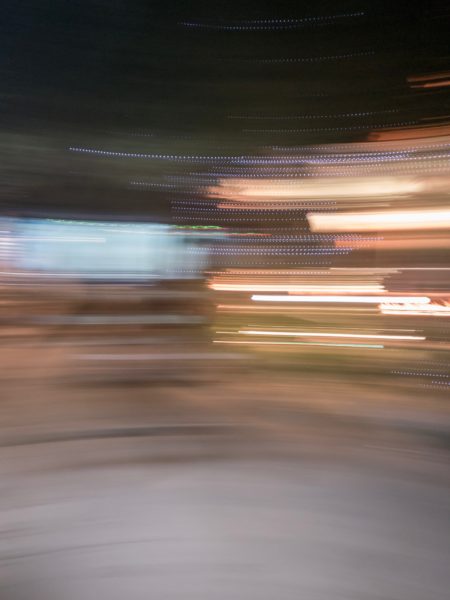
Camera Shake
Here is a hard pill for you to swallow. When NOT on a tripod and shooting handheld, there is ALWAYS some movement.
No matter who you are and how long you have been shooting, there is always some amount of movement introduced by you when you take an image. NO one can be absolutely still. You ain’t a lampost!
The only thing we as photographers can do with the blur is to minimize it. Minimize it to such an extent that it is virtually nonexistent no matter how much you zoom in the image.
Sounds fair?
So how do we do that?
It’s elementary, my friend. By increasing the shutter speed.
Let’s understand shutter speed a little more closely. By the way, if you are new to photography and have not been able to grip the concept of shutter speed well enough, I highly encourage you to read this article to strengthen your understanding.
Here you go, Understanding Shutter Speed | How It Works And Affects Your Images.
Coming back to the present topic.
Shutter speed of a camera determines a period of time during which an image is recorded.
So if you use a shutter speed of say, 1 second. What you are actually instructing your camera to do is record whatever it sees over a duration of 1 second.
If there is no movement in the frame, then probably the image would look just fine. But if there are elements moving in it, the camera would very well record their movements too.
Movement represented on an image is what we see as a blur. As simple as that.
So how do we deal with this?
Instead of giving you the answer straight up, let me help you get it.
Consider The Following
Think of a moving car and an empty road. Let’s say, you get to play God for 10mins and can control time.
The best super power ever!
But there is just a hair in the soup, you cannot control the speed of the car. All you can control is the time.
Let’s also assume that the car moves at a speed of 100km/hour. So in an hour, the car can travel 100 kilometers.
Really focus now.
If you want the car to move less, how would you do it?
Think hard…think, think!
Yeah, you got it. By reducing the time isn’t it?
I mentioned that the car can move a 100kms in one hour, and since you have to power to control time, if you reduce the time the car has to move, it would travel a shorter distance. Logic.
Let’s say you give it half an hour.
The car hence would be able to travel only 50kms. Half of 100kms, since you also halved the amount of time it had.
If you reduce the time by half again, now the car has just 15mins (half of the 30mins it had earlier). The distance traveled by the car will also be divided by two. So now it would only move 25kms.
What if you want the car to move further?
Simple, you increase the time it has. So, using the same logic, if you double the amount of time the car has, it will also travel double the distance. Increasing the time to 2hours will also allow the car to travel 200kms.
You get the drill, right?
Increase the amount of time to let the car travel further and reduce the time to make it move less.
This is the exact logic you need with shutter speed.
Remember this for life.
Increasing the duration of time your shutter remains open always lets more movement into the shot whereas, reducing the duration always makes it capture less movement.
So, if you want to introduce motion and blurriness, increase the duration for which your shutter remains open.
Two things to wrap your head around.
- Duration of shutter speed is inversely related to the number in the denominator when you write your shutter speed. Larger the number, faster the shutter speed.
1/100th of a second shutter speed is faster than a 1/10th of a second shutter.
1/1000th of a second shutter is faster than a 1/100th of a second shutter.
1/5000th of a second shutter speed is faster than 1/1000th of a second shutter.
Always look at the denominator to make sense of it. - If you think introducing blur into the image is crazy, it’s NOT. There are many genres of photography, where motion blur is actually used to make the images more expressive. Read The Art Of Camera Panning | How To Introduce Motion In The Frame, to know about it more.
Camera Holding Technique
Although increasing the shutter speed is your best bet against blur induced by camera shake, you can also use a better camera holding technique to help facilitate a more steady shot.
Here is how you do it.
Subject Motion
The next prime reason for images to come out all shaky is due to subject motion/motion blur, i.e, blur caused by elements moving in the frame.
In a way, this is just the reverse of camera shake.
Like I said before, movement of any kind causes images to be blurry and hazy. Camera shake is when you as the photographer are causing the movement.
The subject motion caused blurriness is introduced in the frame when the subject is actually faster than the shutter speed you are using.
Let me illustrate this with an example.
Example Time
Say you are taking an image of a subject which is absolutely static. Like, say a building or a landscape.
No matter how slow a shutter speed you choose, you will never have blurriness creeping into the shot caused due to subject motion.
Why?
Because the subject simply doesn’t have ANY motion.
Note: An important thing to bear in mind here is that, even though you cannot introduce blurriness in the shot from subject motion, you may very well cause blurriness due to other reasons such as camera shake and out of focus subjects. More on this later.
What if we shoot subjects with a little more motion in them?
You cannot be always shooting inanimate objects. So, for subjects with a little more motion in them such as people walking, cars moving on the road, you simply need a faster shutter speed.
The equation is as simple as it could be. Faster the subject motion, faster the shutter speed you need to freeze the motion and avoid blur.
You got a moving subject? Take an image, if you got some blur in it, increase the shutter speed and try again. Keep doing the same until you get a sharp image.
What could be easier?
One thing that you should keep in mind here is, the ONLY way to get a sharp image of a subject which is moving fast is to use a fast enough shutter speed. There is simply NO workaround around this.
Just to let you understand, these may be the shutter speeds you want to use:
- A person sitting on a park bench: 1/60th of a second
- Same person running: 1/200th of a second
- Fast Car: 1/1000th of a second
- Hummingbird with its wing NOT in a blur: 1/8000th of a second, etc.
Using a faster shutter than you actually require would not make much of a change to a shot but using a slower one will definitely cause it to be blurry.
A very easy and spontaneous way to determine the shutter speed is to use the Reciprocal Rule. It is an excellent way to develop your understanding of the shutter speed as a beginner.
Buy Why?
Why does using a faster shutter speed stop the image from having blur in it?
The reason is pretty much the same one we had for camera shake.
For as long you instruct the camera to keep the shutter open (by selecting a specific shutter speed), the camera would record everything it looks at. Motion and movements included. If the subject happens to move during the brief period when you instruct the camera to open its shutter, that movement is recorded too.
If you reduce the time for which the shutter is kept open, the potential to record motion also diminishes.
A person sitting on a park bench is probably not moving much, hence even a relatively slow shutter speed of 1/60th of a second should be enough to capture a sharp picture.
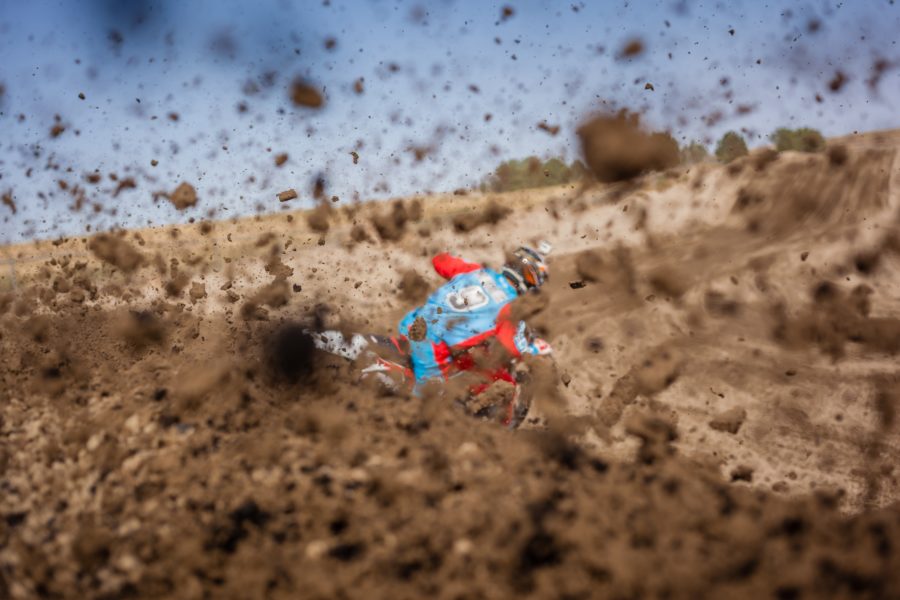
On the other hand, the same 1/60th of a second shutter speed may be insufficient to eliminate blur if you happen to shoot a dirt bike on full throttle.
Your stance or camera holding technique doesn’t matter in this case since it in NO way makes a difference to the movement of the subject itself. So even if you have the camera secured on a tripod, you will still encounter some blur in the image if you happen to use a shutter slower than the subject.
Subject Out Of Focus
This is purely the case where you misjudged your depth of field and somehow managed to keep the subject out of the plane of focus. NOT to be mistaken with the Focal plane.
To understand this part, you have to have a very good understanding of the concept of depth of field.
I am not going to go too deep into depth of field in this article. Just to give you a basic understanding of it, think about it this way.
Imagine a rectangular tub which can contain water. Yeah, like a rectangular aquarium.
You can draw water in and out of this tub whenever you want. You also have a few random objects that you want to submerge in the water in the tub.
It will all make sense in a little bit, just hold one for a minute.
You fill the tank with water and make it an inch deep. So any object that you place inside which has a height of 1inch or less is going to be submerged and anything taller than that is going to have some parts of it out of the water.
Easy enough?
Now comes a little crazy part.
Try and imagine the entire tub now rotating on one of its sides. So the bottom is now one of the walls. Also, imagine the water to still be behaving as if the bottom is still the true bottom. Basically, the water sticking to the previous bottom in spite of the tub turning on one of its sides.
It is a little dizzying, I agree. But bear with me a little.
Since the water inside the tub is now vertical instead of horizontal. Like a wall. The more water you add, the thicker the wall gets.
This is the concept of depth of field.
You may think of the water as being controlled by aperture values. Smaller the aperture value, the less amount of water in the tank (thinner the water wall) and vice-versa. So an aperture value of f/1.2 represents a very small amount of water, whereas f/22 would give you a significant amount of water depth in the tank.
Think about it a little intuitively.
To sum it up:
- The water level -> Depth of field
- Amount of water -> Determined by the aperture value used
If you understand well concept of depth of field, the rest of it is pretty obvious.
Parts of the image which are included within the depth of field, come out nice and sharp and everything else is blurry and hazy.
It is for the same reason when you use a smaller aperture value and manage to focus correctly on the subject, the background comes out all blurry and beautiful. Giving you a nice subject-background separation, while preserving the sharpness of the subject itself.
Read How To Get A Blurry Background With Almost Any Camera the learn how to do this with ease.
I apologize for the tub example. I wish I had a nice animation to go with it but I don’t. Okay, I will try and learn a little bit of After Effects just for you and put it up as soon as I can.
The Fix
It should be abundantly clear now that the only way to stop an image to go unsharp because of non-inclusion of the subject within the plane of focus is to include it in the plane of focus.
This is as simple as it gets.
To do this correctly, you have two options here.
- Readjust the focus to keep the subject inside the plane of focus: Sometimes while working with small aperture values such as f/1.2, f/1.4, etc. when the depth of field is only a few centimeters, it is extremely easy to just miss the subject. You would need good hand-eye coordination to get the subject in focus first and then keep it there.I would like to draw your attention here to one of the most mistaken aspects of depth of field and aperture values. The relation between subject distance and depth of field. I seriously urge you to read Subject Distance & Aperture Value | This Is What You Should Know. You wouldn’t believe how many seasoned photographers have this wrong notion embedded in their belief.
- Increase the plane of focus altogether by using a larger aperture value: If using a small aperture is getting a little difficult for you to manage, you can always pump up the aperture value and give yourself some wriggle room. A higher aperture value will give you a deeper depth of field which should cover more elements of the frame within the plane of focus.
Determining The Cause Of The Blur
By the time you finish photographing your first 10,000 images, which according to the most famous street photographers of all time, Henri Cartier Bressan, are your worst, you will have formulated a pretty good idea about which of the reasons above causes which type of blurs.
Heads up they are all NOT the same.
Camera Shake Blur
Think about this a little intuitively and you should get this very easily.
I said motion causes blur because that is what the camera sensor gets to see. So when you have blur on the image caused due to camera shake, EVERY element in the frame seems to be a little blurry.
Why you may ask?
Think of it like this. As you let the camera jerk a small amount, all that the camera is looking at seems to move from the point of view of the camera.
To find the closest example when such a similar thing happens, think of the last time you were on a static train but the train just next to you was moving. Didn’t you use to feel as if your train was the one that was actually moving?
A very similar thing happens with the camera jerk/shake.
Trademark: All elements of the image seem to be a little blurry and also the same amount.
Fix: Increase the shutter speed or hold the camera still (maybe use a tripod).
Subject Motion
Images which inherits blur due to subject motion tend to have the blur associated with only the parts where there was motion.
Say you make the mistake of using a slow shutter speed and wanted to take an image of a cyclist riding through an empty street. If you manage to keep the camera fairly stable and there is still some blur in the image you will see that the blur is only on the part(s) where the cyclist is.
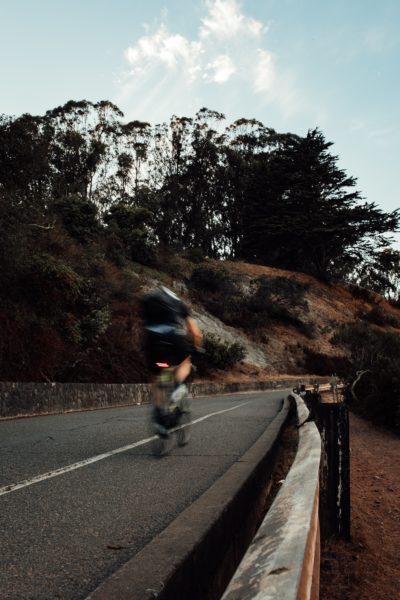
The rest of the image should be sharp enough.
Trademark: Only parts of the image with motion tend to have blurred out.
Fix: The only way to counter subject motion is to use a faster shutter speed.
Subject Out of Focus
Out of focus images have blur which is pretty uniform and NO directions.
If you look closely at the images above, the image with some camera shake has some blur for ALL the elements in the SAME direction in which the camera moved/shook.
In the case of subject motion, only the parts near the cyclist blurred out, in the direction in which the cyclist was moving.
For images with out of focus blurriness, the resulting blur is just smooth, without any directionality. It is pretty obvious and easy to identify.
Generally, when you miss focusing on one element of the image you tend to focus on something else. So maybe the eyes of the subject didn’t come out as sharp as you wanted them but the lips are really sharp. You just misfired the focus.
Trademark: Consistent, uniform and directionless blur, only on certain parts of the image.
Fix: Better targeting of focus.
Conclusion
That is all you need to know about blurry images.  These three reasons account for nearly all the blurriness you will ever encounter.
As an exercise what you can do now is go back to your old images and look for the symptoms like I told you. It should be very easy for you to recognize the causes. Now you know the tricks of the trade.
Take some more images of both static and moving subjects and I am sure you will be able to keep blurriness out of your pictures for life. Or at least troubleshoot them even if you somehow manage to get some.
Hopefully, you learnt something interesting today.
Please share your thoughts if you want to.
Keep shooting amazing.
This is now a teeny tiny blog trying to compete with the big guys. If you liked what you read, please take a second to share it. It would help me a lot. Thank you.
