Ah! The Manual mode, the hallmark of any “professional photographer.” The sign of a true master of the craft and the epitome of creativity.
At least that is what it is supposed to be, isn’t it?
Popular culture combined with photography blogs and some YouTube videos has almost engraved the idea in our heads (especially amateurs) that shooting images using the Manual mode is the ONLY way to make good images.
And without it, you can never really be called a “true” photographer.
Right?
Let me break the news to you, it simply DOESN’T matter.
Not convinced?
Okay. Pick any one legendary photographer. Any genre, any time period. Now Google as much as you want and try and find out what camera mode he/she used to shoot his/her body of work.
I am pretty sure you will have a hard time fishing out the information.
You know why?
Because nobody cared. It’s almost akin to asking Michaelangelo what brand of color he used to paint the ceiling of the Sistine chapel. Or asking Aguste Rodin what hammer he liked the most.
The information is not going to help you in any way to produce art of the same caliber as the work of the artist you are mesmerized by.
Okay, just one thing before you start reading this. This is the longer, much more detailed and illustrated version of the Manual Mode. If you want something which is shorter and more to the point, please read this instead: How To Shoot Using Manual Mode | The Easiest Way I Know.
What Is Manual Mode?
In photography, Manual mode refers to the camera mode in which a photographer chooses ALL the settings for the camera manually.
No interference from the camera whatsoever. No settings suggestion offered. Nada.
When on the Manual mode, you are on your own. The camera simply carries out the settings it is handed over.
Sounds scary, doesn’t it?
Especially so when you just bought your new camera and started shooting.
But let’s just take a moment here and think for a second. What are we so afraid of after all?
A bad image?
You just started taking pictures, remember? As far as I am concerned, bad images are your birthright at this point in time.
And this is possibly the best time in history to make some atrocious images. You lose no money, waste no resources, stand to learn a lot, and make some massive strides toward making better images. What is there not to like?
Had this been before the digital era, each image would cost you some film, a lot of time to get it developed, and a load of money.
Not anymore!
So go ahead and shoot as much as you want. All you have to do, if you do not like the image, in the end, is press the delete button and it goes away. Like it never existed.
Okay, I get it. You do not want to go to an event and shoot some hundred images with the Manual mode, only to come back home and find that all the frames are either dead black or look as if drunk aliens are moonwalking on the surface of the sun.
You want some insurance, right?
Other Modes
As far as the insurance of a ‘good’ image goes, you are in the right using any other semiautomatic mode of the camera. Barring some extreme situations, they are almost certain in ensuring a well-exposed image.
Yes, that is all a semi-automatic mode promises, a properly exposed image.
Not a well-composed image. Not an image with a good story to tell. Just a photograph that has properly exposed highlights and shadows.
Now you have to ask yourself the question. Is that enough?
And before you answer that, just think about all the things that you are giving up in pursuit of this perfect exposure. Forget the list, let me just give you one. Your creativity.
The shutter speed you use for an image has the capability to introduce motion or freeze action.
The aperture value determines the amount of the frame which is in focus and appears sharp.
The ISO value may introduce noise at higher values.
These are critical handles to shape the image that you want to make. Giving up control of them is like asking a painter to paint with not one but both his hands tied in the back.
Long story short, you need creative control to create images your way. Automatic is not a good idea when you are trying to create images with a little of yourself in it.
Hello, Elephant!
So let’s address the elephant in the room.
How can we ensure well-exposed images even when using the Manual mode?
Let me put your thoughts to rest right at the beginning. Making a correctly exposed image is NOT a guessing game.
There are ample resources and data provided by your camera BEFORE you take every image. So, there is absolutely no reason to guess the settings you require to expose properly.
The two very basic tools you can use are:
- The light meter in the viewfinder/LCD
- The image histogram
If you are hearing about them for the first time and do not know how to read them and make changes accordingly, I highly suggest reading the following posts:
- How To Best Use The Light Meter On Your Camera | Explained
- How To Leverage Histogram Explained | Plain & Simple
To simplify the system, even more, think of the entire thing as a game.
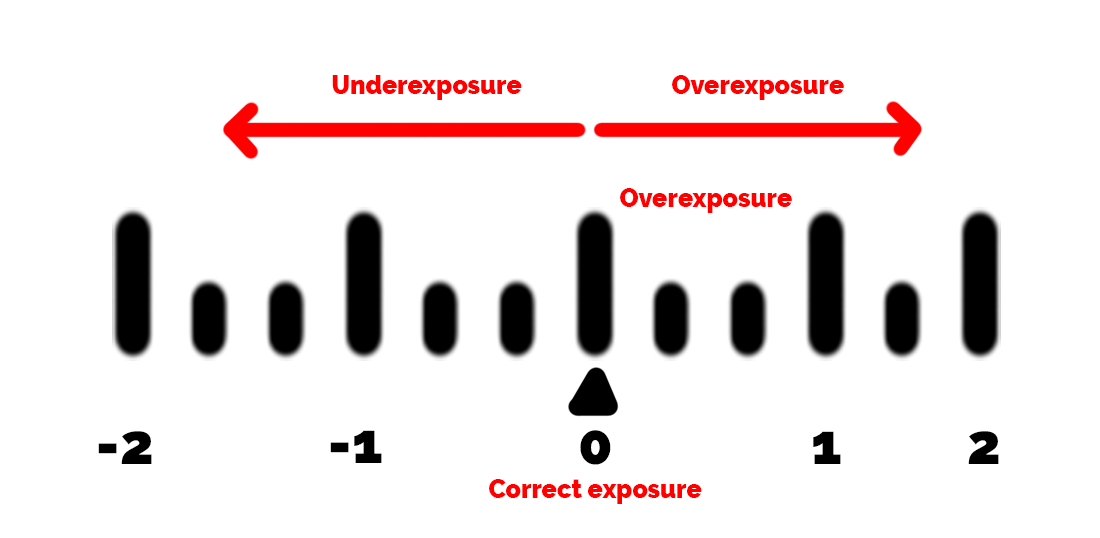
When you are following the light meter, try and adjust the settings so that you do not stray away too much from the ‘0’ mark in the centre. If you go too much on the positive (+) side, you are overexposing the image, and if you go too much to the negative side (-), you are underexposing.
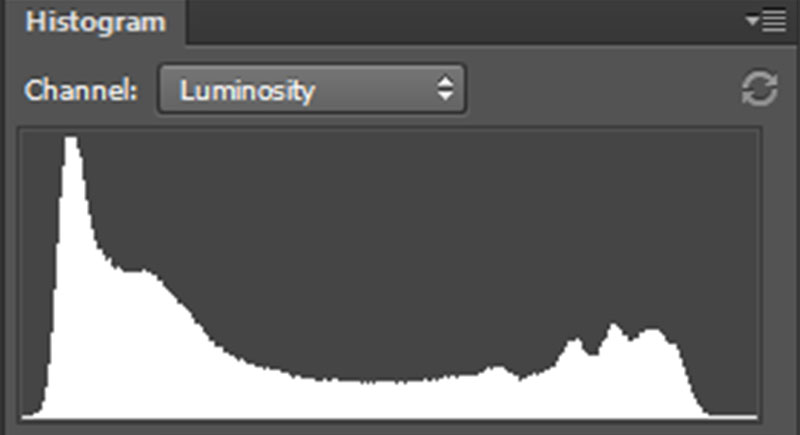
Same deal with the histogram. Just try and keep the graph from touching the right wall. Touching the wall implies that certain pixels of the image are overexposed and are probably impossible to recover data from.
Why mention the right wall but not the left?
As you already know from the histogram post, touching either wall indicates that a certain number of pixels are either over/underexposed. Touching the left wall is not such a big deal since in digital photography it is much easier to recover details from pixels that are underexposed than pixels that are overexposed.
This, in no means, is a license to underexpose routinely and repair the image in post. Try to keep it in the right as much as possible in the camera itself. Post-processing should only be used to accentuate or intensify what is already there in the image and not create new stuff.
Easy Manual Mode
Let’s get our bearings straight first.
The Manual mode deals with three primary settings:
- The aperture value
- The shutter speed
- ISO
Basically, the three components of the exposure triangle.
Your objective as a photographer is twofold.
- Shape your image using the three handles above.
- At the same time, keep the light meter reading in mind and stay as close as possible to the above-mentioned ‘0’ mark.
In other words, you need to balance the three set of controls to make the image you want but also make sure that you do not mess up the exposure of the image.
That’s the goal.
Now here is how to go about it.
Brightness: Low, High
Let me give you a brief overview of the entire situation here and then we can dive deeper.
Also, the example I am about to present to you would require some imagination to grasp. Just give it a minute, I promise it gets easier.
Ready? Okay, jump in with me then.
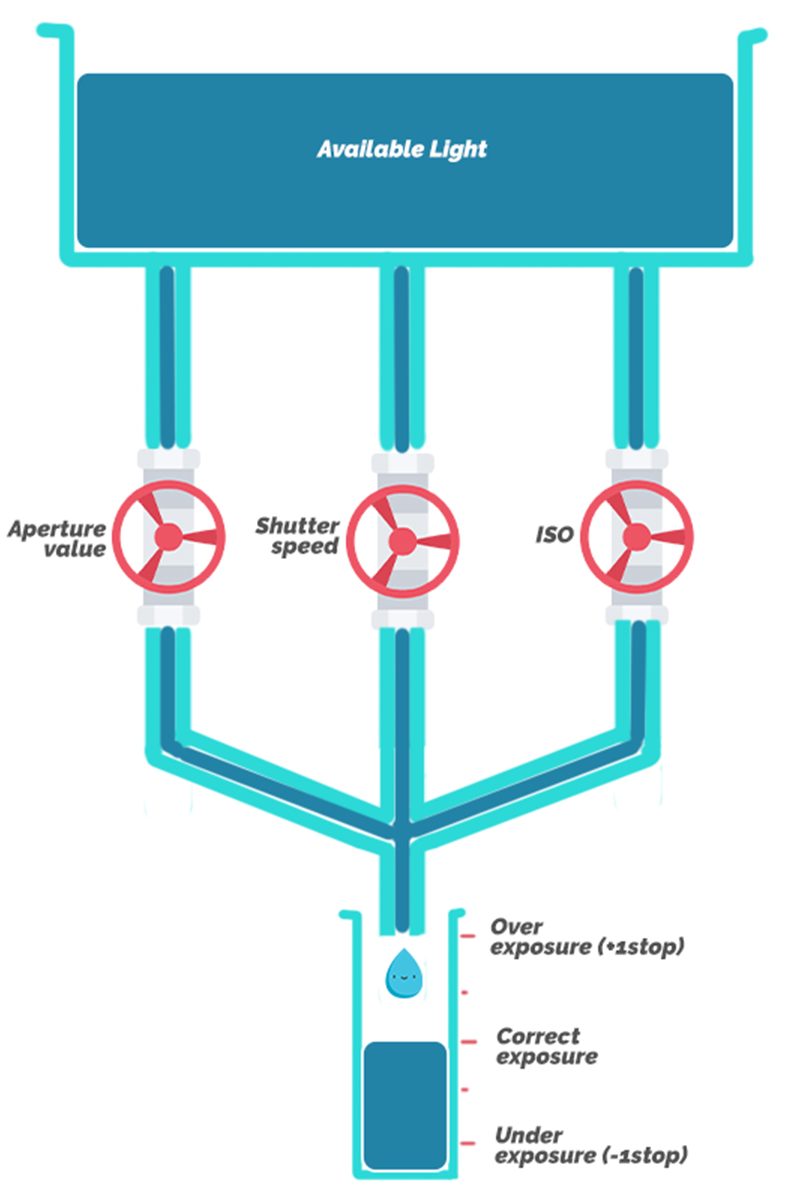
Think of the three settings: aperture value, shutter stop, and ISO as three taps which can be opened or closed.
When you open any tap, water flows to a reservoir. The more you open a tap, the faster the water flows.
Furthermore, no matter which tap you open, the water collects in the same reservoir.
Last, the amount of water in the reservoir determines the brightness of the image. Greater the amount of water, brighter the image and vice versa.
I know it is a little too much to imagine but just hold on for a sec.
The Aperture Value Tap
Let’s start alphabetically.
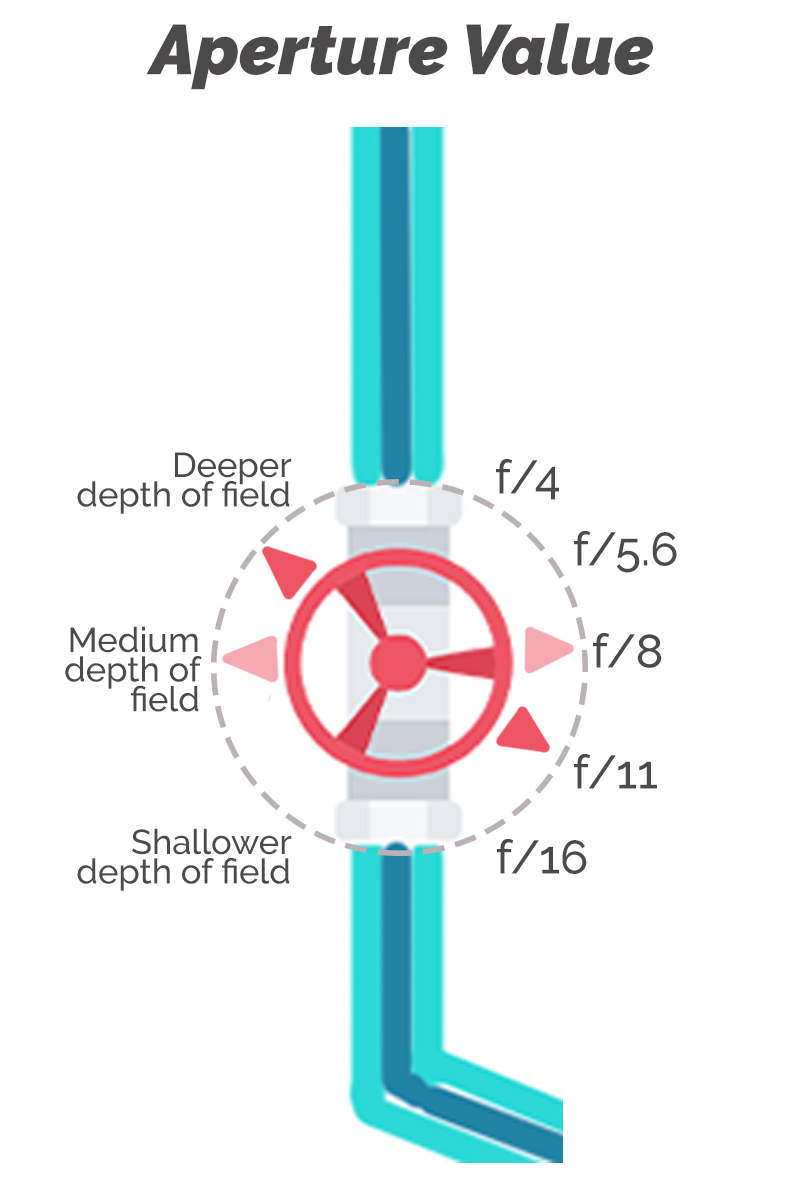
As you can see, the aperture value tap opens as you turn the tap counterclockwise. You would also notice that the aperture values also decrease in the same direction.
Say we start from a value in the middle, f/8.
If you turn the dial clockwise and select f/11, the tap closes up a bit and allows less water to flow through it.
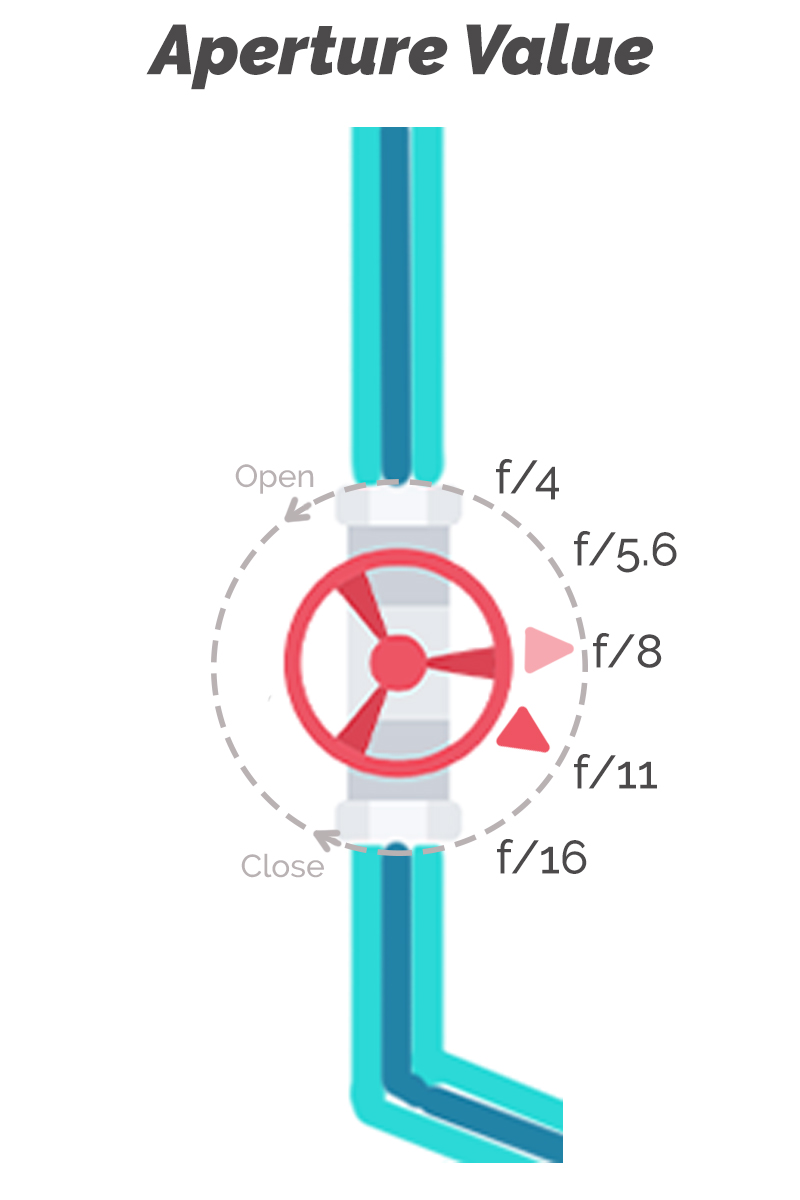
If you turn the dial counter-clockwise and select f/5.6, the tap opens up a bit and allows more water to flow through it.
Now the consequences:
First case: If the two other taps (shutter speed and ISO) are kept constant, closing just the aperture value tap reduces the water flow into the reservoir and allows less water to collect than is necessary to make a correctly exposed image. The image hence would be a stop underexposed.
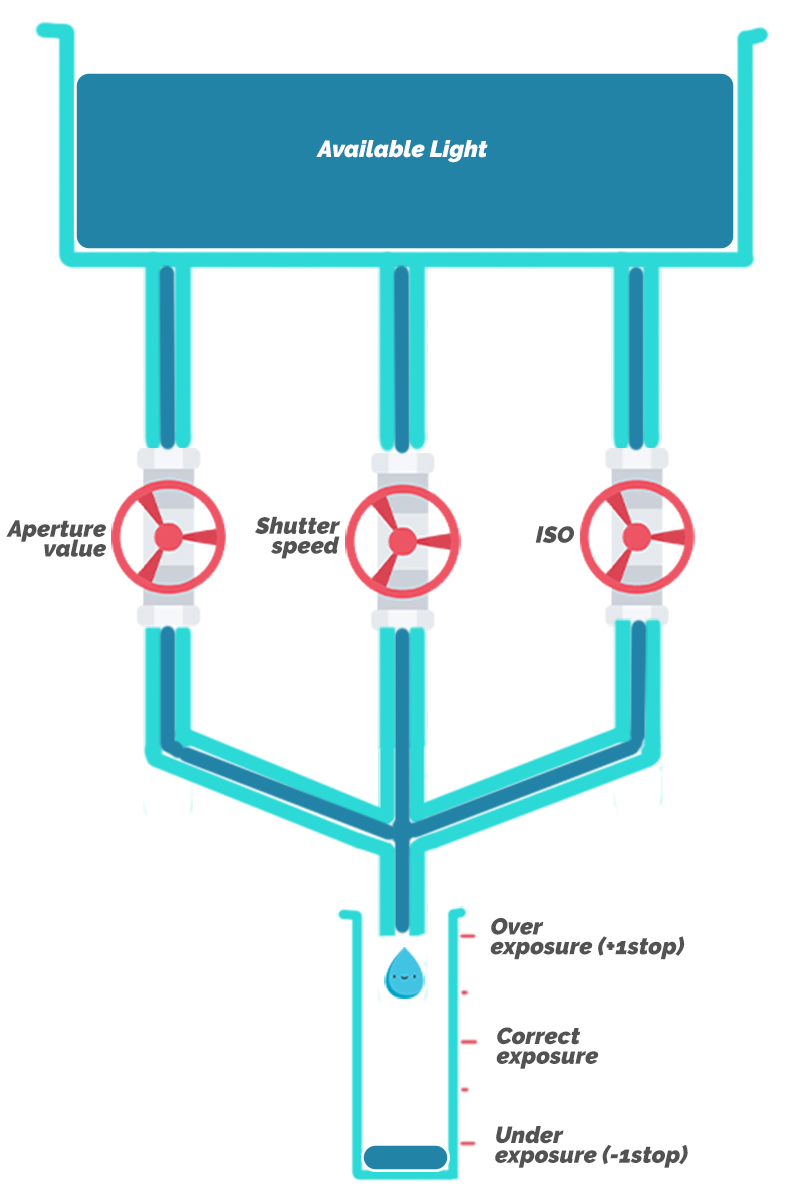
Second case: The exact opposite happens here. Since the tap is opened up more, excess water is collected in the reservoir than is necessary to make a well-exposed image. The image hence would be overexposed by a stop.
In case you are wondering what a stop is, it is a unit used to measure light.
One additional stop means doubling the amount of light allowed inside the camera and similarly one stop less light refers to halving the amount there was before.
Note: The reservoir in the image does not take into account the doubling and halving principle in a literal sense. Please take it as a reference only. It is only for demonstrating a concept.
The Shutter Speed Tap
This is very much the same as the aperture value tap.
If we start from say 1/500th of a second and twist the tap counterclockwise (to say 1/250th of a second), the water flow increases and more water collects in the reservoir.
On the other hand, if we turn the tap clockwise (to say 1/1000th of a second), the tap closes up and as a result, less water reaches the reservoir.
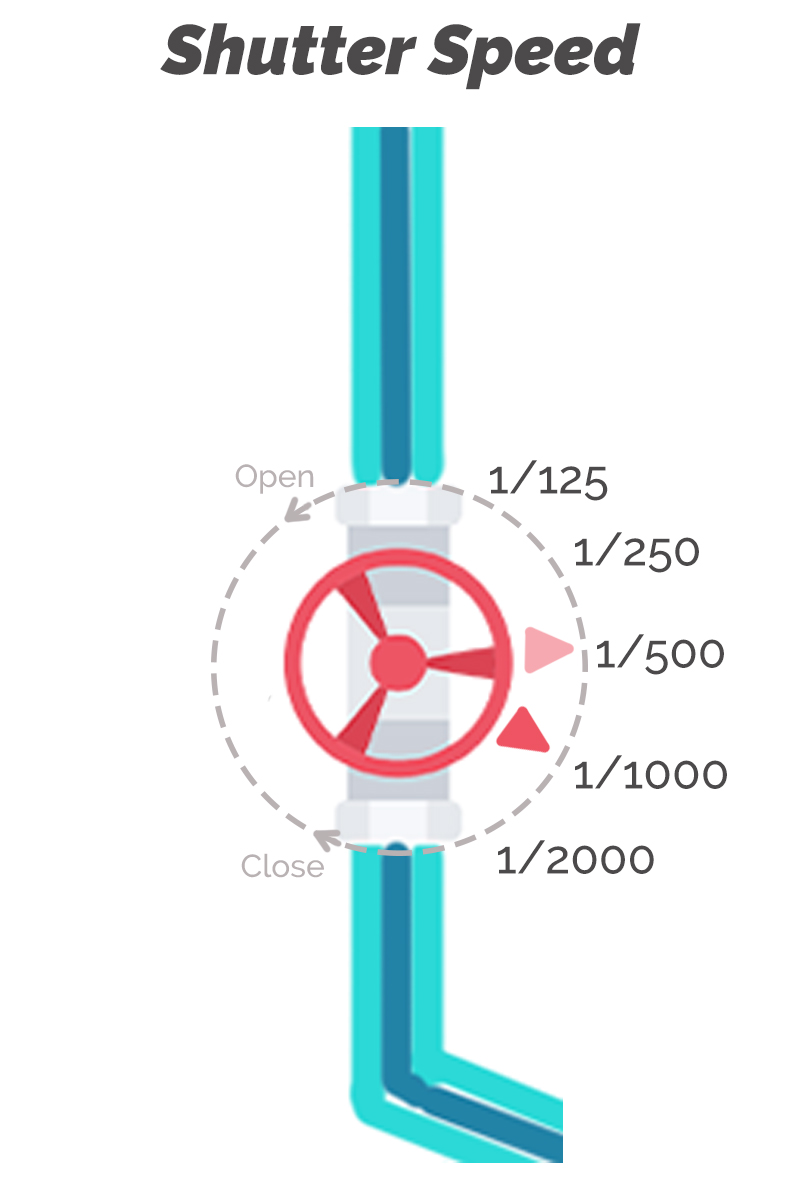
In the first case, excess water overexposes the image by a stop and in the second case, the image is underexposed by a stop.
The ISO tap is exactly the same with ISO values e.g., ISO400, ISO800, and ISO1600. So, I am not explaining that any further here. I will, however, discuss the influence a high or low ISO value has on an image. Just give me a minute.
The Common Thread
I hope by now you have noticed the one property all the three taps above share.
As they are turned counterclockwise, they open up letting in more light and result in the image being overexposed. In other words, opening up the taps results in bumping up the brightness of the image.
Similarly, as you turn them clockwise, the taps close up and the image brightness decreases.
All three components of the exposure triangle essentially control the amount of light, which in turn determines the brightness of the image.
So Why Have Three Separate Controls?
If all of the three elements of the triangle control just the brightness of the image, why even have three separate dials for them. What is even the point?
Here’s why…
Every individual element of the exposure triangle besides controlling the brightness of the image also controls one other important aspect of the image.
Understand this part very clearly. Pay attention here.
Opening or closing any tap does control the brightness of the image. But in addition to the controlling the brightness of the image, they all have a unique secondary feature that also changes depending on which way you turn the tap.
The secondary features each of the elements control are as follows:
- Aperture value: Depth of Field
- Shutter speed: Motion blur
- ISO: Sensor sensitivity to light and amount of noise
Let’s talk about them a little bit now.
Aperture Value
Remember just a little while ago I said that the job of a photographer is twofold?
- Creative side: Shape the image using the three primary controls available
- Technical side: Maintain the amount of light required for a good exposure
That is essentially the game we are in now. To exercise your creative control over the image, you need to change the values of the elements. But with each turn of the dial, you are also influencing the amount of light that is entering the camera which affects the brightness of the image.
So let’s revisit the image of the aperture value tap.
You see the subtle change now?
The aperture value still decreases as you turn the tap counterclockwise but now along with the aperture value, the depth of field also decreases.
What does this mean?
Just to refresh your memory, the depth of field is essentially the amount of the frame which is in focus.
When a small part of the image is sharp (in focus), we call it a shallow depth of field.

On the other hand, when a large part of the image is sharp, we call it a deep depth of field.
The aperture value you choose directly determines the depth of field of the image. Higher the aperture value, the deeper the depth of field and vice versa.
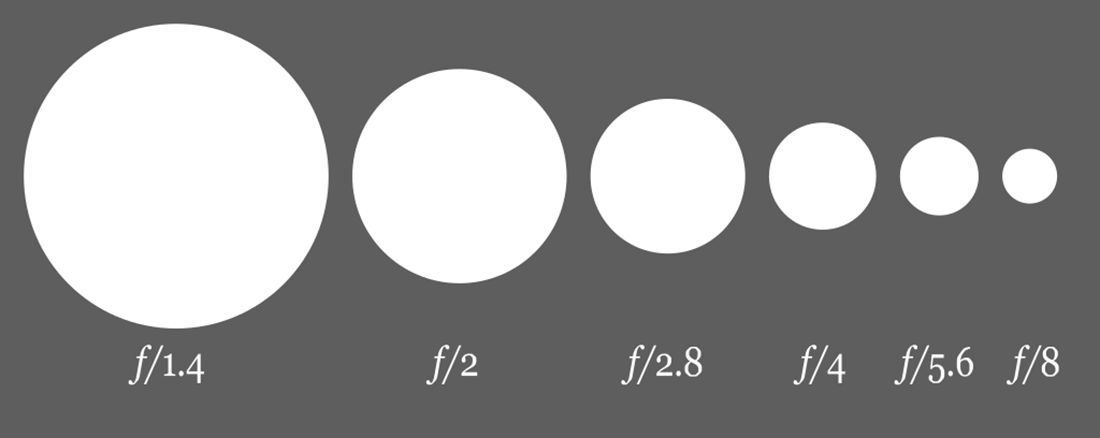
Note: Please keep in mind here that a higher aperture value represents a smaller actual aperture opening. f/1.8 is a large opening, f/22 is a small opening. It is an inverse relationship. Just keep this in mind.
Real Picture
So how does all this hold up when taking an actual image, in real life?
Let me give you an example to drive this point home.
Lets us say you want an image with just the subject in focus. This is to draw the most attention towards your subject and make him/her/it the centerpiece of the image. This is also by the way how most portraits are shot.
Now a shallow depth of field is created using a smaller aperture value. Say you are happy with the depth of field that is created when using f/2.8. You like the look of the image.
So, you decide on using f/2.8.
This is the creative decision you took about the aesthetics of the image.
Now you need to reconcile with the technical side of things. f/2.8 is a rather large opening. This means that the aperture value tap is opened up a lot, allowing a huge amount of light to flow inside the camera. This way surely overexposes the image. The degree of overexposure is one stop (+1 stop).
All this could be settled right now if you just decide to use a higher aperture value (smaller actual aperture opening).
Using f/5.6 will instantly solve the problem and will give you a properly exposed image.
Why f/5.6 you ask?
Because f/5.6 allows one less stop of light inside the camera as compared to f/2.8. This is exactly the amount by which the image was being overexposed earlier.
Read this for any confusion regarding f-stop and how they are used to measure and evaluate light in photography: F-stops Vs T-Stops | Which One Should You Use?
You need to know the degree of displacement from the correct exposure (whether over or under and by how much) to make the adjustments.
But you do NOT want to use f/5.6.
f/5.6 is a higher aperture value that you intend to use. A higher aperture value causes the depth of field to be deeper, thereby causing more of the frame to be sharp and in focus.
What now?
This is exactly why we have three independent elements in the exposure triangle.
Since we do not want to compromise on the aperture value we want to use, and the aperture value we actually want to use (f/2.8) is causing the image to be overexposed, we can make adjustments to the brightness of the image using any of the other two elements of the triangle: shutter speed or ISO value.
So, in effect, we maintain the aesthetics of the image as we wanted but at the same time also satisfy the technical requirements for proper exposure.
You get it now?
Eureka, Eureka!!
Let’s keep at it then.
This is how we do it.
Shutter Speed
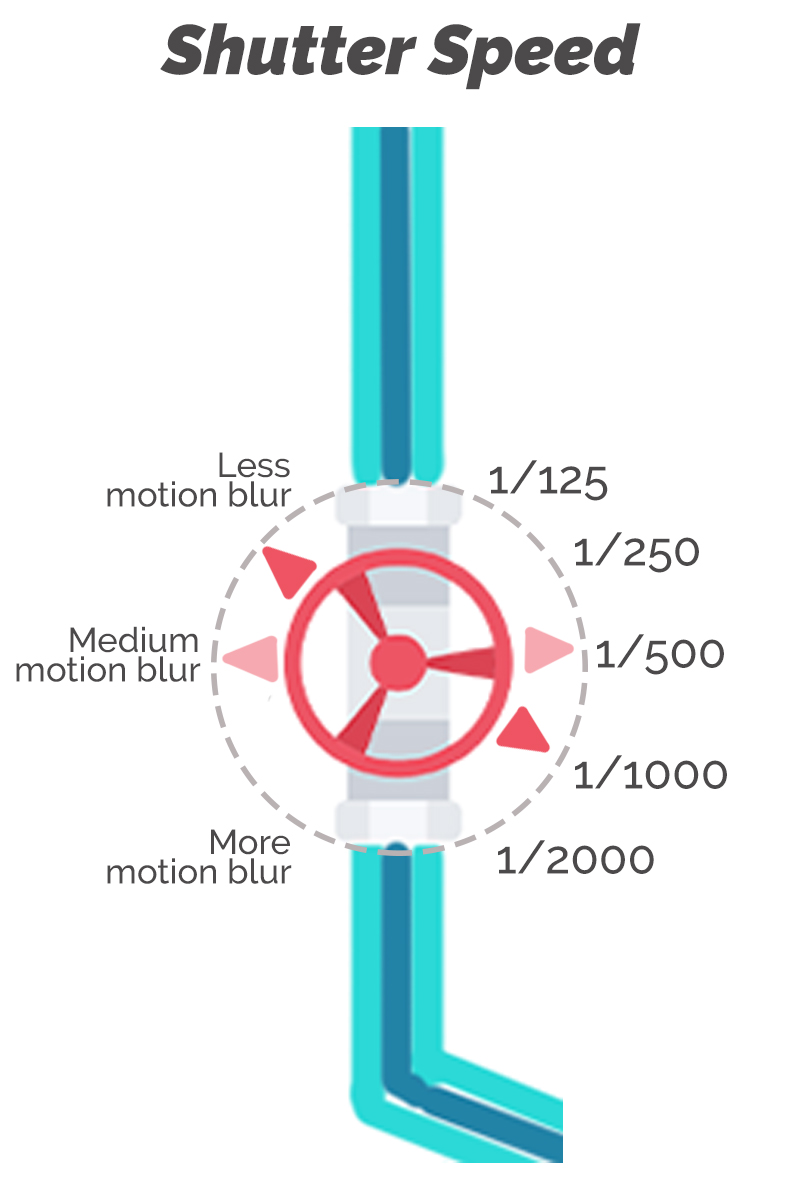
Shutter speed controls the amount of motion blur in the image.
- Slower shutter speed (e.g., 1/2th of a second): More motion blur
- Faster shutter speed (e.g., 1/8000th of a second): Less motion blur
One very important thing to understand here.
The adjective ‘slower’ or ‘faster’ used above are relative in nature. The same shutter speed can be fast enough for one situation and at the same time be slow for some other situation.
For example, 1/250th of a second is a fast enough shutter speed to shoot human subjects. It is almost guaranteed to give you no motion blur.
But 1/250th of a second is not fast enough to shoot an F1 car during a race. Since the car is moving so fast, you need a much faster shutter speed to freeze the motion.
The phrase motion blur also requires some explanation.
Motion blur is basically the amount of blur caused in the frame due to motion/movement. More motion equals more blur and vice versa.
Motion for our purposes has a time component to it as well . This is how it fits in.
Explanation Of The Concept
Imagine two cars. One traveling at 50 km/hr and the other at 100 km/hr.
If we assume that both the cars started from the same position at the same time, the car moving at the speed of 50 km/hr will have traveled 50 kms, while the other car would have traveled 100 kms after exactly an hour.

If we could photograph the entire road the two cars traveled on and use the shutter speed of 1 hour, the car with the faster speed (100km/hr) would make a longer blur as compared to the car with a slower speed (50km/hr).
The point I am trying to drive home is, a faster object moves more than a comparatively slower object in the same period of time. What moves more also creates greater amount of blur.
The amount of motion blur introduced in your image is directly determined by the amount of motion in the elements of your frame. In other words, how much stuff in your frame move during the period of shutter speed you choose.
The reason why 1/250th of a second is a fast enough shutter speed for human subjects is because, during this extremely small time frame even if the human is actually moving, the amount of movement would be so small that it would be negligible in the photograph.
On the other hand, the same 1/250th of a second shutter speed is considered slow and something which may introduce some motion blur in the image is because an F1 car is much much faster. Even during the small shutter duration of 1/250th of a second, the car is capable of moving sufficiently enough to cause some blur.
When thinking about motion blur, always think in terms of motion per unit time.
How I learnt that 1/250th of a second is fast for a human but not for a car is purely by experience. The more you shoot, the more you would understand this relationship.
Sorry, I got a bit carried away there. I just wanted you to know the basics before I explain anything further.
Circling back to the topic at hand now.
Course Correction
Let’s continue from where we left off the aperture value discussion.
We wanted to use f/2.8 as the aperture value but that was causing our image to be overexposed, correct?
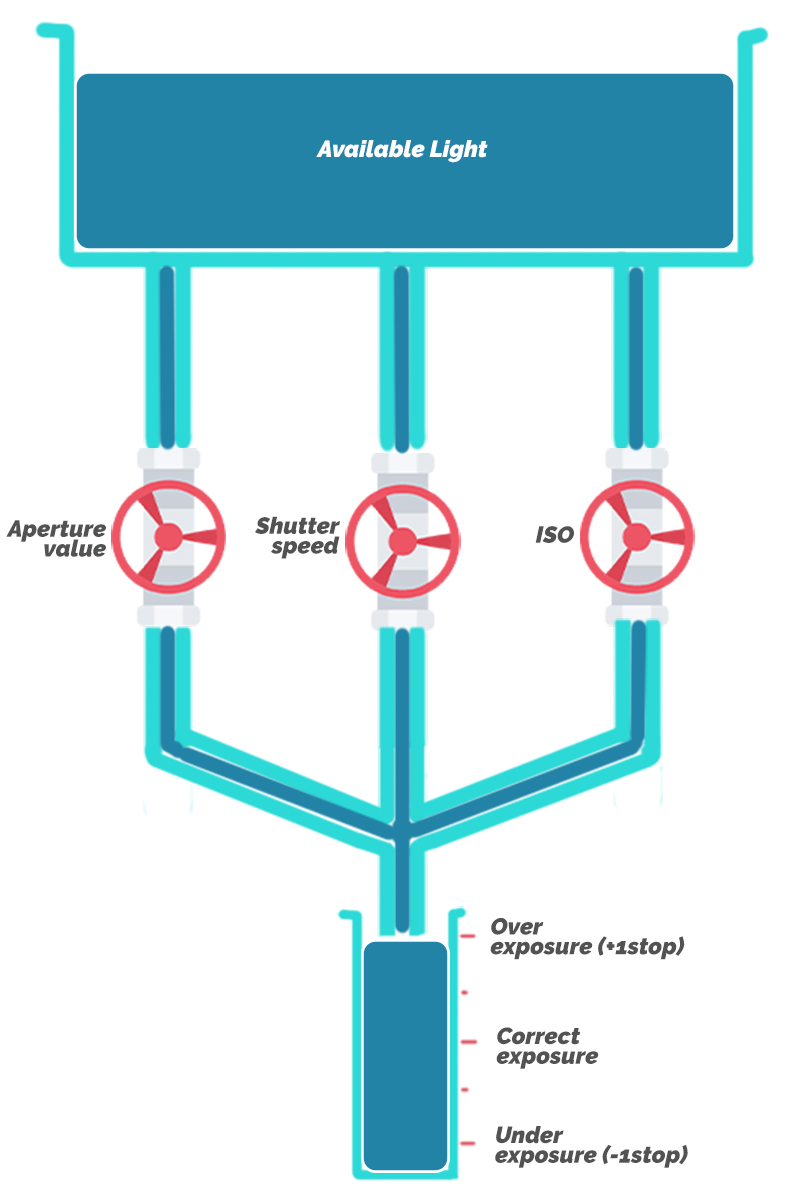
One thing that you may have noticed in the tap reservoir images I used above is, the amount of water in the reservoir solely determines the exposure of the image.
It does not matter which tap/channel it came through. The total combined amount of water in the tank determines if the resulting image is underexposed, properly exposed, or overexposed.
This means the extra water that flows in through the aperture value tap when we open it up to f/2.8 can be compensated by tightening of any one of the other two taps (shutter speed or ISO).
So to keep the image aesthetics the way you want it, you use f/2.8 as the aperture value and then to readjust for the extra light you tighten say the shutter speed tap. Just so you understand, we could have used the ISO tap here too. Or both of them together.
Now the big question, but by how much?
This is where the degree of under or overexposure comes in handy. You can easily measure this with the light meter in the camera. If you don’t know how to do this, read How To Best Use The Light Meter On Your Camera | Explained.
For our case, using the f/2.8 aperture value was overexposing the image by one stop. So we need to cut the amount of light by one stop. If initially, we were using 1/500th of a second shutter speed, we just need to use 1/1000th of a second shutter speed to do this.
Doubling the shutter speed allows one stop of light less inside the camera and vice versa.
ISO Values
ISO is a pretty straightforward concept to understand. It simply represents the degree of sensitivity of the image sensor.
- A higher number, say ISO 1000, makes the sensor very sensitive to light. This helps in making images in very low-light situations.
- A lower number, say ISO 100, makes the image sensor fairly sensitive to light, you may want to use it when the amount of available light is abundant, say outdoors on a bright sunny day.
It’s the same deal as the shutter speed, double the ISO value to increase the light sensitivity of the sensor by one stop and halve it to decrease the sensitivity by one stop.
- ISO 500 to ISO 1000: +1 stop
- ISO 500 to ISO 250: -1stop
The ISO value, however, has another component of the image that it solely influences, the amount of digital noise.
Digital noise is nothing but very tiny grains that have a tendency to form when the image sensor is made very sensitive to light (high ISO). The darker regions of the image are especially susceptible to noise when shooting in low-light situations.
To keep matters simple, just remember to ALWAYS use the lowest ISO value you can for a particular situation. This does NOT mean you use ISO 100 for everything. You may need to bump up the ISO value when shooting in situations where the amount of available light is not enough to make a well-exposed image. Try and use the other two handles of the exposure triangle, namely shutter speed and aperture value to see if you can add some more light in before you push the ISO values.
Dialing in more ISO value should be your absolute last resort for any image.
The Mother Of All Questions
How do we choose which one tap/component to use to add/reduce light?
This is the million-dollar question on which the entire art of photography hinges on. Which setting to adjust indeed?
The short answer is unceremonious. It depends!
Well, I am not going to leave it at that. I know you expect more from me. So, here is all you need to know to make the best possible decision for yourself.
Let’s start with the factors which influence this decision-making.
Here is a small non-exhaustive list; what setting you need to adjust may be influenced by any one or more of the following:
- Amount of available light
- Amount of artificial light
- Depth of field you desire
- Motion blur you want
- Amount of noise you are willing to allow
- Size of the sensor in your camera body
- Focal length of your lens
- Shooting handheld or on a tripod
- Your own skill set
The list just goes on and on.
The reason why this is such a hard question to answer is because photography is a form of creative art. So by definition, you the photographer are free to find creative ways to fill the light reservoir (the water reservoir in the example I used before) for a well-exposed image. Which channels you use to flow in or cut back light and how you adjust that with the look and feel of the image is totally up to you.
There are no hard and fast rules.
Moreover, sometimes you do not even need to expose an image properly. There are entire genres of photography which are all dedicated to such creative and expressive images. High key photography is just one example.
Had there been laws about how you do a certain thing, which by the way also implies that anything else you do other than what is specified is wrong, all the images in the world of the same thing would be the same. The creative approach of photographers and their sense of vision together make images so different from each other even when the subject is the same.
Let me give you some concrete and real-life examples now so that you understand the underlying point better.
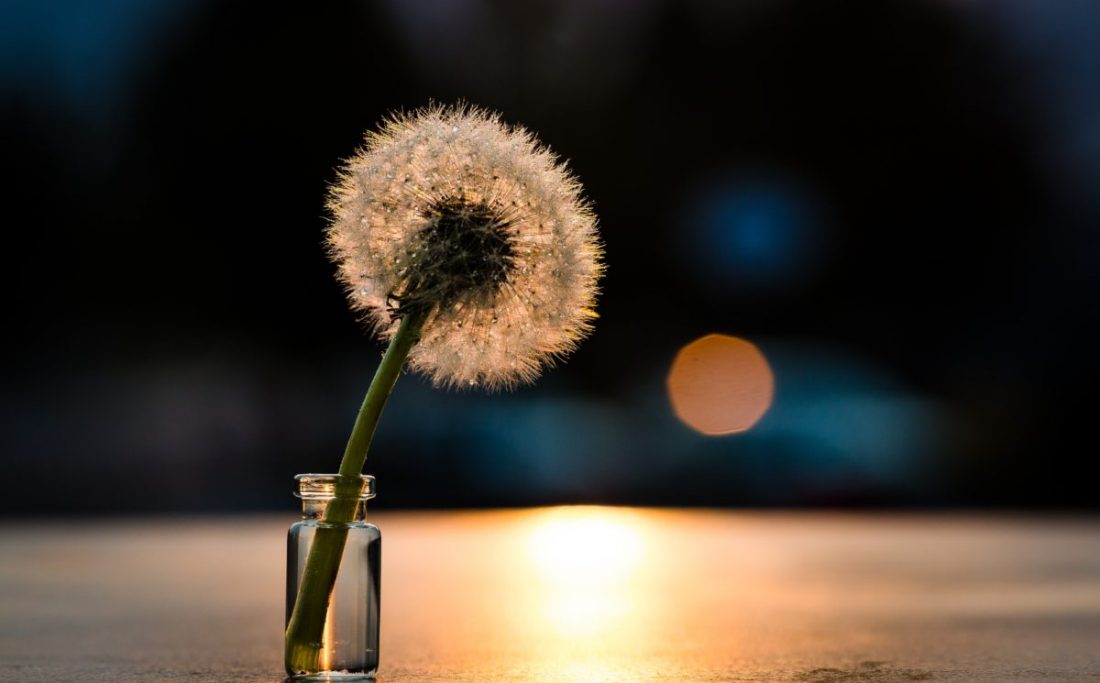
Photograph Of A Flower
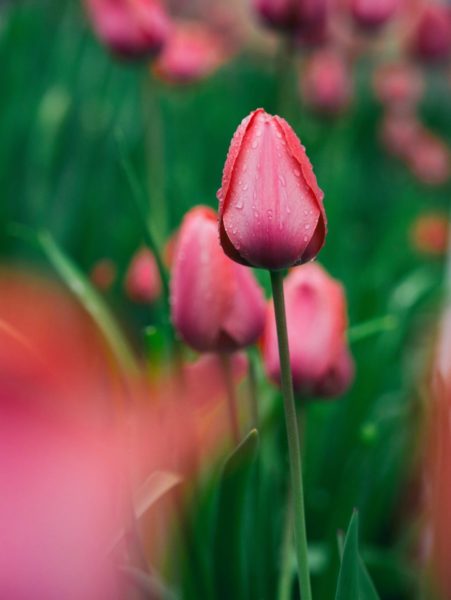
Okay, let’s imagine we are somehow teleported to the south of the Netherlands to a beautiful tulip garden. You stand there for a moment mesmerized by the beauty, and then your impulse as a photographer kicks in and you want to make an image similar to the one you see above.
Let’s ask some questions now and we will be able to come up with a good set of settings on our own. Just got to ask the right question.
How is the light?
It’s still early in the morning. The dew hasn’t settled yet. The light is soft and ample but not overpowering.
What is the most important feature of the image?
The shallow depth of field. Notice the flowers in the foreground and in the background are all soft and out of focus. Just one flower, in particular, is in focus, enveloped in the morning mist.
So which exposure setting should you set first?
The aperture value. Since that is what controls the depth of field of the image. We want very little of the frame in focus so a smaller aperture value is preferred. f/1.8 or f/2.8 should work just fine.
What to consider next?
This morning the air is pretty still, not very windy. So the flowers and the plants are not swaying too much. In other words, there is little motion in the scene. We could get by using a shutter speed of about 1/125th of a second.
What about the ISO?
Having already set the aperture value and the shutter speed, I can see now that at ISO 200 I am one stop short of a correct exposure as reported by the onboard light meter. So by bumping up the ISO to ISO 400, we have the perfect set of settings.
All you need to do now is frame up your shot, focus correctly on the flower, and click.
Now you tell me, was that really hard?
Let’s do another one!
Let’s say now you want to shoot this image below.
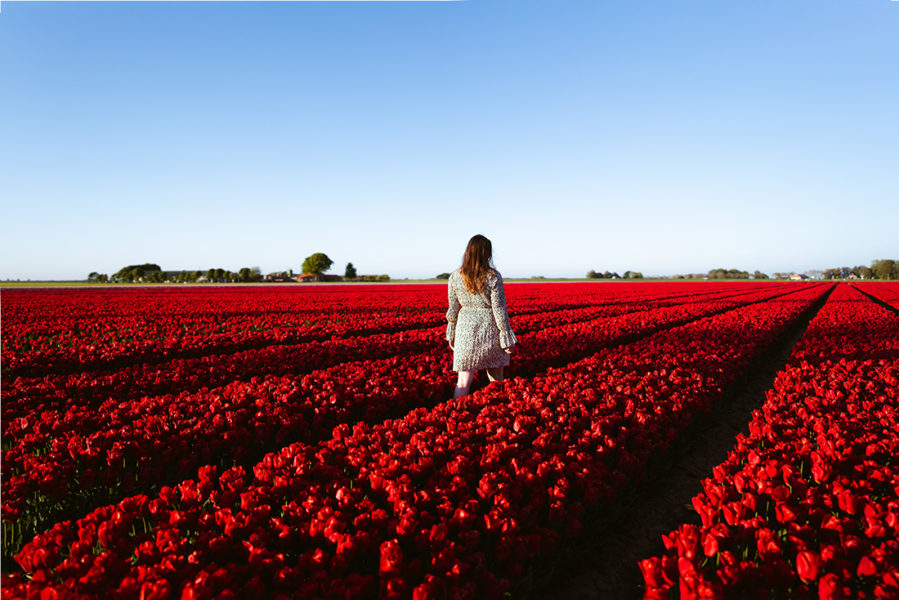
You ask your beautiful girlfriend to walk in the frame. Her white dress makes a quite good contrast to the red flowers all around (extra marks for that). The big blue sky forms a nice backdrop for the entire scene.
What are the settings you need to readjust to make this image now? Let’s go through the questions again.
How is the light?
It’s a little later in the day. The sun has come up now. The overall amount of light has increased since our last shot.
What is the most important feature of the image?
One very important difference between the previous image we took and this one which we are trying to make, is the difference in the depth of field of the photographs.
This image has a much deeper depth of field as compared to the last image we took which had only the one flower in focus. Here, we have nearly the whole frame sharp. From the flowers in the foreground to the trees in the background, everything is sufficiently in focus.
To get the focus to be this deep, we need a much higher aperture value. I imagine f/11 should be enough.
Now we need to do some math. We changed the aperture value from f/2.8 to f/11, this decreases the light allowed inside the camera by two full stops. Remember this.
What to consider next?
Obviously, the shutter speed.
The entire frame has just one moving element, your girlfriend. I imagine she is just strolling around, so still not too fast to make much of a difference. 1/125th of a second should pull through.
What about the ISO?
You reduced two stops worth of light by choosing a high aperture value. Now you need to make up for that lost light.
You used ISO 400 for your last shot, now for two additional stops of light you need to use ISO 1600.
But wait!
Since the sun has come up a bit now, you have comparatively more light to play with.
The amount of available light has gone up. So for the same set of settings, more light should enter the camera. Choosing a higher aperture value requires us to add more light, but the sun has brightened up the scene and that has reduced the requirement by one stop. We kept the shutter speed the same, so the only handle left to adjust exposure is the ISO.
To add one stop of light more, we need to bump it up, not to ISO 1600 anymore but, just to ISO 800.
The sun basically adds in one stop worth of light in this case. Had that not been the case, we would need to use ISO 1600.
You get the picture now?
Few Misconceptions To Avoid Here
- You need not make readjustments using just one of the elements of the exposure triangle. You can always distribute the amount of change you need among the two other elements. For example, if you need two stops of extra light to make the correct exposure, you can slow down the shutter speed to allow one additional stop and then bump up the ISO value to add another stop worth of light. It doesn’t matter where the light comes from as far as the exposure is concerned, remember? So naturally, always use the handle which helps you keep true to the composition you actually want.
- Bumping up ISO should in theory add more digital noise to the image and make it look grainy. However, this varies greatly from one camera to another. Modern sensors do a great job at collecting light and hence, the amount of noise introduced even at relatively high ISO values such as ISO 2000 or ISO 3000 is very minimal. You should anyhow shoot a few images dialing up a higher ISO value each time to find out the limit till which the amount of noise is acceptable to you.
Conclusion
That is it, guys. That is all you need to know about the infamous Manual mode.
I know it has been a long read, but I only wanted to be thorough with you and tell you the reason why we are making a change instead of mindlessly spoon feeding you the answer for a particular situation.
To be a great photographer you need to know the basics so well that you are able to make new rules for yourself.
Now you know that there is absolutely no reason to look at Manual mode with fear and confusion. It is just another way to configure your camera which allows you to shoot the images you want.
It is ALWAYS okay to use any other mode you want as long as the images you make are to your liking.
Just as using the Manual mode doesn’t make you a great photographer, NOT using it does not make you bad either.
That is it from me this time. I will meet you again in the next one.
Keep shooting beautiful.
This is now a teeny tiny blog trying to compete with the big guys. If you liked what you read, please take a second to share it. It would help me a lot. Thank you.
