Bracketing in photography is the process of taking multiple images of the same scene, each taken with a slight change in camera settings with the hope that one of them turns out “correct”.
Bracketing is also widely used to create a bunch of images of the same subject, each with some amount of favorable qualities and then later combine them all to make one consolidated image which compiles all the “good qualities” into one image.
Sounds a little difficult and pointless?
Well, stay with me here. I assure you it is not as hopeless as it seems at the first instance.
Let’s first back up a little and find out where the idea of bracketing came from.
The Film Days
As with countless other things in digital photography today, the concept of bracketing also filtered down from the days of analog/film photography.
In those days there was no way to look at the images you just took. Absolutely NO chimping! You had to wait at least a week or two while your film roll gets developed and printed on photographic paper.
So any mistakes you made while taking photos was almost never forgiven. By the time you knew you did not expose properly or you missed the focus on the eye, it’s already too late.
Enter the concept of bracketing.

Initially, it was just a form of security in numbers.
So now whenever the photographer found himself in a tricky lighting condition where he did not know if he is blowing the highlights or losing details on the shadows, what he could do is take multiple images of the same scene by just varying the exposure slightly.
This basically increased the prospect of getting at least one of them to hit the mark greatly.
Makes sense right?
Evolution Over Time
Although the primary reason for using bracketing was to ensure proper exposure of the image, with the advent of digital photography, reasons for using bracketing has changed a lot too.
You see digital copies of images lends itself to a far greater degree of image editing and manipulation than their analog counterparts.
So now instead of just making sure you exposed the image properly, you can use the bracketing feature to make sure you get your focus right or even better combine many images together to make an extremely detailed image which could be printed large enough to cover the face of a building without breaking a sweat.
High Dynamic Range (HDR) photography is yet another thing that also requires bracketing.
What is HDR you ask?
Well, an HDR image is one which is a product of integrating a number of images of the same scene, each taken with a slight variation in exposure.
The process of creating an HDR is pretty simple and straight forward:
- Take a bunch of images of the same scene, each with a slight variation in exposure. Say you take three images with a difference of 1 stop of light in between. So one ‘correctly’ exposed image, one underexposed by a stop and the last one overexposed by 1 full stop. As you would expect, static subjects work best in this case.
- Gather all the photographs together and combine them together using any post-processing software you like.
- Tinker with the settings until you like what you see.
The only rationale behind making an HDR image is to be able to capture a broader dynamic range than the camera can natively see.
Think of the process this way.
When we take a relatively underexposed image, what we are trying to do is protect the highlights. Make sure that they are not blown out and contain a sufficient amount of detail. At this point in time, we do NOT care about the shadows of the images at all. In all probability, they will be underexposed so much that harnessing many details from them will be an uphill journey anyhow.
Similarly, when shooting an overexposed image next, all we care about is bringing the shadows to prominence. Exposing them properly so as to gather as many details as possible.
The grand idea now is to use all three images and their properties to create one image with a much broader dynamic range.
Think of the dynamic range of as the difference between the darkest and the brightest part of an image.
So in the final consolidated image, we create the shadows using the initially overexposed image. For creating the highlights we use the underexposed frame and for the mid-tones, we use the ‘correctly’ exposed image.
You see it now?
Once you learn the entire story it does make sense to bracket your shots, doesn’t it?
Note: Just to make sure you understand the point, let me reiterate. Bracketing always doesn’t exclusively refer to exposure bracketing. Bracketing as I said before is essentially taking a few shots of the same scene with some slight variation in camera settings. These changes in settings may or may not affect exposure.
Bracketing is widely used for focus stacking, creating high-resolution images, not to mention flash bracketing, white balance bracketing, etc. So do not think of bracketing only in context with camera exposure.
Moving on now.
Let’s get our hands a little dirty and learn how to actually shoot a batch of exposure bracketed shots.
The Fundamentals
So, we need a few photographs of the same subject/scene which are all exposed differently.
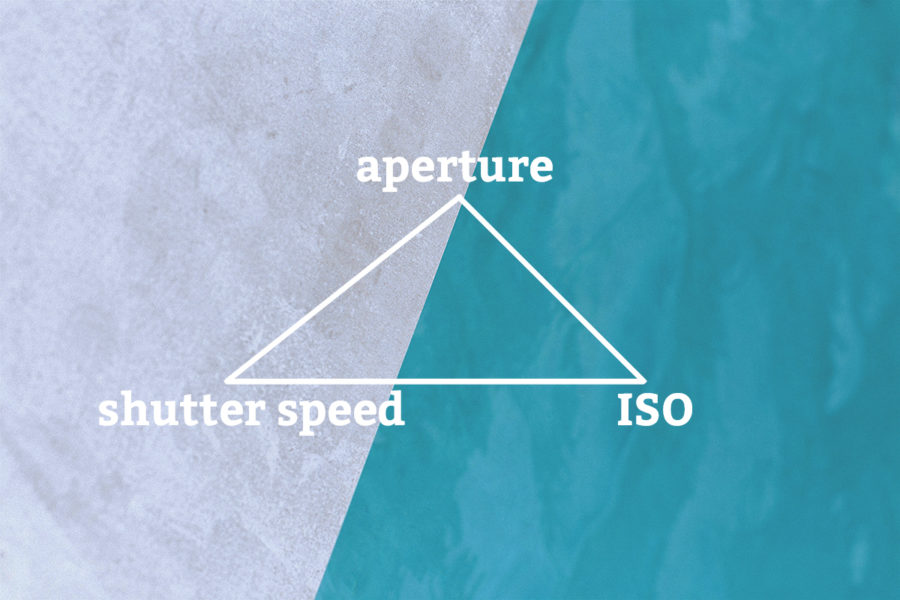
Based on what we already know about the basics of photography we can easily say that the exposure of an image could be altered by adjusting any one or more of the three primary elements of the exposure triangle; namely shutter speed, aperture, and ISO.
So, which one should we choose and why?
Here is where we have to make some considerations. There are pros and cons to selecting any of the three elements at play. Changing the settings from one frame to another will have different effects on the image.
What we should keep in mind at this point in time is that all we are looking for here is to be able to vary exposure and exposure only. We do NOT want any other changes or variations in any subsequent photographs. This will allow us to merge all the differently exposed images together later in post and make it look consistent and neat.
Adjusting Aperture
Any changes in aperture value will result in more or less light reaching the camera sensor. So, technically we can use it for our purpose of moderating exposure.
But there is a side effect to changing the aperture.
The aperture value used when creating a photograph also determines the depth of field of the image (DOF).
In other words, as you change the aperture the amount of area in front of the camera which is in focus changes. Now depending on the scene and the subject you are shooting this could be a potential deal-breaker.
Say you take the first frame with an aperture value of f/5.6. To overexpose the next shot, you bring down the aperture value by a full stop to f/4. This also results in contracting the depth of field you had available to yourself earlier. So now you will have some of the elements in your frame out of focus which was previously covered.
It may not always affect your images, especially if you work with higher f-numbers (say f/16 or higher) but it is in my opinion best to avoid using the aperture to tinker with the exposure for bracketing.
Trying to combine images with different depth of field is never a good idea.
Adjusting ISO
Changing ISO values may not be the worst idea because it doesn’t change any of the primary attributes of an image.
However, any ISO change comes with a subtle but omnipresent change in image quality and luminosity difference. Depending on the camera model you have and the capabilities of its sensor, this subtle difference may not be so subtle after all.
Adjusting Shutter Speed
I believe dialing in different shutter speeds to vary the exposure levels of the bracketed shots is the best way to go about bracketing your shots.
For obvious reasons, bracketing does not dovetail pretty well with scenes that have dynamic subjects in them anyhow. Genres such as architecture and landscapes work the best.
So, as the level of motion and movement diminishes in the scene, the prominence and effects of the shutter speed are also dumbed down.
For an absolutely still subject, such as a wall with constant lighting, shutter speed literally makes no difference at all.
Shooting Modes
Let me not push you into thinking that using the shutter speed is the only way to shoot a batch of exposure bracketed shots. You may just as well use ISO or aperture values if you please.
You know what, actually you should. Try it.
Try shooting a group of images while changing the aperture value and then another lot while changing ISO.
Later try to stitch them up in Photoshop or Lightroom and see what you get. This practical knowledge will get you much further than any theory you ever read on the internet.
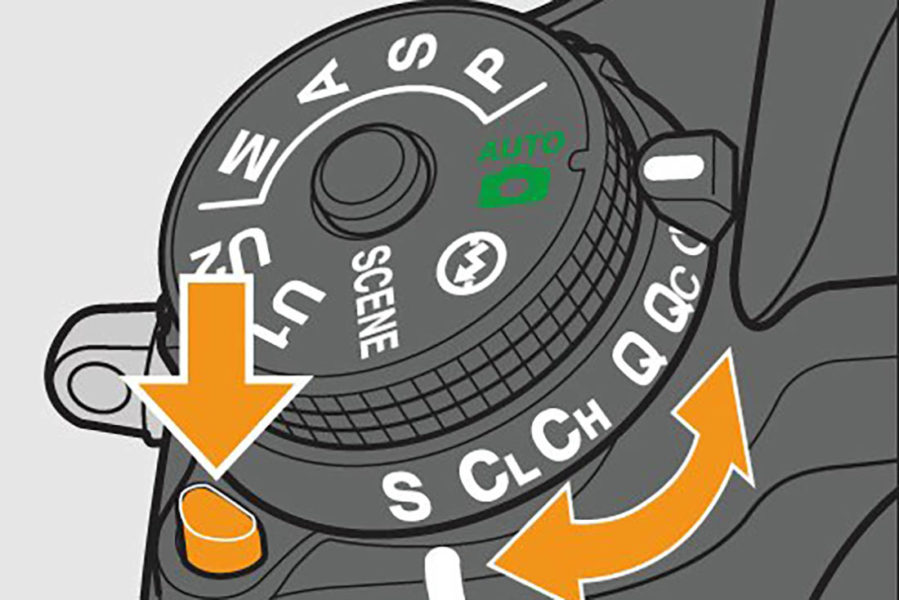
Now, let’s come back to the subject at hand. The shooting mode.
Exposure bracketing can be achieved using any of the semi-automatic or manual mode on a DSLR or Mirrorless camera.
So Program (P), Shutter Priority (S), Aperture Priority (A) or Manual Mode (M) all could be potentially utilized.
The thing that you should consider when deciding on the shooting mode is the camera setting you want to change to achieve the changes in exposure.
For example, if you select Shutter Priority, where the photographer dials in the shutter value while the camera decided the aperture value so as to attain the correct exposure. The changes in exposure of the bracketed images will be an effect of aperture value change.
This will also cause a change in the depth of field of all the subsequent images you take. As we discussed earlier you may not want to frequent this route.
My suggestion will be to use the Aperture Priority mode (A) or as Canon calls it Aperture Value (Av) mode since then the exposure is adjusted using the shutter speed of the camera.
Number of Images
Whenever you are out shooting exposure bracketed images always try and keep in mind the fact that in the end, all you want is one single image.
If you are trying to hedge the risk of inaccurate exposure by taking many shots of the same scene by bracketing, usually three RAW images should suffice.
I mentioned the image file format (RAW) because Jpegs wouldn’t allow much latitude for adjustments later in post. In especially the exposure department.
However, if HDR is what you are after. I would suggest you take at least 5 images. One ‘correctly’ exposed and two on either side.
More frames are always better for creating HDR images.
More images you have, more overlap you have from one frame to another. Smaller the jump.
This also helps maintain the smoothness and graduality of the final image. Not to mention a larger batch also allows you to make precise local adjustments that smaller groups of images may not always allow.
Exposure Increments
Image sensors these days are extremely good. Even if you miss the perfect exposure by a couple of stops and you had the good idea to shoot RAW, you may just be able to get away with it.
The last statement in no way encourages shooting photographs with inaccurate exposures.
And not just exposure, always try and get as many things as you can, right in camera itself. Will deal with it later in post is a fool’s proposition.
One to two stops of increments is ideal for any auto exposure bracketed batch of shots.
It should give you enough detail in the bag to play around during the editing phase.
Drive Mode
The camera drive mode simply is the description of what happens when you keep on pressing the shutter button after it has taken one shot. Does the camera stop taking images or does it continue to record new frames?
By default, it is set to one shot in most cameras. This means that the camera would take a single shot and stop when you press the shutter button.
You could alter this setting and set the camera to a continuous mode which makes the camera keep on taking images for as long the shutter button is kept pressed.
Continuous drive mode is what you want since this is what facilitates Auto Exposure Bracketing.
Auto Exposure Bracketing
As the name suggests, it is exposure bracketing done automatically. That is it.
And no, by doing it automatically you the photographer do not lose much autonomy at all.
Let me explain the process a little bit further.
Since for bracketing, we need a bunch of images that have nothing changing in them except for the exposure levels, we need a stable environment. By stable, I mean the camera perched on a tripod and everything else, including the subject as still as possible.
Now, it should come as no surprise that shooting a group of exposure bracketed shots handheld is a real challenge.
Unless you are a photographer extraordinaire there is no way you can take a shot, change some settings get it back up to your eye and get the same shot again. Something is gonna change for sure.
And that is going to ruin the entire batch of photographs.
Not to mention this process of shoot-change settings-shoot is really cumbersome and a giant pain in the posterior. Imagine how you would feel if you had to go through this tedious routine for more than 10 groups of images.
To get around the two problems mentioned above, camera manufacturers have come up with an automatic way of changing the settings.
Without any manual input, you can program your camera to take a certain number of images with predefined exposure increments.
So now you do not have to care about changing settings at all. You can just keep the camera to your eye and keep the shutter pressed and the camera will do all the heavy lifting for you.
You could even specify the order in which the images are taken (bracketing sequence).
So you could go, underexposed-> correctly exposed -> overexposed. Or in any other order, you like. Check your camera manual to find out if your camera supports this. This feature comes in real handy when organizing the images later for processing.
Exposure Compensation
This is venturing in a little more advanced area of AEB but is worth the extra effort if you are up to it.
Exposure compensation can be paired with Auto Exposure Bracketing to make further finer adjustments to the exposure of the images you are about to take.
Typically most cameras take one ‘correctly exposed’ image and then depending on the number of shots you selected, distribute them evenly between under and overexposed frames.
For example, say if you chose 5 frames, to begin with. The camera would take one properly exposed image and two underexposed images and two overexposed images respectively.
Now, what if you do NOT want a properly exposed image to be captured at all?
Enter exposure compensation.
Using this you can further specify where exactly you want the exposure to be at.
If this is the first time you are about to shoot bracketed images, it is best not to bother with exposure compensation much. Learn the nuances of plain and simple bracketing first before you dive any deeper into it.
Switching Off
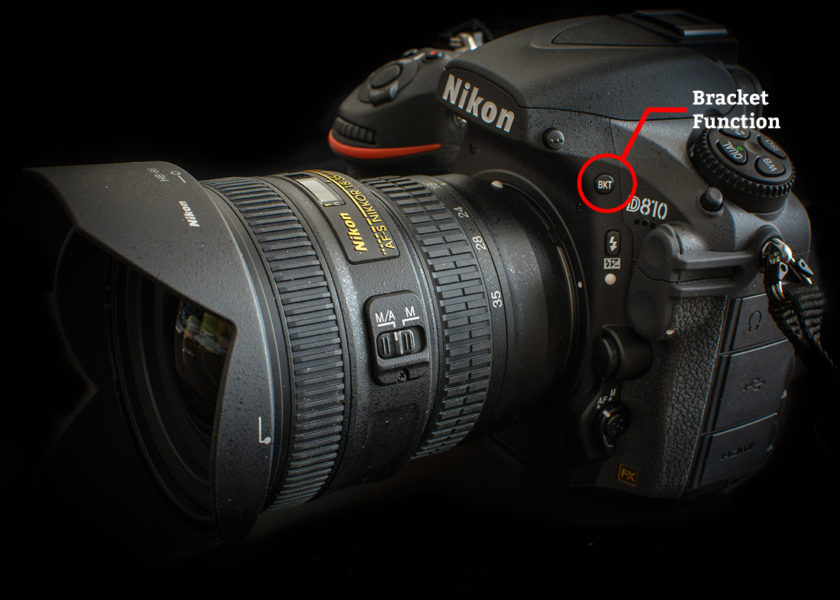
Last but not least, always remember to switch off the bracketing function once you are done with it.
Bracketing by definition implies more than a single shot for a particular scene. So if you somehow forget to turn it off by any chance, all subsequent images will undergo the same cycle of under and overexposure.
You seriously don’t want that.
Some recent camera bodies also offer the option of Auto switch off bracketing sequence. If you have it on your camera, you should definitely give it a try.
Forgetting the camera on bracketing mode is like one of those pesky little things like messing up the camera diopter setting. It is annoying like hell and it is an absolute chore to find out what the real reason for it and then fix it.

If you by any chance do not know what a camera diopter is, you should definitely give this a read. This could potentially save you a lot of time and frustration someday.
Camera Diopter | What All Photographers With Glasses Should Know
Recapitulating
I know this was one of the longer articles you had to get through. I just wanted to be as thorough as possible and make sure you understand the underlying reasons for some actions.
So let me give you a small rundown of all the things we just discussed.
- Bracketing is used for primarily two reasons: 1) When not sure about the exposure 2) To create an HDR
- You can bracket your images both manually and automatically.
- Shooting modes such as Program, Aperture Priority, Shutter Priority, and Manual can all be used to bracket shots. Just be wary of the settings used to make the changes in exposure.
- Continuous drive mode is preferred since here you do not need to press the shutter button multiple times and the camera automatically keeps count of the images you take.
- The two primary settings you need to specify to use the Auto Exposure Bracketing are 1) No of images to be taken. 2) Exposure Increments.
- Bracketing works best with static subjects. Subjects with motion such as sports and wildlife don’t really fit in very well with this genre of photography.
- Never trust your camera LCDs for being certain about your exposure. Use the camera histogram whenever in doubt or bracket you shots to be absolutely sure.
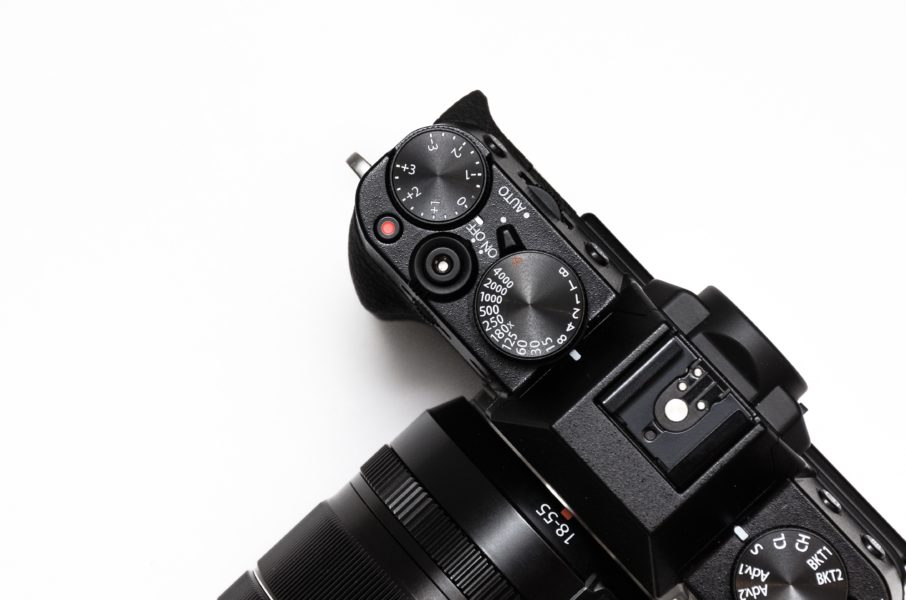
- Most semi-professional and professional camera bodies have dedicated buttons labeled ‘BKT’ or ‘AEB’. You can always use them to make your life a little easier.
- After all is done, remember to turn off the bracketing.
That is it guys, hopefully, now you have a good understanding of how exposure bracketing works and how you can use it to make some amazing HDR images or just insure your images better.
It goes without saying that you probably cannot and potentially should not try and bracket all your shots but in some tricky lighting situations this neat ‘trick’ might come in handy.
If you have any further questions, please feel free to post them below and I will get back to you as soon as I can.
Keep shooting beautiful.
Hand Picked For You
 Blurry images, photographs coming out too dark or too bright, inaccurate colors,...
- You are shooting backlit when the primary source of your light is directly facin...
- All you need to convert your old film negatives to photographs is a camera, the ...
- Exposure compensation is a simple process using which the photographer can overr...
- The P Mode or the Program Mode on modern digital cameras is a semi-automatic mod...
- Do your images often turn out to be dark or simply washed out? Here is how to be...


