The Release Mode Dial is commonly found in Nikon manufactured professional and semi-professional level DSLR cameras. It is actually a small ring-like dial located just below the actual Mode dial of the camera. As the name suggests, the Release Mode Dial determines how the camera reacts after the shutter button is pressed.
Still confused?
Okay, let me break it down for you.
Overview
Suppose you want to shoot an image of a landscape. Since the landscape is not moving and is completely stationary, you need not worry much about the shutter speed. In this case, you would probably put the camera on Aperture Priority Mode and select a large aperture value, something like f/11 or f/16 so that the entire scene is contained within the plane of focus and is hence, sharp.
Correct?
Now rewind a bit and think about why you chose Aperture Priority Mode to shoot the landscape and what was the rationale behind it. Let me guess. You chose Aperture Priority in this case since that is the mode that best fits the situation….right?
The Release Mode Dial is exactly the same. Using this, you as the photographer get to choose what the camera does after the shutter button is pressed. I emphasize upon the word “after” because the dial controls only the process that occur after the shutter button is fully pressed.
Now you might think ‘how is this even important? I release the shutter, the camera takes the image, isn’t that all?’
Apparently, it isn’t.
Like the case we discussed above where you had to change the mode of the camera to fit the situation, the shutter of the camera also has to vary and adjust with the scene, so that it provides the photographer the maximum edge to get the best image possible.
Tell you what, if you have a Nikon DSLR camera, go get it right now and then keep reading the rest of the article. As I explain the functions of the dial, repeat them on your camera and I am sure by the end of it, you will have understood it fully.
Got your camera? Let’s begin then…shall we?…
‘S’
‘S’ stands for Single Shot. In other words, when you press the shutter button fully, the camera takes only one shot and stops. This mode is widely used for shooting stationary subjects like architecture images and landscape photography. If you want to take a second image you will have to release the shutter button and press it again fully.

It is worthwhile to know that everytime you press the shutter button, the camera meters the available light again and refocuses on the subject before taking the image. If you are just starting off in photography, this may not mean much to you. Just give it some more time and you will understand why this is important.
‘CL’
‘CL’ stands for Continuous Low. I will explain the ‘Low’ part in just a second but first, you need to understand what ‘Continuous’ means here.
In contrast to the ‘Single Shot’ Mode, when in continuous mode the camera keeps on taking images for as long as the shutter button is pressed down. You frame the shot, press the shutter button halfway, the camera meters the light and refocuses and as you press the shutter button down fully, the camera starts to take images. It only stops when you release the shutter (or if your memory card fills up, or your battery dies).
The Continuous Mode is used to photograph fast, unpredictable action when the subject or the scene is changing so rapidly that you do not know when to precisely take the image. So what you do is take as many images as you can within a short burst and then select the best among them.

This Mode is regularly used by sports, wildlife and bird photographers. Since all their subjects are very fast and difficult to predict, the Continuous Mode gives them the best shot of actually having one good image.
Oh! I almost forgot…the ‘Low’ part.
The word ‘Low’ refers to the number of images the camera takes per second when the shutter button is pressed down. Generally, in the ‘Low’ setting, the camera takes one or two frames less than the maximum number of images the camera can actually take. According to Nikon, shooting slightly slower than the absolute maximum produces a better image quality. Just to give you a reference, my camera Nikon D7000 can shoot up to six frames per second but when on the ‘Low’ setting, it takes five or four shots per second only.
‘CH’
‘CH’ stands for Continuous High. Everything is exactly the same in this Mode as in ‘CL’. The only difference is, this Mode takes the maximum number of images the camera body can take in one second. So if I were to use CH Mode on my camera (Nikon D7000), it would take the maximum of six frames per second than the four or five it took when on ‘CL’.
Easy enough?
‘Q’
To be absolutely clear, this is NOT the one James Bond refers to as his boss. ‘Q’ here stands for Quiet Shutter Mode. But when compared to the really silent and almost sublime mirrorless models (I still love DSLRs), it makes quite a bit of noise when taking an image. This is mainly because there are many mechanical parts inside the DSLRs which need to move and adjust before the camera can take the shot. The most prominent of which is the 45-degree mirror inside which needs to flip up so that the light can reach the image sensor. The Quiet Mode, when selected, tries to reduce the noise created by the camera as much as possible.

What this Mode essentially does is flip up the mirror as quietly as possible and then holds it there even after the shot is taken but the shutter button not released. Even though the Quiet Mode is really not that quiet, it does help a little when shooting in places where loud clicking sound may be an issue, for example, a library or a hospital.
A Small Clock Symbol
The clock symbol stands for Self-Timer Mode. I am pretty sure you already know what this Mode does, it delays the time between when the shutter button is fully pressed and the camera actually takes the shot. In Nikon cameras, the default delay is 10 seconds. The autofocus assist bulb in front of the camera would start blinking along with a timer sound as soon as you press the shutter button fully to let you know the time remaining before the camera takes an image.
Just to let you know, you can totally change the default delay to be any time period of your choice. What you can also select is the number of shots the camera takes and the interval between them. So now you can mount the camera on a tripod, frame the shot and release the shutter and then come back and join the group. If you choose say 10 shots with 2 seconds delay between them; once the camera starts taking images you can change your poses within those 2 precious seconds and take 10 images in quick succession. No need to repeat the process 10 times.
Since Nikon’s software is a little different for nearly all the types of DSLRs it manufactures, there is no one way of doing this for all the camera bodies. You have to fidget with your camera manual to find out how to do this on your camera. It should be pretty easy though.
Remote Symbol
If you look closely at the front of the camera, where the camera’s model number is written, you will find a small circular black dot. This is actually an infrared receiver. When the Release Mode Dial is used to select the Remote Mode, this infrared receiver is activated so that you can use a wireless remote controller to fire the shutter.
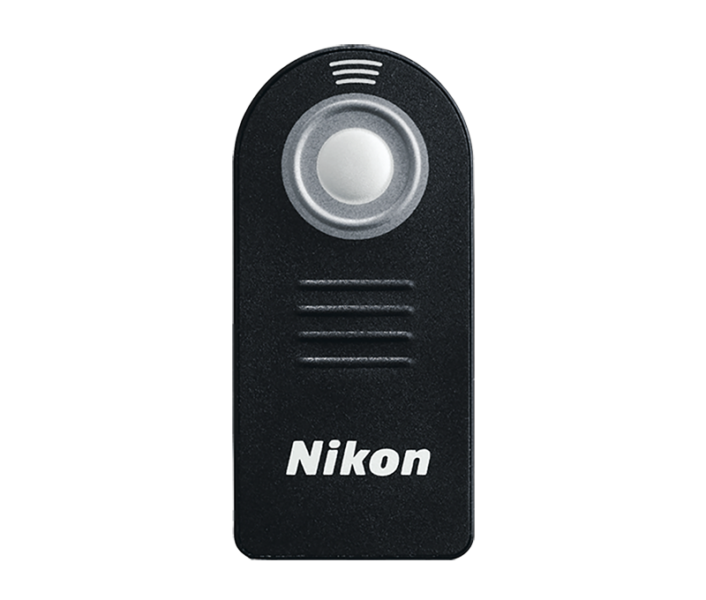
Nearly all Nikon DSLR cameras are compatible with the Ml-L3 wireless remote controller. You can use the controller to remotely trigger the shutter when away from the camera, like when taking a self-image. Or you can also use it during long exposure shots or while taking macro shots when the camera needs to be perfectly still to avoid any blur or camera shake.
MuP
This is the abbreviation for the Mirror Up Mode. Apart from making quite a bit of noise, the mirror is also responsible for introducing an extremely small amount of camera shake. You see when you press the shutter button on a DSLR, the 45-degree mirror inside has to first flip out of the way to let the image sensor behind receive the light. This ‘flip up’ of the mirror may sometimes give rise to some camera jerk.
In our day to day normal shooting, we would never notice the slight blur since it is next to negligible but in certain scenarios, it can be the difference between a good image and garbage. A very easy example when this slight vibration might show is long exposure shots.

What the Mirror Up Mode does is, it lets the mirror flip up out of the way before the image is recorded. This happens in two steps.
- Keeping the MuP Mode selected when the shutter button is pressed the first time, the mirror is flipped up and locked into its place. But no image is recorded still.
- In order for the image to be recorded, the shutter button has to be released and then again pressed fully to activate the image sensor.
Since the flipping up of the mirror is decoupled with the taking of the image, the image would now have no camera shake whatsoever. Just remember that when the mirror is locked up you will not be able to look through the viewfinder; so always frame up your shot before you press the shutter. Also using a wireless remote or a cable release is advisable to shoot long exposures since pressing the shutter twice is potent enough to create that slight amount of blur you are trying to avoid.
Wrap Up
That is all you need to know folks about the all-powerful Release Mode Dial. Use it, play with it and just create beautiful images.
Keep shooting amazing.
