It’s already the peak of the digital revolution but since you are here, I have a strange feeling that you either still shoot film or have a ton of old film negatives lying around which you want to digitize before they go bad.
Good decision.
I am a 90’s kid myself and a bulk of my own childhood was shot on film, so I totally get it. In fact, my first camera shot film. I wonder where those films are?
Anyhow, let’s get on with today’s agenda of digitizing film as cheaply as possible while striving for the highest quality.
The basic process I am going to explain now is pretty simple and straightforward. And the best part? You can do it all for the princely sum of ₹0 ($0).
FREE, FREE, FREE!
Having said that I should clarify although the free route is possible and it gives you more or less the same final quality, it is a little cumbersome and hard to repeat. So if you intend to use this setup for a long time or have a lot of films to digitize, I would advise spending a little bit of money on the bare minimum which would make the process much simpler, consistent, and reproducible.
I will mention both the FREE and the paid options for each step. You can pick and choose your own strategy.
Let’s begin then, shall we?
The Blueprint
Here is how we are going to go about the process.
Think of the film negative as a piece of plastic that has the light information recorded in it but in an inverted format. This just means that the darker areas of the film represent a bright part of the actual photograph and vice versa.
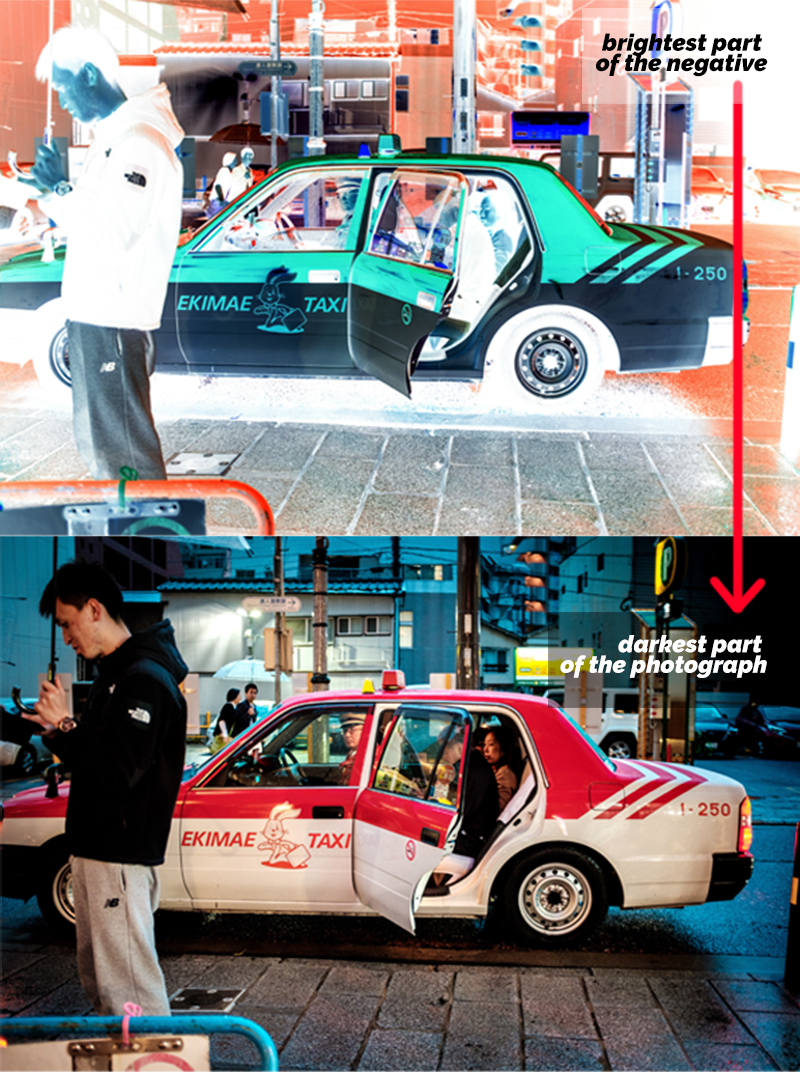
To produce an image out of a negative, all we need to do is invert it (make it positive). But before we can do that, we would need to be able to feed the film negatives’ information into our computer so that we could process it.
Wondering how to get the negative on your computer? Well just take a picture of it against a bright light source. Done!
All that is left to do is process this new photograph of the film using an image editor such as Adobe Lightroom or Photoshop, few clicks here and there, and presto manifesto, you have a fully digitized image.
Simple, isn’t it?
Let’s explore these steps in a little more detail now.
Bright Background
Free Option: A white screen of any kind. You could use your phone, tablet, or computer screen for this.
Paid option: Dedicated Lightpad ($30 – $120)
To photograph the film and bring out the details as much as possible, you need to light it with a powerful backlight.
I did mention a dedicated light pad for this but you can just as easily use a phone or a tablet screen for this. Just make sure that the screen is completely white and the film is placed a few centimeters above the light source.
You just need a uniform source of light, as long as you can get it, it is going to work just fine.
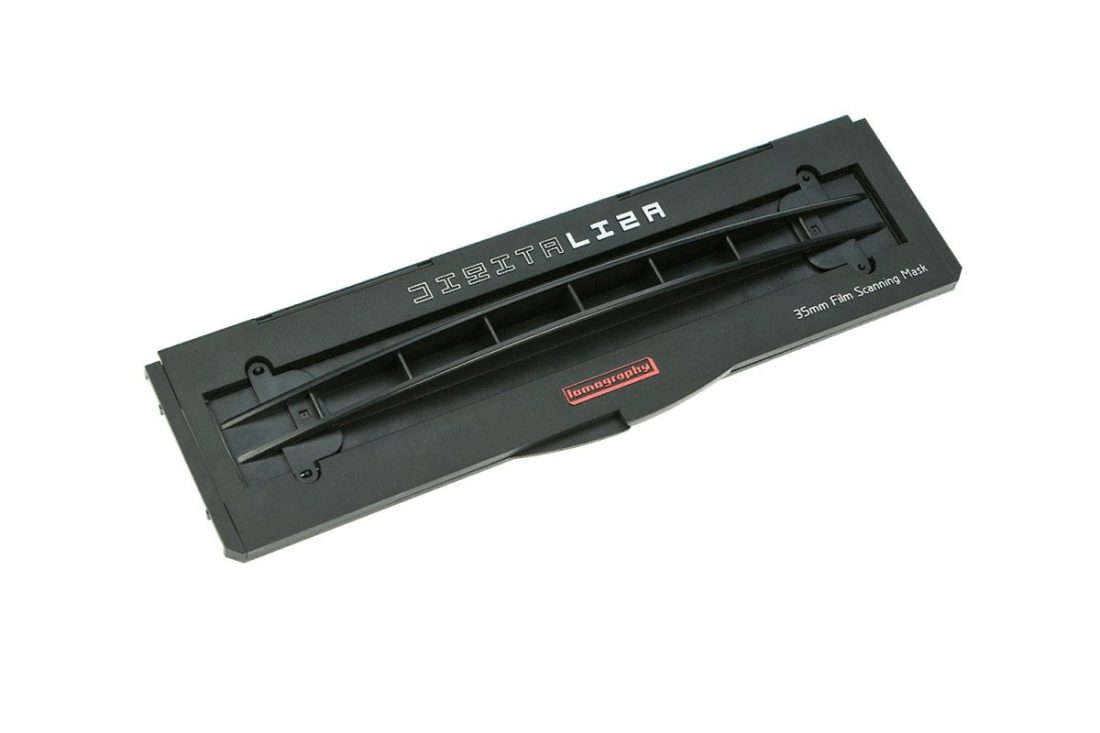
Hold The Negative
Next, we need a way to hold the film above the light.
Not just that, we also need to ensure that the film negative is not crumpled or wavy but held perfectly straight, equidistant, and parallel to the light source.
Free option: Use some books or just two pieces of wood to grip the film in place over the light. Just get creative.
Paid option: Use a scanning mask. It is nothing but a glorified holder which holds the film along its edges and keeps it perfectly flat.
Rooted Camera
Next, you need to get your camera looking down on your film from the top. Just like how you do while taking overhead shots.
A tripod is a must for this step. You could do this handheld, but if you have a lot of films to process and/or need to scan films quite regularly, a tripod is the easiest way to buy some much-needed consistency.
Just set up your camera on the tripod, make sure that the camera is parallel to the film, and you are good to go. To check the level, you may use either a physical spirit level or the inbuilt digital level found in nearly all cameras these days.
It really doesn’t matter if the camera casts a shadow on the film. We are going to turn off all the ambient light in the room anyhow and backlight the negative.
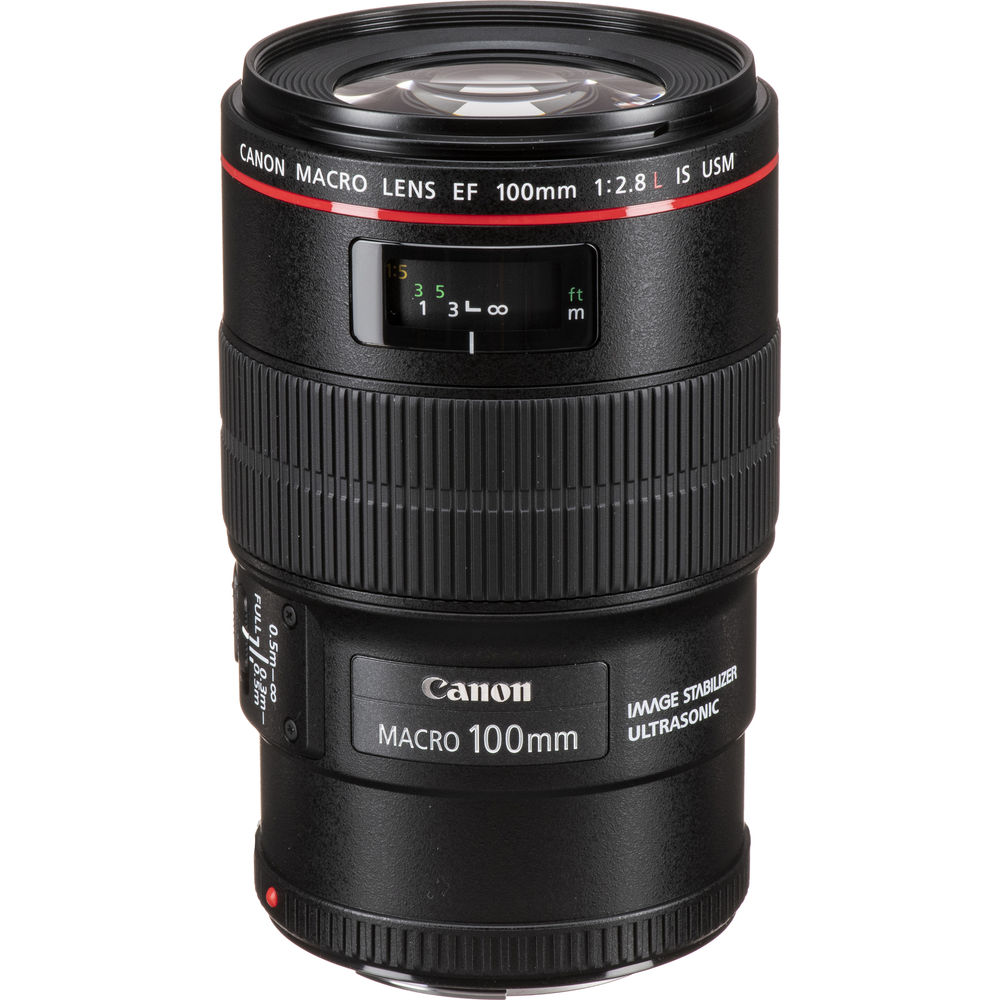
Lens
For this process of digitization to work, the selection of lens plays a crucial role.
That is because, in effect, when photographing the film using a second digital camera what you are doing is blowing up the details of the film and recording it using a digital medium aka the digital sensor. No points for guessing, the best fit for this purpose is a lens which is designed to magnify small details of the subject and make it look bold and prominent.
Any particular lens comes to mind?
Yes indeed! A macro lens.
But what if I don’t have one?
In that case, you could do one of the following (Free options):
- Take a high-resolution image of the film. In the process, get as close to the film as possible, exploit the whole minimum focusing distance, and then later crop out the unwanted parts. Read: How To Upscale Your Images By 200% For Free | Super Resolution
- Use the Reverse Lens trick to temporarily convert your existing lens into a macro lens.
- Use the Macro mode on your camera if you have it.
Camera Settings
Full Manual is the need of the hour. And before you ask, yes even the focusing is better done manually.
But why?
Well, because we are going to shoot the film in a completely controlled environment. From the camera to the subject (the film in this case) and the lights, all will be subject to it. So it is quite obvious that we would want the camera to use the same set of settings for all the films we shoot in a single batch.
If you do not use the Manual Mode, the camera might just keep on changing the settings from one exposure to the other, thereby producing wildly different final results.
As far as the question of focusing goes, an aperture roughly between f/5.6 to f/11 should produce enough depth of field to keep the film sharp. And since the relative distance between the camera and the film remains unchanged throughout the shoot, the focusing doesn’t need to be readjusted with each exposure.
As always, use the lowest possible ISO value you have on your camera that is ISO100 in most cases.
Lastly, depending on the brightness of the light source you decide to use, select a shutter speed that exposes the film correctly. You may want to look at the image histogram at this stage to make sure that you are not accidentally over or underexposing the image.
You may be forced to choose a slow shutter speed to expose the image properly since you already selected a rather large aperture value and a low ISO number. But do not worry too much, your camera is attached to a stable tripod anyhow. As long as you do not stumble on it during the exposure, you are going to be just fine.
Negative To Positive
Okay now that we have a digital image of the negative, we need to make a positive image out of it.
As I discussed earlier, this requires us to just invert the image. To do this, you have two primary options:
- Free: Manually convert each image to positive (you can do this in Photoshop, Lightroom, or any other image editor you currently use)
- Paid: Lightroom plugin which does the heavy lifting for us.
Let us first discuss the paid way since this is obviously faster and simpler.
Honestly, the manual method (free) is also not very tedious just that it may turn out to be a little time consuming if you have a lot of films to convert.
The paid plugin I would suggest for this job is called Negative Lab Pro ($99). It is a pretty simple-to-use tool, which converts the negative images to positive using just a click. Here is a walkthrough presented beautifully by YouTuber Darryl Carey.
If, however, you are on a budget and do not want to spend on the plugin, you can get by shifting some slides on the editor. Here is how to go about it:
I would like to just add one small thing to Sam’s video above. If you want to repeat the process for multiple films, you can create an action for yourself and thereby reduce a huge chunk of the processing time.
Personally, I have tried both methods and with some tinkering have been able to get good results with both. You can’t go wrong with anyone of them.
Finishing Off
Just a few small things to keep in mind while you convert your film stock to its digital counterpart:
- Remember to keep your work area clean and dust-free. Any small speck of dust is going to show up in the magnified image of the film later on. Use a blower judiciously and maintain a clean environment.
- Try not to use the shutter release on the camera to fire the shutter. This may cause camera shake and may result in a blurry image. Instead, use a remote or Wifi trigger if you have one. Many intervalometers these days also double as an excellent remote shutter release, so look into them if you have about $20 to spare. If all the above is too much hassle for you, just use the camera’s inbuilt self-timer.
- Shoot RAW and not Jpegs. This will help you extract the best out of your negatives during post-processing later.
- Keep track of the histogram at least for the first few shots to make sure you are nailing the exposure correctly. This is very important.
- To be extra careful, you can even bracket your shots. This is almost never required in real life but I am just letting you know of this option, should there be any nagging doubts.
- The best results come when during this process we let the camera capture only the light that passes through the film. Any ambient light present in the room or even the backlight shining into the camera may deteriorate the quality of the final image. So make sure to do all the photographing in a dark room and if possible tape up the backlight from where you do not need the light.
That is it, guys. That is all you need to know to digitize your own films at home with almost no extra pieces of equipment.
I hope this guide helps you in some small yet significant way.
If you have any questions, please post them below and I will be glad to answer them for you.
Keep shooting beautiful!
