Yeah, I know how you feel.
You wish you had that camera body with a bigger better sensor capturing crazy amount of details, but alas you can’t foot the bill. Sound’s like a broken record, doesn’t it?
It’s always the same. The price tag pokes its ugly head into everything nice, and it just seems that people with more money just get by with anything and always have massive advantages over us mortals.
Not this time though.
Today I have for you a way you can upscale your images up to four times for FREE!
Just to put that in perspective, even if you have a camera body that shoots 12 megapixels images, you could create a stunning 50MP high- res image with this method.
And the good news just doesn’t stop there. The final image will have noticeably less amount of noise grain, will be much much cleaner with greatly enhanced details, dynamic range, and practically no moire at all.
No, you do not need to run off to get a new body or a lens or, for that matter, ANYTHING at all. We will make magic with the gear you have, at this very moment. Data and statistics is what we are going to use.
Sound’s too good to be true? Well, trust me this time it is true.
Sometimes good things do happen to good people after all.
So, what do you say? Shall we start with it already? We have some ground to cover.
I need to clear just one more thing before I start for the sake of transparency.
Using the method I am about to show you, you cannot bump up the resolution of any image you already have. This process of upscaling requires multiple images of the same scene to work. So if you were considering to use this method to up the resolution of any old image, I am truly sorry to say, that wouldn’t be possible.
On the other hand, if you just happen to have more than a few shots (need at least four) of the same scene and want to use them for this method, well you are in luck.
Now, we are ready. Here we go…
Basic Overview
Although it seems that we are creating data about details from thin air, in reality, it is not so.
The process is very simply intended to first create a huge data bank about the same essential picture. Using math and statistics (don’t worry you don’t have to go look for a calculator), we would average the data we have about each of the regions and take the best available to build that part of the image.
Without making this look too overtly complicated, all I want you to know is this.
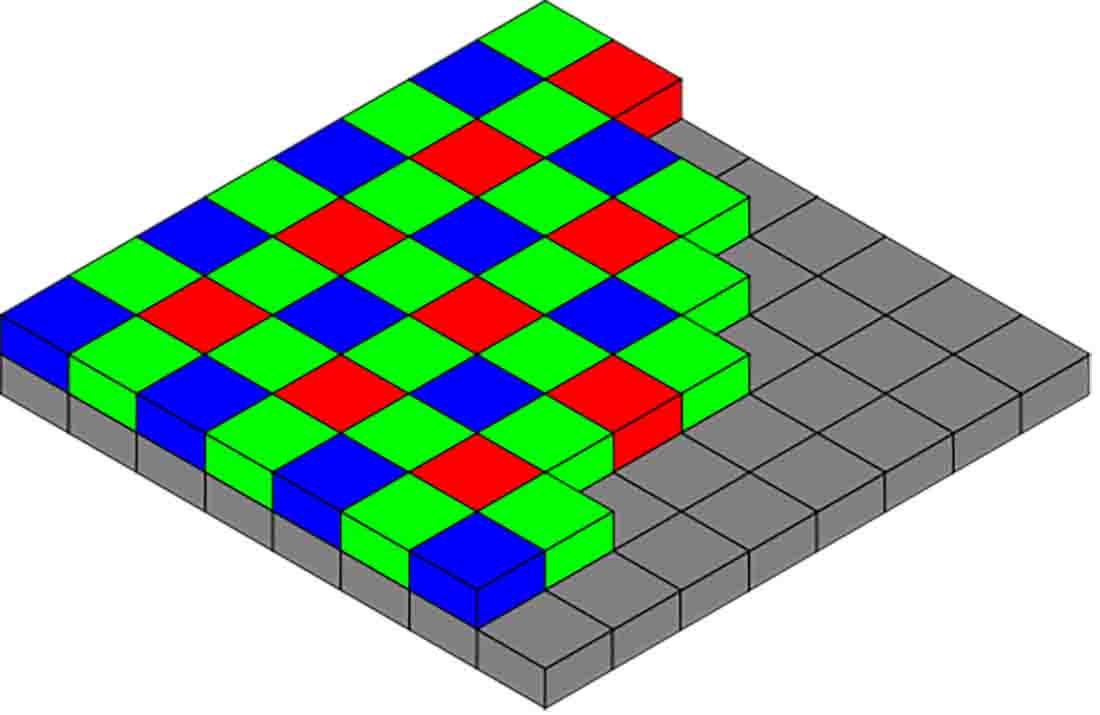
You already know that your camera image sensor is made up of photosensitive areas called pixels right? Each pixel on your sensor is capable of recording data about a single primary color (red, green, or blue) only.
So when you use your sensor to take a single image, what happens is that each of these pixels record data about one color of a specific location only. So the data about say the bottom left corner of the image comes from a single pixel of your sensor.
By using a bunch of images of the same scene, we are trying to shuffle what each pixel of your sensor gets to record each time. So maybe on the first shot, a blue pixel records the bottom left corner, maybe next time you shoot the same area using a green pixel. On the third try, maybe the data is recorded using partially a red and a blue pixel on the sensor.
You get the idea right?
Once we are done shooting, we intend to average out the data we collected over all the images and use it to create a high-resolution image that is built with all the good data we collected.
It is as simple as that. No mumbo jumbo, no black magic.
So let’s continue to prepare our first shoot, shall we?
Shooting The Photographs
To be frank, the shooting process is not very different than how you shoot normally anyhow.
However, there are some key things to keep in mind that would ensure that we have the best possible chance of gathering good quality data which is at the heart of this method.
Lens
Practically any lens would do.
But since we are trying to gather as much details as possible and then planning to pump them up later, any lens which furthers this cause is naturally favored.
Try and shoot using prime lenses if possible, instead of a zoom.
Since prime lenses have nearly no moving parts, they tend to be much superior optically as compared to a zoom lens. Don’t worry you won’t have to break the bank to get one for yourself. Lenses like the 50mm f/1.8 or the wider 35mm f/1.8 are really cheap these days (about ₹7500 or $100).
If you are new to photography and only have the kit lens at this point, I highly suggest you invest in either of these prime lenses. They would single-handedly improve the quality of your images more than you can think. Read these posts which would further explain my point:
- 6 Reasons Why The Nifty Fifty Is The Next Upgrade From Your Kit Lens
- Is The 35mm Lens A Good Lens For Travel Photography?
Aperture Value
Keeping in line with our objectives above, an aperture value between f/5.6 and f/8 seems to be the optimal choice.
Most of the lenses tend to be the sharpest at these values and they also create a good amount of depth of field which would fit many compositional needs, very neatly.
Shutter Speed
Depending on the subject you want to shoot, any shutter speed which doesn’t allow motion blur or camera jerk to creep into the images is just fine.
Just keep in mind that we would be shooting handheld. NOT on a tripod.
If you are having a hard time selecting a specific shutter speed, just use the simple Reciprocal rule. Its fast, simple, and frankly it just works.
ISO Value
Use the lowest value that allows you to expose the image properly. That’s it.
Lighting
Since image details are the currency of the day, I don’t suppose you need me to tell you that well-lit subjects are gold at this point of time.
Better the subject and the scene is lit, better are the chances of you recording them with your camera.
So choose the scene you want to shoot for this method smartly.
Just one little thing. Since we would be shooting a bunch of images at a time; it is preferred that the lighting stays the same in between shots. In other words, stay away from scenes with rapidly changing lighting such as rock concerts.
Before You Press The Shutter Button
We have already optimized our entire shooting process that favors our purpose.
Focus your camera properly and once you are happy, set the focus mode to manual. You do not want the camera to refocus during the burst. If you use Back Button Focusing (which you should definitely try!), let go of the focus button once you are satisfied with the focus.
For the composition, keep a little space around the image which could be cropped later. You would understand why in just a bit.
All you have to do now is to put your camera into continuous shooting mode (also called burst mode) and shoot a bunch of images. About 20 consecutive photographs are more than enough.
You may want to take some test images before you start shooting on burst to make sure of the exposure and the composition you want. Double-checking your camera histogram to ensure the exposure is definitely a great idea now.
Hold the camera as still as you can and control your breathing when shooting. Remember you still don’t want motion blur infested images.
Oh, one last thing, RAW files would give us the best chance of recovering details later in post. So, shoot RAW and NOT Jpegs.
Your natural body movement should give us the amount of necessary movement we need for this method to work.
That is it. That is all you need to do in the shooting department.
Press the shutter down and shoot some images.
Now, we need a computer.
Open Lightroom
The sole purpose of using Lightroom at this stage is to be able to cull out and sort the images you just took.
Go through all the images, one by one and make sure you weed out any blurry shots or images which have missed focus. This is crucial for the method to work properly.
When you are done selecting the images, you may edit the images to your liking.
Editing at this stage (and not later) is encouraged since you would be actually editing the RAW files.
Just make sure of one thing. Apply any edits you make to ALL the images in the group. There cannot be any inconsistencies among the images you export to Photoshop later.
Pick one image to edit and once you are done, sync the editing to all the other photographs.
Now let Photoshop take over.
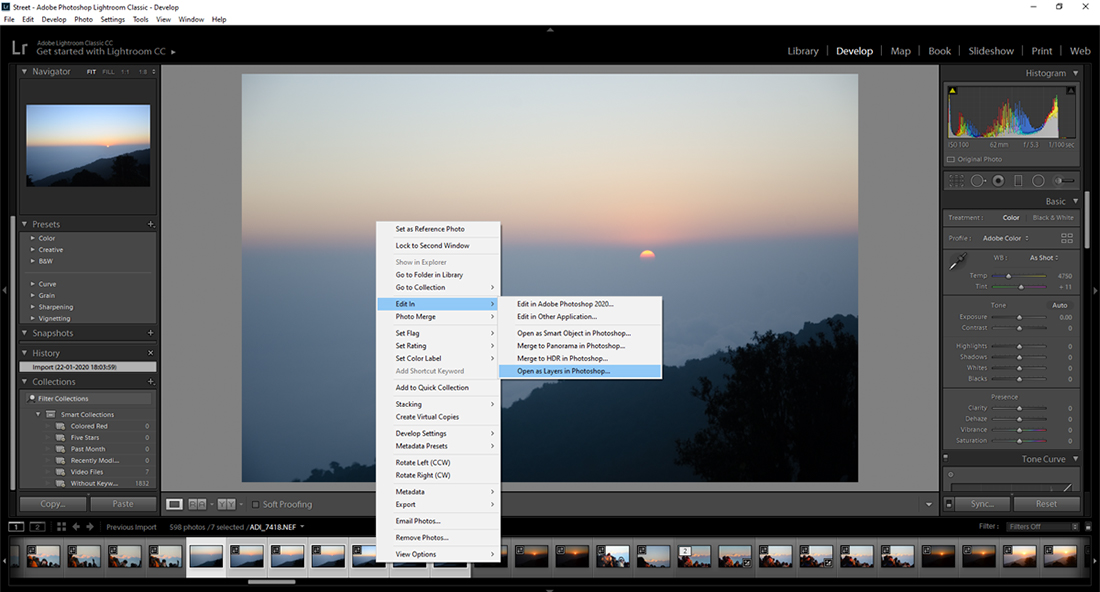
Select the images > Right Click > Edit In > Open As Layers In Photoshop.
Firing Photoshop
Depending on the number of images, the size of each image file and your computer’s computing power, this will take a while.
Just be patient and let it happen at its own pace. It’s not as if you could do much about it anyways.
Once all the images are loaded into Photoshop, the first thing that you need to do is set the target resolution of the final image.
Increasing the resolution about four times seems to be the sweet spot for this method.
So navigate to Image > Image Size. A new dialog box will open.
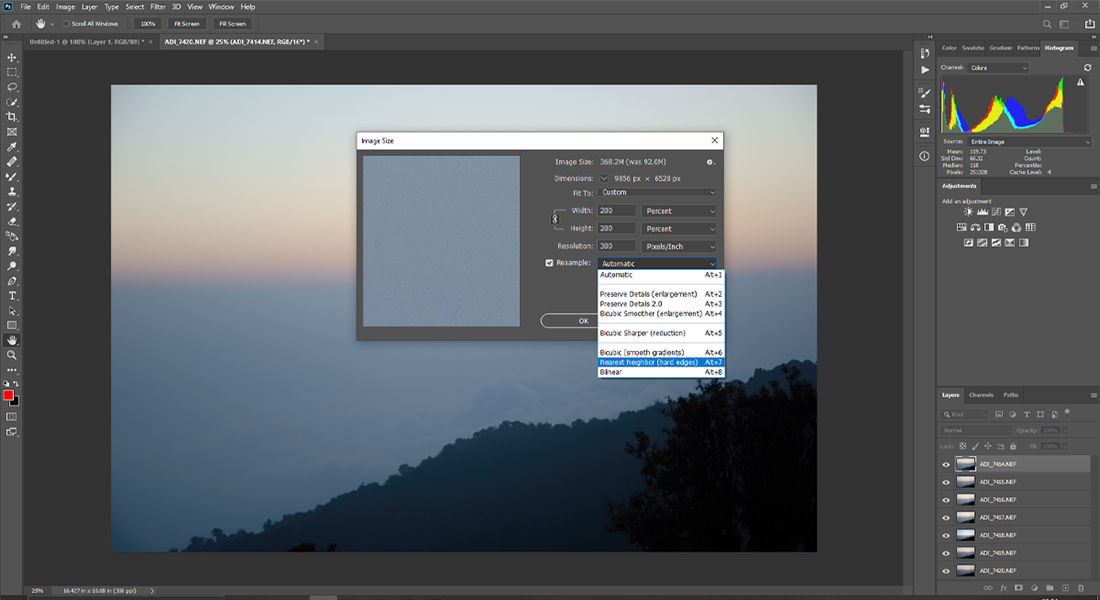
Change the units to ‘percent’ and then dial in the value ‘200’. Increasing the length and the width of the image by 200% is the same as upscaling the image four times.
Before you close the dialog box though, check the resample box and choose “Nearest Neighbor (hard edges)” as the resampling algorithm.
Click Okay. Wait.
Once this is done, the resulting image would look no different than the ones we started with. We need to do a little more.
Select all the layers. Go up to Edit > Auto-Align Layers
Keep the Projection as ‘Auto’ and uncheck the Vignette Removal and Geometric Distortion.
Photoshop will now align each layer using the enormous amount of subpixel data we have given it. It would look at each pixel of each image and place it in such a way so that it aligns with the previous image in the last layer.
Yes, I am trying to distract you so you don’t notice the fact that this step takes a good amount of time to complete. Come on Photoshop! You are making me look bad here.
Once this is finally done. Check if the layers are indeed aligned properly.
Start to turn off a few layers from the top. This means switching off the layers’ visibility (the eye icon) and see if the image looks to move much. If it does, you may have to do some manual aligning yourself.
Happy with the aligning? Let’s keep moving then…
Select all the layers again and then right-click > Convert to Smart Object.
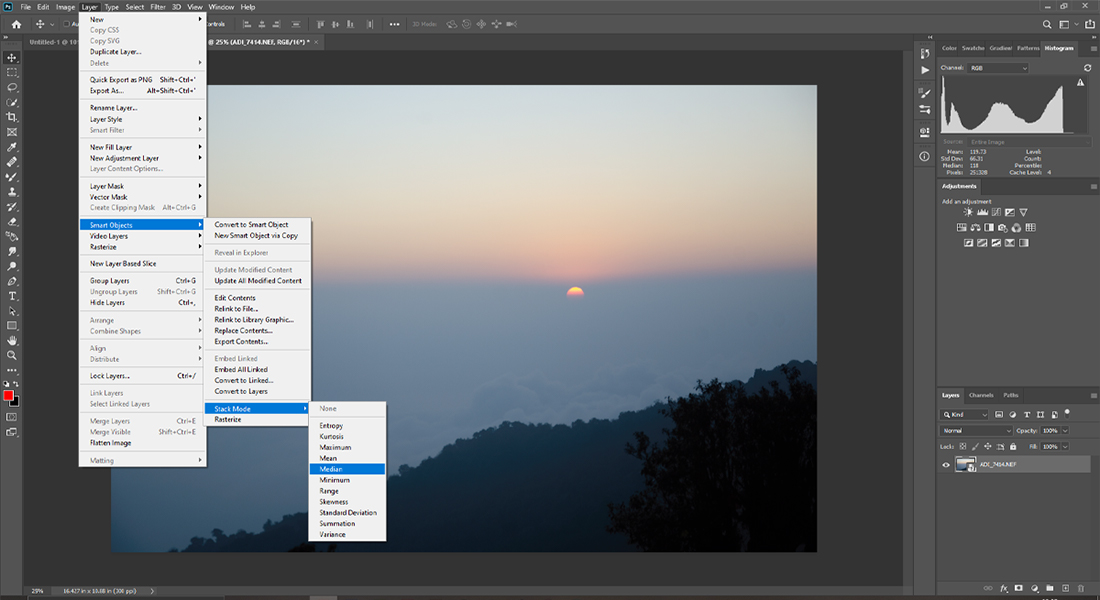
Now go to the Layers option at the top > Smart Objects > Stack Mode > Median
Done!
Your 4X upscaled, mega high-res image is finally ready.
All you need to do is crop the edges a bit. I did ask you to keep some space around the edges to be cropped out later remember?
This image may look a little soft when it is hot off the Stack session. So, applying some sharpening would be a good idea just about now.
You may use any method to sharpen this image. My suggestion would be to use the following method. It’s fast, easy, and customizable.
If going through all the steps that Unmesh in the video suggests seems is too difficult to follow, don’t worry too much. At the end of the video, he also generously offers a neat free action.
All you have to do is run the action and all of it will happen automatically.
You can download the action here.
Limitations
Although this method really does work and the results are good enough to be compared to genuine high-resolution files, it falls short in some places.
The mainstay of this entire method is data harvesting. For a reasonable amount of data that can produce the results we want, we by default, have to use more than one image of the same scene.
This is a big problem with scenes with motion.
The reason is simple enough. Since by definition elements in the scene are moving, no two images would be the same. This means that you do NOT have data about the same area of the scene in multiple consecutive shots. The method fails right out of the gate.
Yes, that is also the reason why you cannot use it to shoot Panning shots.
You may get lucky in some situations where the amount of movement is really low and restricted to a small part of the image only. But even then you may have to go through the arduous process of masking later on.
Long story short, this method is not going to bode well with movement of any kind. Static subjects such as landscapes, commercial products, food and buildings (architecture) are however ripe for this method.
The Good Stuff
I know you came for the 4X upscaling and high-resolution blitz but in pursuit of it, we have indeed achieved an image that is greater than the sum of its parts.
How?
Using a boatload of data to create one image also has other good things that come as healthy side-effects.
Noise: The final image created using median stacking is going to have much less random and repeated pattern noise. It’s going to look much cleaner and have fewer artifacts.
Moiré: If you had the faintest chance of getting moirés in your single images, be rest assured the final consolidated image is not going to have any at all. Now you know why big data rules. If however, you do not know what moirés are in the first place, this short post should get you up to speed.
What Is Moiré? | How To Best Deal With This Nuisance
Dynamic Range: If the input images were exposed properly, the final image should even have a superior dynamic range profile.
Diminishing Results
RAW files produced by cameras these days are really packed with a huge amount of data. It is also for the same reason why they can take so much editing and manipulation before showing signs of stuttering.
More data is always good since they produce cleaner, workable, and simply good looking images.
You could use the method that I just showed you and Frankenstein your own high-resolution images, but be advised that you cannot keep on adding more images to the stack to up the resolution forever.
This is a diminishing return game.
So naturally, the lowest resolution files would profit the most from this method of super-resolution.
For every additional image, the amount of increase in details will fall steadily.
As far as my own experiments, about 20 RAW files and about 200% upscaling should give you the most bang for your time. You could go for more images of course but that wouldn’t produce a stark difference in the final tally.
Concluding
I hope this simple technique helps you to upscale images from small resolution cameras.
I know the method is not perfect, and it cannot be used in some situations but you could do this for free with your existing gear. You don’t have anything to lose, do you?
High-resolution versions of your photographs may come in real handy when the extra details do actually matter. Say when you want to create a huge print of your work for an upcoming exhibition, or for your home.
By the way, if you are wondering how much resolution you really need to make a big print, read How Big Can You Really Print Without Losing Quality? | Answered.
Just as a reminder. When shooting these bunch of images too, always stick to the basics of composition and compose your shots to the best of your abilities. Remember the method only upscales the pixels in your photograph. It cannot and will never be able to better the quality of the content of your image. Make sure it’s top-notch every single time you press the shutter button.
Thank you for reading this long post.
Keep shooting beautiful.
This is now a teeny tiny blog trying to compete with the big guys. If you liked what you read, please take a second to share it. It would help me a lot. Thank you.
