An intervalometer is one of the cheapest, yet one of the most useful and versatile piece of hardware you can have in your camera bag. It’s almost as useful as the 50mm Nifty Fifty Lens of the camera accessories world.
There are so many ways you could potentially use this tiny little device.
Avoid vibrations and get pin sharp images, time-lapses, stop-motion photography, star trails, self-portraits, creative group shots, any form of long exposure photography, the list is simply endless.
The device, however, may look a little bit nonintuitive at first.
Here is a quick run through all the features of an intervalometer and how you can use them to make some stunning images.
Brief Introduction
Primarily an intervalometer is used for three main purposes:
- To add extra features which are not included in the camera’s default software: Many mid and Pro level Nikon and Canon cameras bodies come with a built-in intervalometer system. Although not very robust and versatile, they do have the capability to get basic jobs done. In some Sony cameras, this feature is completely absent. An external intervalometer is the only way to take images for a timelapse or something similar in nature.
- Avoid Vibrations: You may not have realized this (actually it doesn’t even come up in normal daily images) but the camera experiences a good deal of camera shake when you press the shutter button. For images which require a great deal of accuracy and have a very thin margin of error (for example macro images), this little amount of vibration may ruin it all. It may kick the subject out of the tiny depth of field or may introduce unwanted camera shake. An intervalometer is a good way to keep such accidents at bay. It can be used as an external shutter button which lets you initiate the camera shutter without touching the camera at all.
- Execute Complex Shooting Sequences: In nearly all cameras, the shutter button works the same. You press it and the camera takes an image. That is all it is supposed to do. But what if you require something more? Say you want to photograph the entire process of a flower blossoming. That would require you to continuously take images for at least a few days on an end, some serious amount of concentration and then some. A normal shutter (and you) won’t be able to handle it. An intervalometer is a great tool for just this purpose which can perform all such tedious and cumbersome tasks beautifully and with ease.
All set then. Let’s have a look at an actual intervalometer now and I will explain to you all the ‘tricks’ that it can perform.
The Display
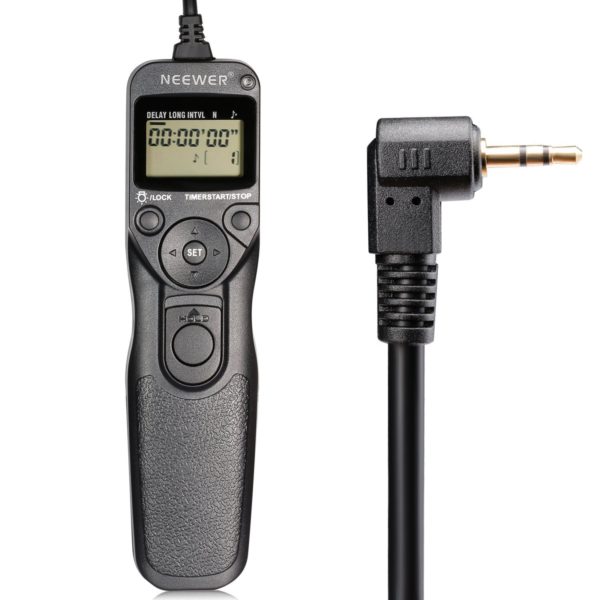
Let’s start with the many items in the small display on the face of the device.
There seems to be a lot of them but let me assure you that all of them have a good reason to be there. To be able to program in complicated instructions and make the camera take images in unconventional ways, these functions are an absolute must.
 Delay
Delay
Delay is very simply the period of time before which the intervalometer starts executing all the instructions the photographer has programmed it to do.
For example, say the photographer has programmed the intervalometer to take 20 images one after another, with an interval of 5 seconds in between shots. He then sets the delay to 5mins.
This 5mins is the delay period. Once the intervalometer is initiated, it will wait an additional 5mins before starting to take 20images.
You can practically use this function when you do not have an idea about what would happen but do know when it would happen.
Long
Long basically denotes the shutter speed of the camera.
One thing that I should mention here (something that I learn’t during a freezing night while shooting some star trails) is that the ‘long duration’ is only functional when the shutter speed actually exceeds 1second.
In other words, you cannot use the long function on an intervalometer to program a camera to take an image where the shutter speed required is faster than 1second. The fastest shutter speed an average intervalometer supports is 1second.
Secondly, always remember to switch your camera to the bulb mode when using the external device to manage the shutter speed.
The bulb mode is simply a shutter mode on your camera which when selected keeps the shutter open till the shutter button is kept pressed. For any shutter speed exceeding 30seconds in length, the bulb mode is what is to be used.
Intvl
Intvl stands for interval which is the time period in between two shots.
Whenever you decide to shoot many images one after another, you may want to pace them in a certain way. For example for the star trail shoot that I was talking about earlier, I used a shutter speed which was in the vicinity of 30seconds.
Now a continuous shoot for more than a couple of hours, with each shot being 30sec in length, is quite rough for the camera sensor. It tends to heat up and that might affect the images and the sensor itself.
To give the camera a little bit of a breather, I intentionally used an interval of about 5seconds in between shots.
Now depending on the subject, you are shooting or the requirements you need to fulfill any given task, you can use the interval function in many different ways.
N
N stands for the number of shots. It’s basically the number of images you want to take before the camera awaits any further initiation.
So if you choose 50 and press start on the device, the camera would take 50 images and only then stop.
Most of the intervalometers are capable of counting about 400 images after which you have to use the infinite counter. When using the infinite counter, the intervalometer never stops taking images until you explicitly ask it to, the battery runs out or the memory card fills up.
Even though most intervalometers do not track the number of images taken once you start using the infinite counter. You can keep tabs on it using this neat little trick using time elapsed.
Here is how you do it.
Say you are taking photos using a shutter speed of 1min and an interval of 30sec. So each picture takes 1mins and 30secs to complete. If you want to take say 100 images, you can just let the intervalometer run for 90sec x 100 = 900secs = 15mins.
Easy right?
Two dashes which look something like this ‘– ‘represents the infinity mode.
♪
This is just an audio chime much like the autofocus lock beep. It lets you know when a certain function is running or if the intervalometer is executing some given function.
You can choose to keep it on or off, as and when you please.
I personally never use it. Firstly, it is a giant battery suck and if you use it for far too many photos it really becomes irritating.
Tab
The little black underline beneath the functions we discussed above is called the tab. It just highlights the function which is currently selected and for which we can make changes using the ‘Select’ and arrow keys.
One very important aspect of the intervalometer that most people tend to miss is that the functions as mentioned on the intervalometer as always executed from left to right.
This means that the first function which is executed is ‘Delay’, then ‘Long’, ‘Intvl and henceforth. In case there are no inputs for some function, it is automatically skipped.
The order of execution is always left to right, remember this.
Buttons
Now that the functions are all well explained, lets come down to the buttons on the device.
Bulb/Lock
A single short press switches on a small light to illuminate the display. It is just to help the photographer to see better.
A long press locks up all the other button of the intervalometer to prevent any accidental presses. It is a lot like the hold button of old iPod classic or the wake/sleep button on your phone.
Timer Start/Stop
As the name suggests, this button either initiates the device to start executing all the instructions programmed into it or stops it if it is already running. Very straightforward.
After you have finished dialing in all the inputs values for the functions, this is the button you press to start.
Set Button With Arrow Keys
The left and right keys are used to primarily shuffle between the functions of the device. Once you want to change the input value of some function, all you have to do is press the ‘Set’ button and then use the Up and Down arrow keys to dial in your value.
Large Button With A Slide
This is just a button which acts as an external shutter release.
Remember I explained how an intervalometer can be used to reduce accidental camera shakes?
But how does it do that?
Since the intervalometer is connected to the camera via a wire or totally wirelessly, there are next to no chances that any movements created while pressing the button to initiate the shutter will be transferred to the camera itself.
The slide is a lock much like the one found on flashlights. It is just there to keep the button pressed without being actually pushed. So once you press the large button in the center and slide the slider, the button will be kept pressed until released.
In some intervalometers, a timer and an image counter start off as soon as you start using the slide and the shutter button. It helps to keep track of the number of images taken and the amount of time elapsed. Pretty handy if you ask me.
Instead of using the button and slide combo though, you can also use the ‘N’ function and the ‘Start/Stop’ button to perform more or less the same set of functions.
Finish
There are a lot of ways the functions of the intervalometer can be used to carry out some pretty incredible shooting sequences. Each function could be used independently on its own but the true magic happens when you mix and match them.
I would highly encourage you to get one intervalometer for yourself and try it out. Big brands such as Nikon and Canon do make intervalometer for their own cameras but often they are much more expensive as compared to the cheap Chinese knockoffs. Save yourself some money and get one of the cheap ones.
Just make sure that it is made to fit your camera. Even though the intervalometer (wired ones) are more or less the same for all cameras, the plug at the end of the wire differs from manufacturer to manufacturer and even model to model.
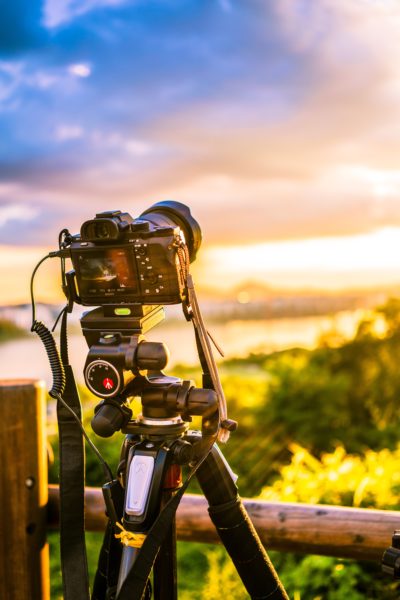
When using the intervalometer with a camera on a tripod, NEVER allow the device to just dangle from the camera resting on the wire.
Firstly the wire may just come undone and the entire process of shooting may stop. Secondly, if there is any wind where you are shooting, the device swinging in the wind may cause some significant amount of camera shake and vibrations. The last thing you want.
There is an easier and inexpensive way to get around this problem.
Just use some velcro on one of the tripod legs and behind the device itself. Whenever using it on the field after you are done dialing in the values, attach it to the tripod. Neat, isn’t it?
That is all folks. I hope you have a pretty good idea now how an intervalometer actually works.
Keep shooting amazing.


