Photography literally means a record of light.
And a camera is merely a tool that helps us in recording that light.
What we photographers (be it in any genre) try to do is capture light in an artistic manner.
Since all we do is deal with light, it is fairly obvious without me pointing it out that there is a dire need to measure the amount and the intensity of light and be able to quantify it to create good photographs.
Seems logical?
Well, that is exactly what we do using the camera light metering modes in our cameras.
Yes, it is that simple.
Did you make it up into a huge thing in your mind?
Have no fear, today we put all those burning questions to rest.
So let’s begin.
Correct Exposure
In theory, a well-exposed image is one that has been able to record and preserve details across the entire frame of a photograph.
So if you have managed to select a set of camera settings (shutter speed, aperture value, and ISO) that has enabled the camera sensor to record details from the shadows and the highlights alike, then you have a well-exposed image.
But this is easier said than done!
Why?
Well because ALL cameras have limited dynamic range.
Now, what does dynamic range mean?
Dynamic range is the difference in brightness between the brightest and the darkest part of the image.
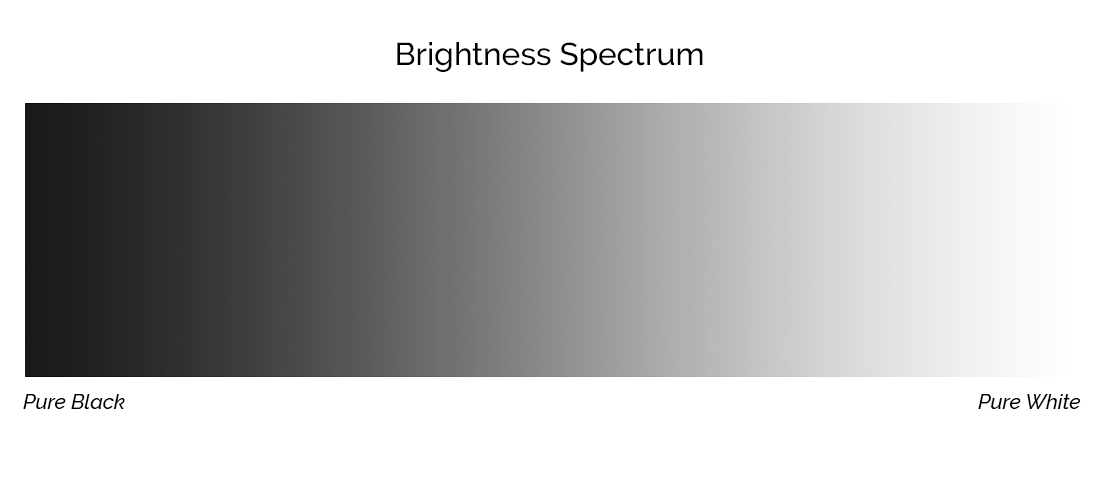
Just look at the gradient above. The extreme left of the gradient represents pure black and the extreme right pure white. All the shades in between get brighter and brighter as we move from left to right.
The problem with our cameras, more specifically the image sensor in our cameras is that it cannot “see” all the levels of brightness I just described.
The ‘visibility’ of the sensor is constricted to a much narrower window, over which it is able to collect and record details for the image.
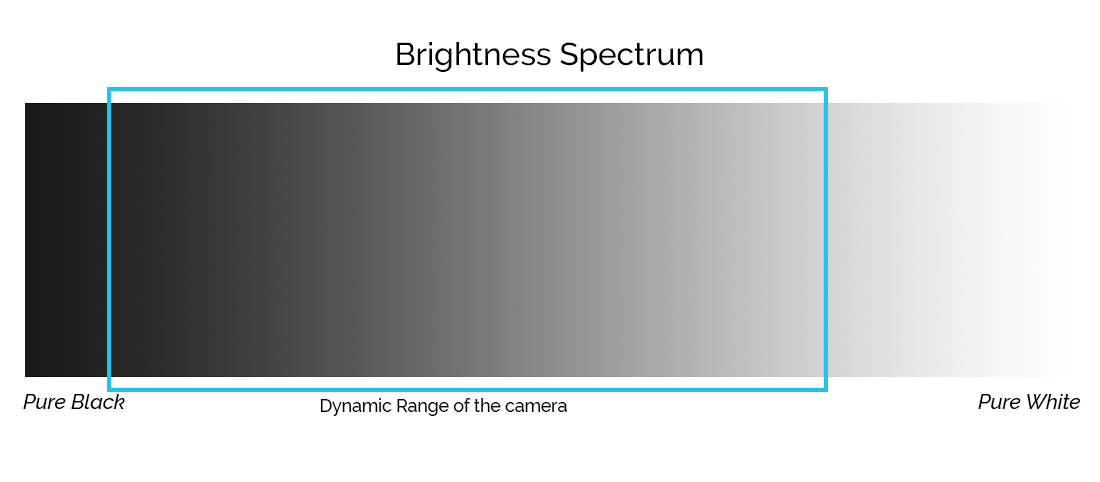
In simple words, if there are extremely dark and bright parts in the same frame, the camera would not be able to collect details over the entire range and will have to sacrifice one way or the other.
Either the highlights would be exposed properly, heavily underexposing the shadows, making them darker than they should be.
Or
The shadows would be exposed properly, now overexposing the highlights.
Any part of the image which is under or overexposed is technically darker or brighter than it should be, respectively. In digital photography, overexposed areas of an image are really hard to bring back even in post-production. Overexposed areas are just white blobs devoid of any details.
Long story short, God has bestowed upon you a great gift in the form of a pair of beautiful eyes, which can see over a remarkable dynamic range. Your camera, however, is NOT so lucky.
It becomes imperative then that we as photographers are able to control and chose parts of the image to expose properly and in turn sacrifice details from the other end if ever one such situation arises for us.
Finer Details
Just to drive home the point and cement your understanding, it is important that you focus on some key aspects of what I just explained above.
The first and foremost thing that you need to understand is that it is not the case that the camera is incapable of recording details from bright or dark areas of the frame. The problem arises when the difference between them is sufficiently large, and then the camera cannot record details from both the ends in the same image.
You can always take a photograph exposing for the highlight and another one exposing for the darker areas and the camera will have done a great job. But it cannot gather details from both the areas in the SAME shot.
Think of it like a window.
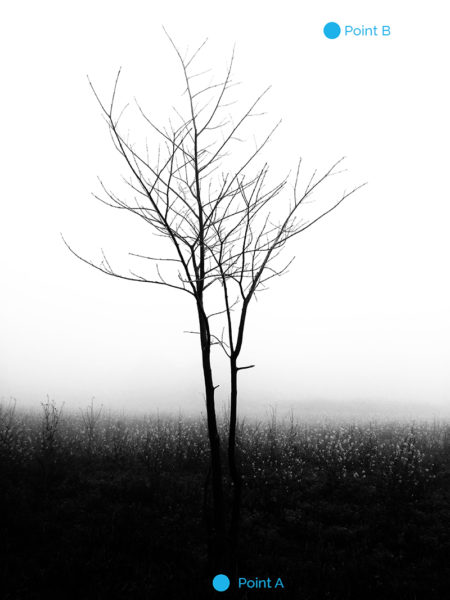
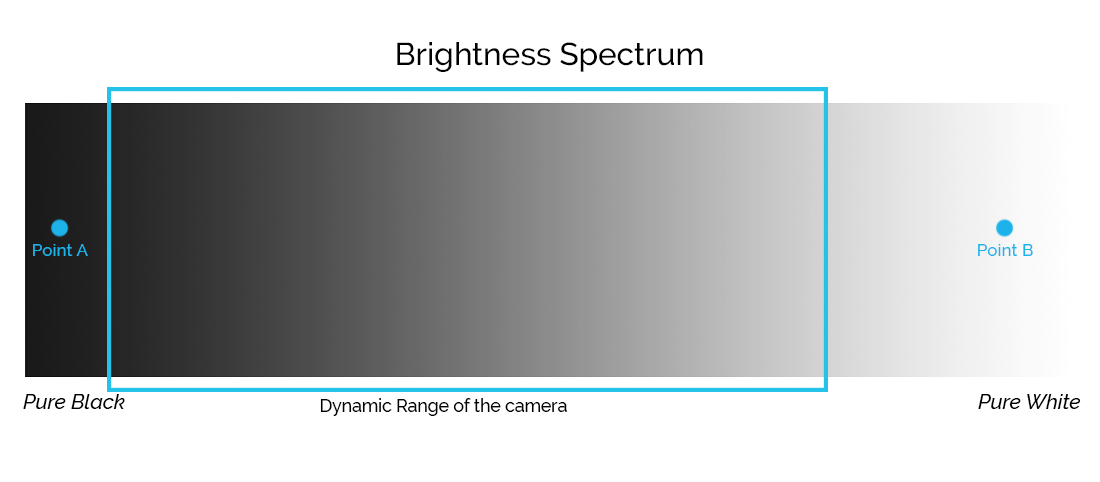
The problem only arises when the points are sufficiently apart. If that happens, the photographer needs to make a conscious decision to properly expose either the highlight or the shadows. Given that the part he chooses to ignore (either the highlights or the shadows) will suffer and lose details.
TTL Metering
Depending on where we meter the light from, in photography, we have two primary ways of metering light.
- Incident metering
- Reflective Metering
They are exactly what their name suggests.
Incident light metering is when we measure the light that is falling on a subject. And reflective metering is when we meter the amount of light that is being reflected off of a subject.
Nothing else changes. The only change is the point from where we metered the light from.
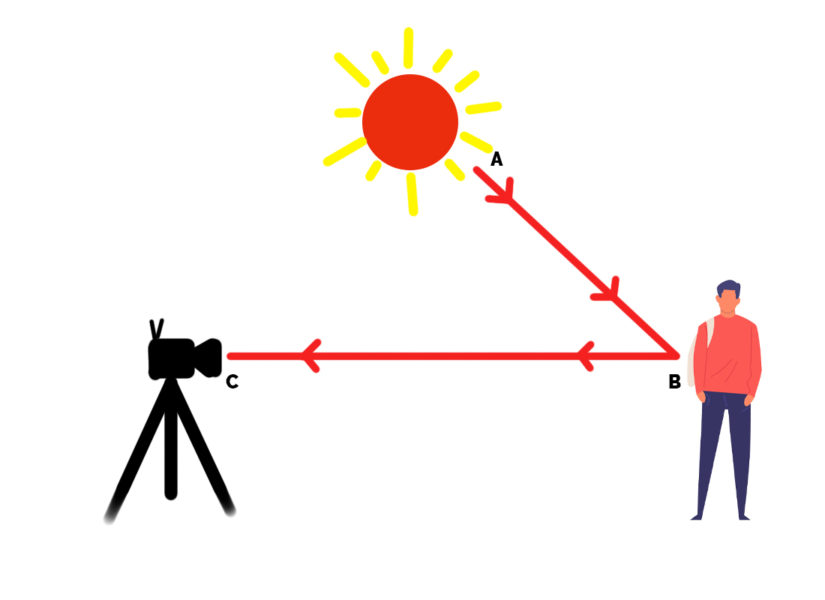
So if we measure the light from a point between the subject and the light source (between points A and B), it is incident light metering. If, on the other hand, we measure light from a point lying between the subject and the camera (between points B and C), its reflective metering.
Easy, right?
Just keep in mind that to get the best possible meter reading, the meter must be held at the last possible point in the space. So if you want to meter light using an incident meter, you should place the meter at the point where the subject would be, facing the light source. In the case of reflective metering, the light meter should be placed where the camera would take the shot from.
The intensity of light falls off as it travels further, following the inverse square law of light. So where you meter the light from does matter.
It should also be mentioned here that incident metering is much more accurate than reflective metering.
It is for a simple reason that all subjects which are visible, never reflect back the exact amount of light falling on them. Some amount of light will always be absorbed by the subject itself. This may give rise to some discrepancy when the exposure has to be right on the money.
In most of the cases, however, this small inaccuracy doesn’t really make a huge difference.
All modern cameras today come with built-in light meters that evaluate the lighting condition before each shot is taken.
Since the light meter is inside the camera and it only measures the amount of light that is able to enter through the lens, this metering mode is called TTL (through the lens) metering. TTL is just a form of reflective metering.
Light Metering Goals
We already discussed how in many scenarios our camera may be incapable of recording details through the spectrum of brightness.
The only thing we as photographers can do now is to prioritize areas which we want to be correctly exposed at the cost of some other areas being slightly over or underexposed. This is the trade-off and the only way forward.
In most cases, this high priority zone would probably be the face of a person or product which is the principal subject of the image.
Makes sense right?
What all the different light metering modes are for is to just help choose these said priority zones. Nothing else.
Spot Metering
As the name suggests, when using this mode the camera meters the light from a single spot.
Depending on the manufacturer and the model of the camera, this ‘spot’ is only about 1% to 3% of the total area of the frame. A very small section indeed.
Spot metering is by far the quickest metering mode out there since it has to evaluate such a small part of the frame.
The margin of error is, however, very small.
Let me illustrate that with an example.
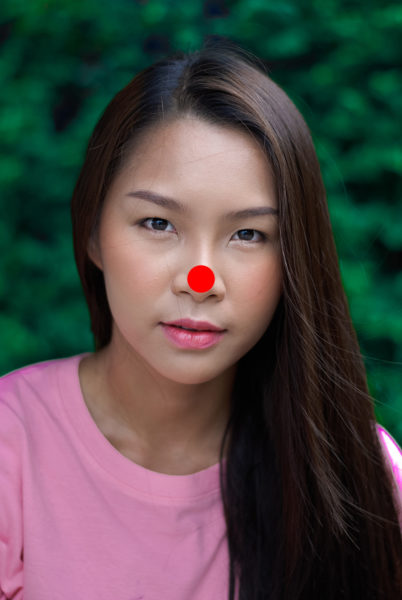
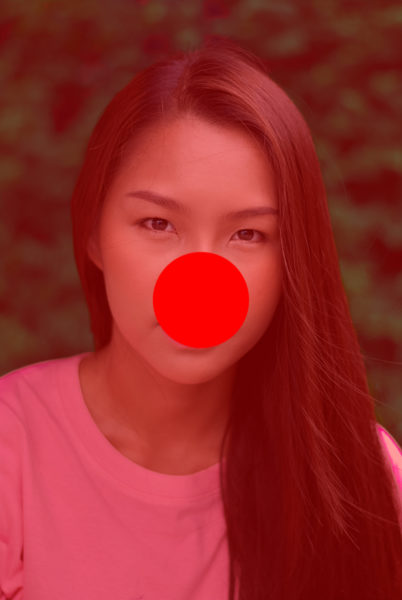
Let’s say you are trying to photograph a person, say a beautiful lady sitting in front of a lovely background. For such portraits, it is very important that the skin tones of the person are exposed properly so that the colors and the texture is represented as accurately as possible.
Spot light metering would work just fine here. If you meter the light from the section of the skin or the face, the metering would be as true as it should be.
If, however, you miss slightly and the spot from where you are metering happens to be on the dark hair instead of the skin, the light meter is going to be wildly inaccurate and result in overexposing the entire photograph.
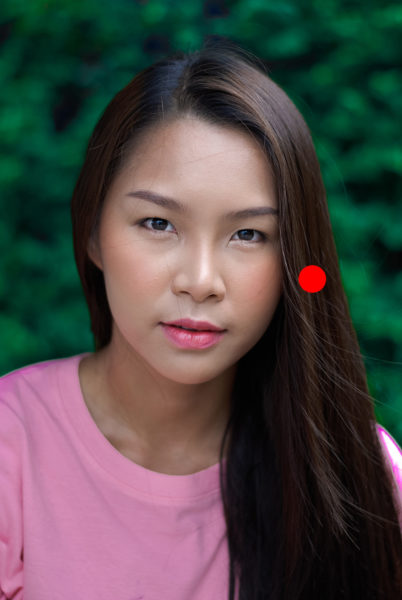
The moment you meter from the dark hair, the camera which is now only measuring the light reflecting off of the hair is thinking “Oh, such a dark region….very little light is reflecting back. I should, therefore, expose the image for a long time to get a proper exposure”.
Spot Light metering is widely used in bird photography since birds are nearly always against a bright sky and what we want to expose properly is the bird and ignore the bright sky as the background.
In short, if you have a large frame and a small spot which you want to expose properly, use spot metering.
Partial Metering
Partial metering is almost the same as spot metering except for one small difference.
In this mode, the camera meters light from an area slightly larger than a single spot. Although the size of the area varies from camera to camera, it is generally in the range of 8% to 10% of the total area of the frame.
As it might be already evident, partial light metering is a little more forgiving than pure spot metering. So even if the photographers miss the exact spot to meter from but land close enough to the targetted area, in most cases the metering would not be affected much.
Think of partial metering as metering from a bunch of spots grouped together.
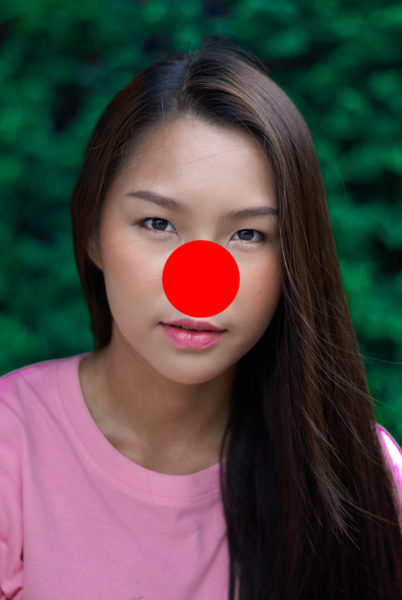
This metering mode is optimal for shooting portraits of people when it is imperative that the face of the person is exposed properly.
Centre-Weighted Metering
Camera manufacturers came up with the Center-Weighted Average Light Metering when the previous light metering technique called the Average Light Metering failed to expose important subjects in the frame properly.
An everyday user of a camera tends to shoot subjects like friends, family, and structures by placing them right in the middle of the frame. Center-Weighted Metering takes advantage of this exact human behavior. It places more importance on the meter reading from the centre of the frame.
In other words, the camera takes a light meter reading of the entire frame but the meter reading from the center of the frames is given much more importance than the reading from the edge of the frame.
So, if the photographer is trying to take an image of a group of people and the sun is behind them at the corner of the frame. The camera will place more importance on the light from center-frame (where the group is) and ignore the offsetting effects of the sun in the corner; thereby exposing the group image perfectly.
Again to reiterate, the camera meters the light coming from the entire frame but prioritizes the metering from the centre of the frame. This is done with the underlying presumption that the most important subjects of the image are located in the middle of the frame.
When deciding to utilize this method, make sure that you are not making an image with an off-center subject.
Matrix/Evaluative Metering
Matrix Light Metering is one of the most advanced and accurate light meterings we have at our disposal.
Our cameras are all digital now and all of them have substantial amount of computing power. Matrix Light Metering harnesses this computing power of our camera’s processors and uses it to configure the exact light metering for a particular scene.
The basic working of Matrix Light Metering is as follows:
The camera divides the entire scene into a few zones. Each zone is then carefully metered and the readings are then used as inputs for the camera’s internal algorithm.
Although each camera manufacturer has different algorithms to follow, overall these algorithms are extremely intelligent. They can identify key subjects in the frame no matter where they are placed in the scene and then suggest a specific setting for the camera to attain that perfect exposure.
The algorithm uses a host of other data like color, autofocus points, the distance of the subject from the camera, light type and intensity, etc so that the suggested camera settings are as accurate as possible.
Many of the Nikon cameras even use an on-camera image database. The stored model images are used as references and for comparison with the present scene. This makes the process of Matrix Light Metering quick and extremely accurate.
If you are just starting out, I would highly recommend you to use Matrix Light Metering as it is the easiest and the most accurate of all. If you are shooting regular subjects, Matrix Metering will give you fantastic results nearly always.
Oh, by the way, Canon calls the same metering mode as ‘Evaluative Metering’. Matrix metering is the same overall process as Evaluative metering, it is just a different name that Canon uses.
Reading The Light Meter
Now that we know how the camera light meter works in principle and how we could use the various metering modes we have at our disposal to our advantage; it is time to put the data to the best possible use.
The readings of our in-camera light meter are presented neatly on a simple scale which looks something like this.
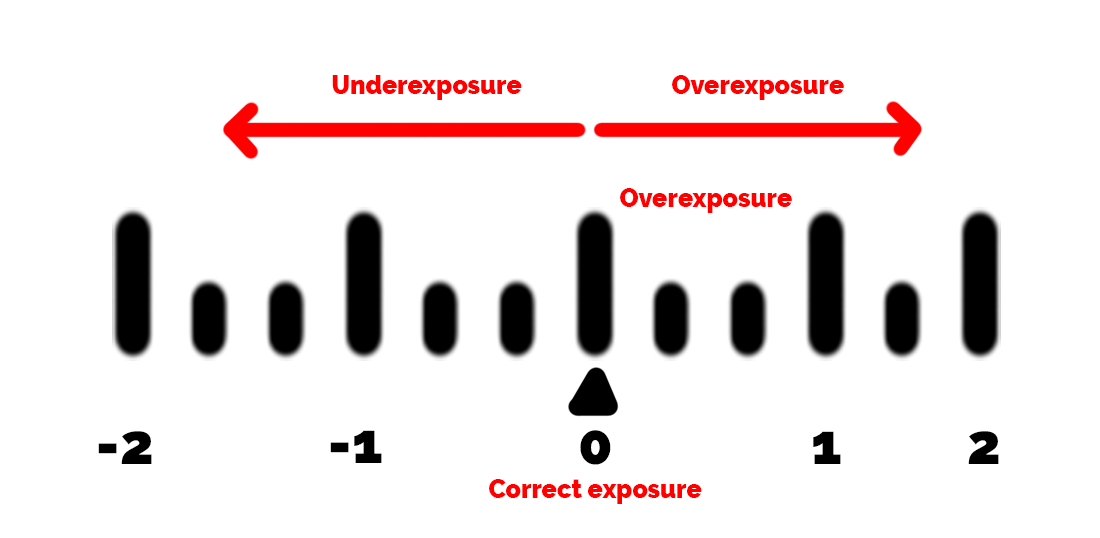
At the extreme left, you will find a negative symbol ( – ) and the extreme right a positive one ( + ). These two symbols represent under and overexposure respectively.
Just below the metering scale, you will also see a teeny tiny inverted triangle pointing at the scale above. This triangle marks the current state of the scene.
Let me demonstrate the workings of the light meter with an example. Look at the image below.
This is an underexposed image. In other words, the image is darker than it should be. On the meter, if the triangle below the scale points towards the first marking to the left of the zero. This means that the image is one full stop underexposed.
The larger spaced out markings on the scale, mark out each full f-stop while the smaller dashes represent a 1/3rd stop each. Think of this scale like that on a ruler, where the larger dashes represent one centimeter each and the smaller dashes one millimeter.
If you do not know what stops are and how they are measured in the world of photography, I highly recommend reading: F-stops Vs T-stops | Which One Should You Use?
The zero at the centre of the scale represents perfect exposure.
When you are trying to take an image and the triangle is pointing at the zero on the scale, it means if you do record the image at that instant, it is going to be properly exposed.
Any deviation to the left or right of the zero marking represents an incorrectly exposed image. The position of the triangle pointer relative to the zero determines if the image is going to be under or overexposed, while the scale above measures the degree of deviation from the “correct” exposure.
“Correct” Exposure
It needs to be mentioned here that although our cameras these days are marvels of modern digital technology, there are still some major problems with how our cameras meter and measure light.
These problems really come to the forefront when trying to photograph perfectly black or white subjects.
Think of a black cat on a black rug or a polar bear on pure white snow.
In the aforementioned scenarios, it is very likely that the meter inside of the camera would be thrown off track and give us a flawed meter reading. This is because of the underlying principles all digital cameras use today to base their exposures off of.
For a detailed discussion about how and when our camera’s reading may be misleading and how to adapt to those situations, I recommend you quickly go through: How To Use Exposure Compensation To Gain Control Of The Exposure.
Even when the light metering is correctly represented on your camera, it may not be the metering you should go after. Always remember photography is an art form, there are no right and wrong ways to do stuff. Depending on the elements in your frame and the feel you are going for, you can choose to over or underexpose your image on purpose.
It is not the case that you always have to strive for the triangle to be at the centre. Treat it like a guideline or suggestion rather than a rigid law.
Conclusion
Believe it or not, you are more intelligent than your camera (in the field of exposure), if you understand how your camera determines its own exposure settings and what could potentially mislead it.
The Matrix Metering Mode for all its advanced algorithms still seeks the holy grail of exposure that is 18% grey. There are many scenes (possible both indoors or outdoors) that may completely fool the camera’s internal light metering and ruin potentially good shots.
It is important that you as a photographer know about these possible situations and take care so that you have perfectly exposed, nice images ALL THE TIME.
So my simple advice would be to understand the basics first, learn about the potential pitfalls and you will be secured from exposure problems for life.
That is all for this post, guys. I will see you again in the next one.
Keep shooting beautiful.
