This is exactly what you probably have been asked NOT to do.
Shoot into the Sun.
Under normal circumstances that would indeed be perfectly good advice. But what if we could craft the downsides of shooting against the light and use it to make something truly amazing?
What others are rejecting right out of the gate, how about we go the other way and try and find a strategy to make it actually work. This is exactly what I asked you to do about shooting in the rain.
Beauty lies in the most uncommon places, can’t blame me for it!
A Sticky Wicket
Let’s start with a simple yet annoying situation.
Say, you went to visit Machu Picchu. You only have an evening there, and the next day you are flying out of the country. There is no coming back another day.
Here comes the kicker. When you show up to the site, it’s sunny as hell.
So, are you going to listen to all the advice you have received over the years about how not to shoot into the light?
Or, are you going to find a way to do it anyway?
If you choose the second alternative, please let me help you with it.
Protect The Downside
Shooting against the light is ill-advised for a reason.
The images are most likely to be not exposed properly, with dark, unrecognizable subjects shadowed by unintended silhouettes in most scenarios.

If you are lucky, you may even catch a lens flare with some rainbowy color intrusion in your photographs.
Hardly the perfect photograph.
Yes, all this would happen to you if (and this is a BIG if) you are on the “Auto” mode and let your camera take all the decisions for you leading up to the shutter release. This may also be the case even if you use a semi-automatic mode, such as Aperture priority (A/Av) or Shutter priority (S/Tv).
But we are not going to make these mistakes now that we know about them.
The situation above is almost akin to saying “You will lose a street race if you take a Prius.”
We already know how the camera meters light, and how a light source directly shining in the lens may throw the meter’s reading awry. So all we have to do is note the potential problems, find the root cause and protect against them.
Backlighting Basics
I have been talking about “shooting into the Sun” or “against the light” until this point but you need to understand what backlighting truly means.
In the simplest sense, you are shooting backlit when the primary source of your light is directly facing the camera.
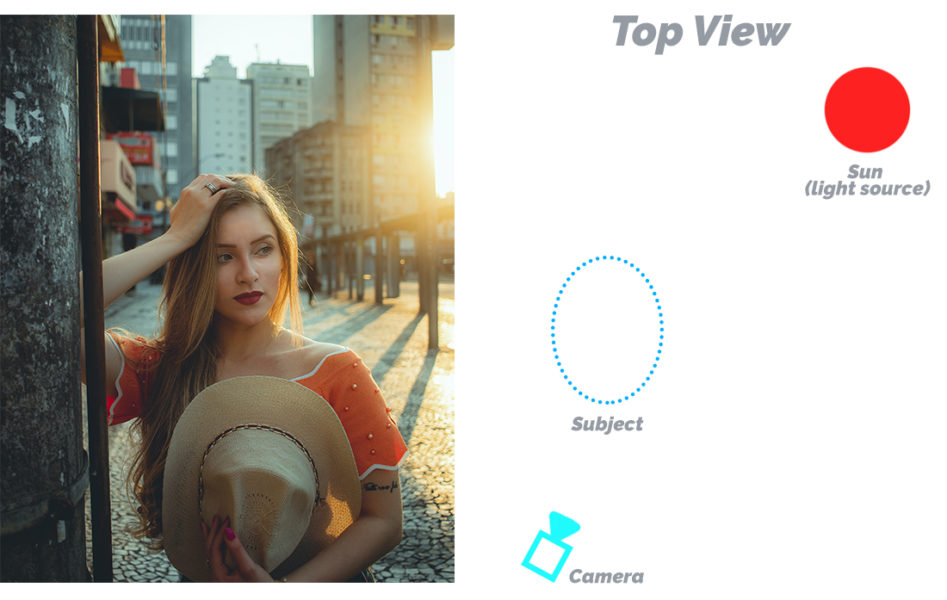
Since you would be naturally facing the subject you are about to shoot, the light would be coming from behind your subject. Lighting the back of your subject. You get it now?
Proper Exposure
The biggest hurdle in shooting backlit subjects is getting the exposure right.
You can’t really blame the camera for this, neither the light meter inside it. Let me explain where the problem stems from.
As you already know, the light meter inside our camera bodies is called a TTL (through the lens) meter. This is because it only meters light that comes in through the lens of our cameras. This is the same light that is reflected off of our subjects.
Under normal circumstances, this mechanism works just fine.
The problems with backlighting arise when light NOT reflected off of the subject starts reaching the camera meter. This extra light is what causes all the problems.
As soon as this extra light reaches the camera’s meter, the meter thinks that there is too much light in the scene to expose it properly. So, it naturally tries to cut out some light.
If the photographer now happens to shoot in any of the semi-automatic modes or for that matter full “Auto” mode, the cameras would have control over one or all of the three determinants of exposure. It would use this/these determinant(s) to control the incoming light.
For example, if the photographer were shooting using Aperture priority:
The camera would still have control over the shutter speed. To restrict the extra light, the camera may use a fast shutter speed.
Because of specifically this reason, images turn out darker than it should be and the subjects are barely discernable.
Unfortunately, our cameras are still not smart enough to figure out a solution to this problem, by themselves. So you as the photographer need to step in and force the camera to use a given set of settings that are deliberately selected to properly expose the main subjects of the image.
Easy, right?
So how do we take control of the camera and make it use the settings we want?
There are two major ways to do this:
Exposure Compensation
Yes, you guessed it.
Exposure compensation is an easy little handy tool that you can use to tell the camera how to use the reading of its light meters.
Now look, the situation is always going to be the same. The camera is always going to overestimate the amount of light available and underexpose the subject if left to itself.
So to prevent the subjects from turning into dark spots, what you can do is simply add one or two stops of exposure compensation. Adding one unit positive exposure compensation is just asking the camera to meter the scene and then whatever the value it deems fit, add the one extra stop of exposure to it.
So like the previous example, if the photographer was shooting using Aperture priority and the cameras were initially suggesting a value of say 1/500th of a second, after the addition of one positive unit of exposure compensation, the camera should use 1/250th of a second shutter speed to record the same scene.
To add the one extra stop of light, the camera slows down the shutter speed by half. Just to remind you, every stop of light doubles the brightness of the image.
If you do not have a well-defined idea about exposure compensation and how it works in conjunction with the cameras light meter, read How To Use Exposure Compensation To Gain Control Of The Exposure.
Manual Mode
You could do the same thing we just did with exposure compensation using the Manual mode on the camera.
Remember the idea is to NOT let the camera use the settings suggested by the light meter. When using the Manual mode, that is exactly what we do anyway.
To use the Manual mode method, first, we need to get a base reading of the scene.
Get close to the subject and fill the frame with it. This is just to prevent the excess light to hit the meters. Get close/zoom in and see what settings the camera suggests. Remember these settings.
Now shift to Manual mode and dial in the same settings, and you are good to go.
I know I just contradicted myself but not really. This is why.
Remember I asked you to get closer and stop the stray rays from getting inside the camera? Once you achieve this, the reading on the light meter becomes reliable and trustworthy once again. It becomes the same as shooting any other image (not backlit).
Other Alternatives
Apart from the two methods I just described above, you could handle this situation of extra light management in a few other ways, too.
Spot Metering
The light meter inside our cameras erroneously projects a set of exposure settings that allows less light than is necessary to expose the subject properly. This error is primarily caused due to the stray rays of light reaching the meters of the sensor without being reflected off of the subject.
This you already know.
What if we could cut off these stray rays of light altogether and not factor them in when metering the light?
That is exactly what we do when using the Spot metering mode. You may remember this from the post that I wrote about light meter (How To Best Use The Light Meter On Your Camera | Explained).
The beauty of spot metering is that we can force the camera to meter the light from only a very small part of the frame. Just a spot.
This helps us a lot with the problem.
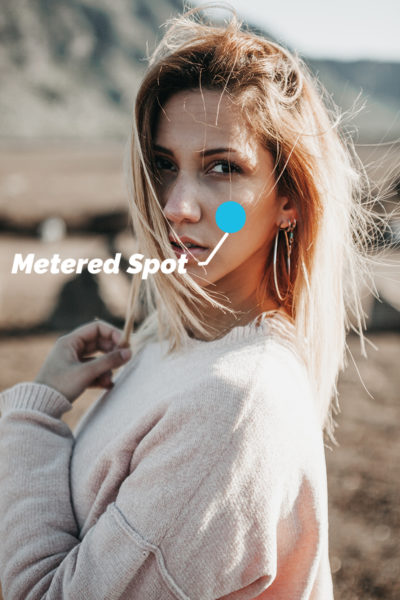
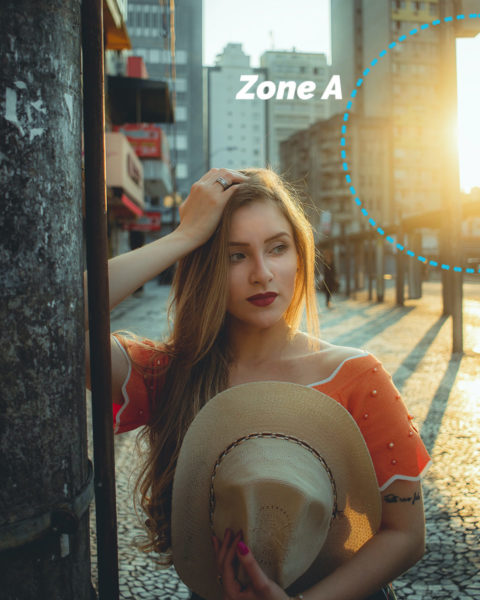
Say, we are shooting a person with his/her back against the Sun. Now, this situation is almost bound to create a backlighting problem. We could, however, skirt the problem by just switching to spot metering and asking the camera to meter the light ONLY from the subject’s face.
With the guided metering, the camera meters the incoming light properly and we get a well-exposed shot.
Fill Flash
Now instead of trying to cut out light and shape it as much as possible, we take the attack the other way by using a fill flash. We add more light.
Wait, what?
Yes, you read that right.
The problem with backlit images is that very often in trying to expose the entire scene properly, the primary subject is compromised and underexposed. Couldn’t we just solve that by adding some light?
So we do just that.
Everything else remains the same. We add some light to the scene using a fill flash.
Needless to say, this flash is solely focused on the subject.
So the Sun or the primary light source lights up all the scene and we try and use some artificial lights to bring up the subject’s brightness.
Simple, isn’t it?
Now depending upon the subject, the type of image and the feel you are going for, you could use remotely triggered strobes or even the popup flash on top of your camera. Suit yourself on this.
Reflector
Same story as above. This is just a passive way of adding light.
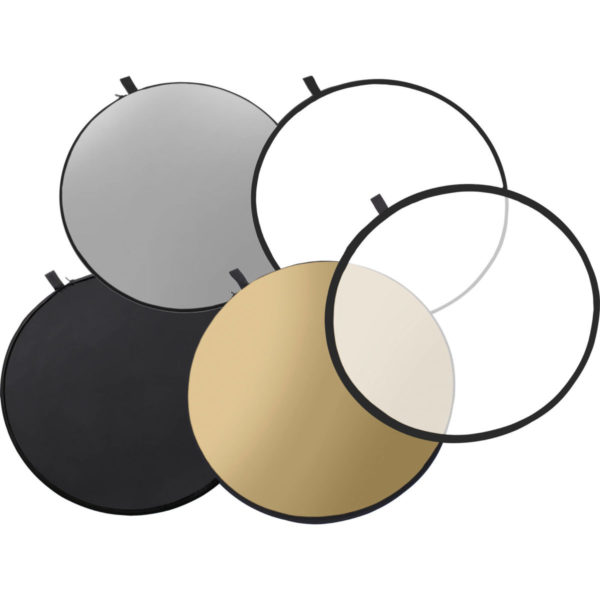
In this case, we do not use any artificial source of light to illuminate the subject. Instead, we use the light coming from the primary source and reflect some of it back on to our subjects.
You could use a dedicated reflector to do the job or you could improvise.
Nearly all objects (if it’s not completely black) reflect some amount of light back. So a white foam core, some printing paper stuck to a giant cardboard, a white wall, sand at the beach, all could potentially act as a reflector.
This is your creative space. See what you can use to reflect some light back on to the subject and it should work just fine.
If however, the reflector on its own cannot fill as much of the subject as you want to, you could always use some extra flash power and the reflector together to get the required amount of light.
Remember Remember
- Including the source of light in the frame will nearly always create an imbalance in the scene too far to bridge. This means that the image would be way too bright in some regions and way too dark in others. An easy way to overcome this is to use the subject itself to block the light source from directly shining in the lens.

- More often than not, when trying to expose the subject properly, the background or foreground is going to be overexposed. Do not worry about it too much. Your subject is supposed to be the cornerstone of your image in any case. Try and find a way to incorporate this washed out background look into the image. It may add a lot of character and feel if done right. Do not fight it, go with the flow.
- A lens hood is an absolute must when shooting against the light. This protects your lens as much as possible from stray rays of light and dramatically brings down the chances of lens flares.
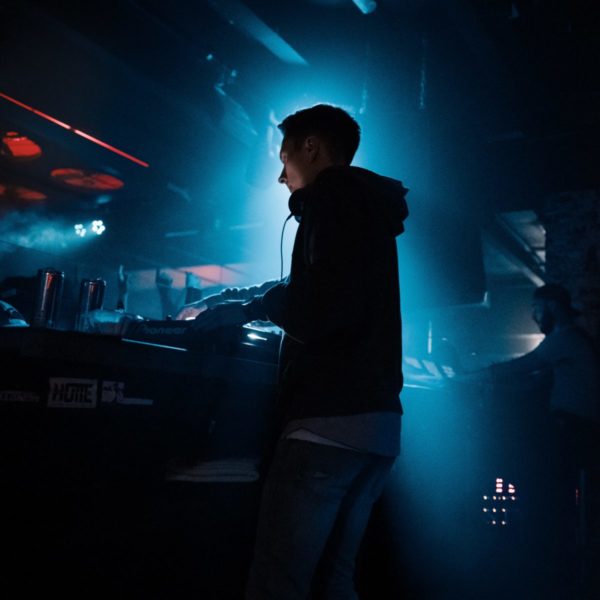
- Backlighting subjects produces a very soothing rim light around them. This effect comes to the forefront when the subject is translucent. Wine bottles, dew drops, human hair, glass, ice all are excellent for this.
- The rim light acts as a good separator from the background. So make sure that your subject is placed against a relatively dark background to make good use of this effect.
- Shoot in RAW if possible. This is going to give you the most amount of latitude to adjust your image, later in post-production.
- If you are planning to use the Sun as the backlight, try and shoot when the Sun is near the horizon. That means either early or late in the day. The quality of light during this time is really soft and easy to work with.
- Pro tip: It’s easier to recover shadows in digital images than bring back details from the highlights. So whenever in doubt, underexpose the image by a stop or two. You can fine-tune the exposure later in post-production.
That is it, guys. That is all you need to know to go out there and make some stunning backlit images.
Shooting into the light is not such a bad idea if you know how to go about it.
Keep shooting beautiful.
