Ah! the monsoons, the dreaded part of the year where nothing good happens except maybe if you are a farmer. Everything everywhere is wet, humid and moist. You probably always have to lug an umbrella just in case and chances are when you do actually carry one it never rains, but when you don’t…..:) The situation is even worse for photographers like us. Cameras are a piece of technology, and the mix of tech and water never does bode well. Lenses, memory cards, hard drives all of them are under constant threat from the moment the first drop of rain hits the ground. The general principle is, when you are caught outside in the rain, pack the hell up and run for cover……correct?
Wrong!
Why?
Because you are missing out on all the drama stupid. With the rain, there comes a host of amazing opportunities to shoot, people running for a shade, beautiful dark cloud formations, the joyous faces of little children, the gloomy face of office goers, reflections on little puddles of water, beautiful rainbows, vivid colors, the list is simply endless. It’s like a gold mine on the street, waiting for someone to come and scoop it up (yes that was from Breaking Bad).
So what the hell do you suggest?
Brave the storm….literally!
But I don’t want to jeopardize thousands of dollars worth of equipment for some rain photographs.
Relax that is not what I am proposing here. I am asking you to take advantage of this wonderful opportunity that nature provides us in the form of rain and create amazing images, and not dunk your camera in water and waste it. It’s like selling umbrellas on a rainy day. Don’t just hide from it. Stand your ground, sell some super cheap umbrellas for a good premium to the unfortunate souls who forgot to bring their own and are now trapped under a ledge or something. Be that guy. Make the best of the available situation, that’s all.
You there with me? Let’s get rolling then.
Safety First
One of the best thing that I learned from the book An Astronaut’s Guide To Life On Earth, written by Commander Chris Hadfield is ‘be prepared’. Be prepared for whatever you anticipate might happen. That is probably the only sincere way to live life and handle best everything it throws at you.
It is the same with rain photography I suppose. You know there is going to be water and you simply cannot let it anywhere near your camera or your other expensive photography gear. So what do you do? You protect them and ensure their safety BEFORE you venture out in the rain. It is easier than you think….seriously.
I know what you are thinking. So I have to go out now and buy a bunch of rain sleeves and waterproof cases? No, not really. Sure they do help in protecting your gear and maybe give you some artificial peace of mind since they cost a good amount of money but you really do not need much to protect your gear. All you need is a large plastic bag, a few rubber bands and as many zip lock bags as you can pack without weighing you down.
#1 Rule Of Shooting In The Rain
Carry less stuff. Most of the photographers, who complain about all the menaces of shooting in the rain and point out how difficult and worthless the entire endeavor is, nearly always carry more stuff than they will ever need. For heaven’s sake, you do NOT need seven lenses and all their ND filters to shoot a rainy day.
Out in the stormy weather and in the complete downpour it would be ridiculously hard to look at a scene, think about the lens that would fit the occasion, open your bag, fish it out, pop it onto the camera and then shoot. Not only is there a terrible risk of you messing up any one or all of the processes above but also nothing stays in the same place during a storm for that long. There is simply no time to analyze so much. Moreover, don’t forget you have to open up the camera and expose the internal circuitry when swapping lenses. That is a bad idea if I ever heard one.
Try and reduce and if possible completely eliminate the need to swap lenses on the go. You are in effect breaking open the seal between the camera and the lens. Agreed not all cameras have weatherproof seals but at least there is something and it is better than nothing. I shoot street and am generally on foot, out in the open so from my perspective, it is not advisable at all. Travel light, travel far. That is my motto (this is supremely important to me since I do not have much gear).
Maybe if you are in a car and shoot landscape, carrying extra lenses and other gear might be an option since you do not have to physically bear them. You may have a little extra latitude but still keeping it simple and straightforward is probably the best idea.
Two-way Attack
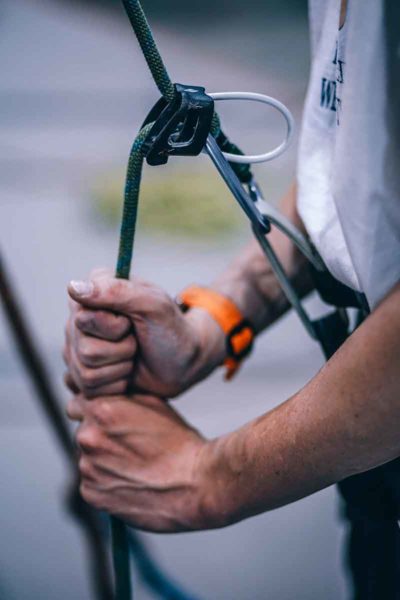
Let us just assume that you have been a good kid and took my advice of really traveling light. Maybe just a camera, a lens, a small backpack to carry the SD cards, battery and the tripod. Yes, you need a good and sturdy tripod to shoot in the rain, I will get back to you on this later in this article.
Think of the water and the rain as enemies in a war front trying to infiltrate your guard lines. What you need is a good defense against them. Don’t worry I have you covered, it is called a ‘two-way attack’, here is what I mean.
Protect Your Camera
Guarding your camera against water is the MOST important thing that you should care about before going out to shoot in a downpour. You can use a dedicated rain cover for your camera like a storm jacket or a think tank hydrophobia sleeve but if you are broke like me and do not have money to spend on such accessories, a large plastic bag would suffice. And no I am not playing fast and loose with your camera’s well being, it is indeed safe. I wouldn’t use it if it weren’t. I have just one camera and honestly, I cannot even get it repaired if something should happen to it, so protection for my camera is supremely important. Be rest assured.
The equation is pretty straightforward; if your camera and lenses are already weather sealed (these are generally very costly lenses and pro bodies) you need less protection but if you have a basic camera setup you need to be more cautious. Just because you have a weather sealed camera doesn’t mean you go scuba diving with it. It can protect itself alright but that doesn’t mean you go easy. Treat it like insurance against the elements and nothing more.
Guard Your Camera Bag
The first rule of shooting in the rain still applies here. Carry as little as possible. If you are going to shoot only for a couple of hours maybe you would not need four or five extra SD cards or extra batteries. Take only what is necessary.
Remember how I asked you to carry a million zip lock bags; yes a million because in the rain you can never have enough of them. Remove all the electronics and paper from your pockets and zip them up in a bag. If possible zip up all the camera gear separately so that in case disaster strikes you will not have all the eggs in one basket. Diversify your risk.
After you are done and all you see are plastic bags, place them in your camera bag neatly. Always try to prioritize depending on the possibility of you actually needing it. What I mean is place the item that you feel you might need least at the bottom, then the next, then the next. This ensures that when you actually need a particular item while shooting out in the rain you do not have to go through all the contents of your bag. They will be in all probability be at the very top if you packed right.
If packing your bag according to priority is too much of a hassle for you, pack however you like, just make sure you at least know what is where. Keep the bag open for the least amount of time out in the rain, that is the mantra.
Packing equipment…DONE!
Now that you are done gearing up your gear, let’s get to the good stuff…….shooting.
Capture The Mood
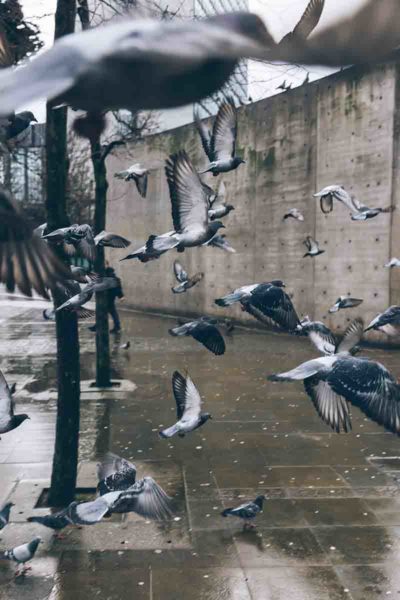
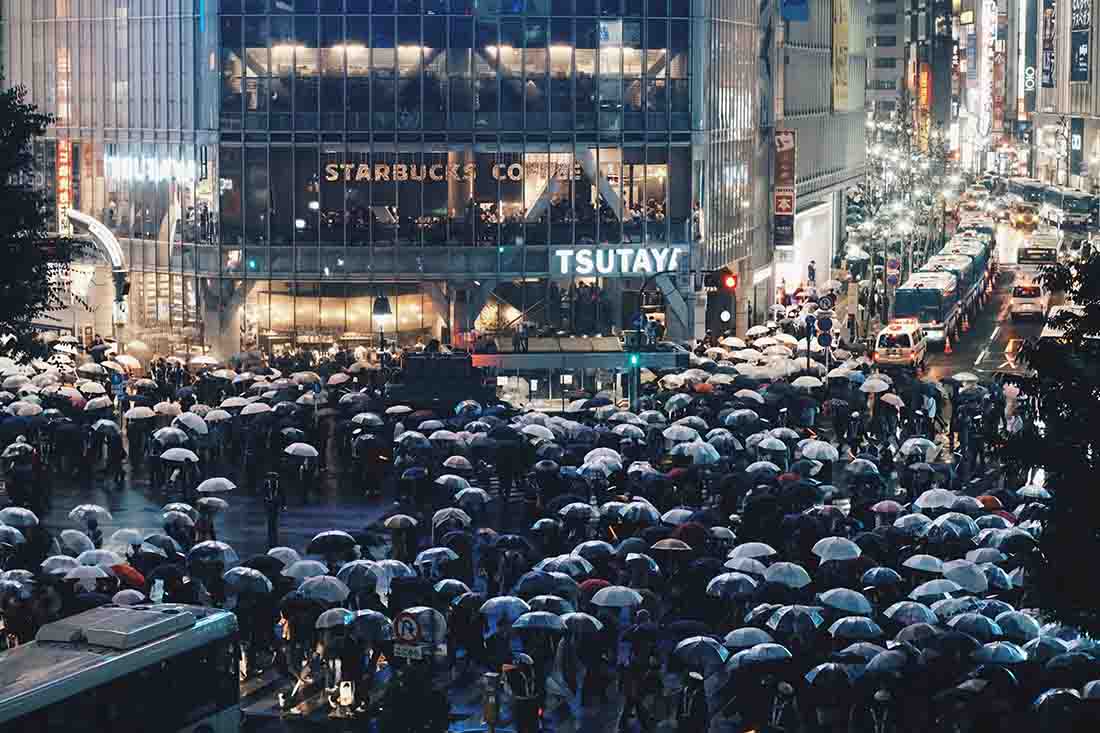
Rain brings a completely new dimension to nearly everything, from to the very ordinary and mundane to the extremely fancy. You may have walked down a road a thousand times and never seen something different, something “photographable” about it but come the rain, the scene can change dramatically. Almost dreamlike lighting, high-velocity winds, people rushing for cover, vehicles splashing water, emotions of people, the thunder, the lightning, colorful rainbows, it’s like a feast for any photographer.
Try and capture as much of the mood as possible. The rain brings with it so much drama that you have to do very little to get a decent image. From the lighting to the subjects, its like drama on steroids. But just a little warning. It is fine to capture as much as you can from this heavenly feast but do not make the mistake of getting too many things in a single photograph. Try and focus on a single aspect of the rain or water and depict that in the best way possible. Too much in a single frame may be a little distracting.
Another important aspect of monsoon photography that many people simply miss is that not only can you shoot during the rain, but also you can make brilliant images before or after a shower. Think about it for a second. You can shoot the coming in of the dark clouds, some high contrast images, gusts of wind, the lightning. And after the rain, you have reflections all around, water puddles, vibrant greens and blues dominating the scene and a lot more.
Filmmakers and directors use water to accentuate scenes all the time and there is no reason why you cannot do the same. Stand out in the open, feel the heavy breeze, look at the somber clouds, soak up the mood with all you got and then just pour them into your pictures. I assure you they will be fantastic.
Position
Next comes the question of position (from where you actually shoot), now this is different for everybody. It depends on the type of images that you are looking for and the subject that you have at hand. Hence I would just try and give you the basic principle that I follow while shooting in the rain, you can apply it any style of shooting that you might like.
Use Available Cover Whenever Possible
Rain is nearly always a little directional and NO, I do NOT mean from the top to bottom. If you look at the raindrops they always tend to come down at an angle depending on from which side the wind is hitting it. Follow that angle and use it to your advantage. Position yourself so that the rain is naturally going away from up and not coming into you. This way you can shoot in the rain without getting inundated by it.
Use any natural cover that you may find. This may be a ledge of a house, an extension in front of a shop, a tree, a collapsed billboard, someone else’s umbrella, anything…..ANYTHING at all that helps to keep the rain at bay and then just wait and let the images come to you. Now, this goes without saying that you need to choose the spot carefully. You should have a plan so as to how you want the image to be and then just try and execute it. It may not always work out since you control nearly nothing of the scene so don’t be disappointed, just keep trying.
You can also use your car as cover. Keep the ‘rain angle’ trick in mind and park it in a way so that the rain is hitting the other side of the car from where you are shooting. This works very well when shooting nature and there is nothing for miles.
Even when the rain has you pinned to a spot, do not give up. Look up, look down, anticipate what might happen next and explore all the possible vantage points and angles that can give you a good image. Be opportunistic and patient, it will eventually come to you….all you have to do is be prepared to grab it.
Keep hunting, NEVER give up.
Light
This is a tricky tricky matter. Light on a cloudy overcast day can really be finicky and hard to keep up with. One moment it is bright and just the next, it is gloomy as hell and dark. There is no simple remedy for this, you just have to be watchful and vigilant all the time and adjust according to it. Before every shot, take a second to asses the light, set up your camera accordingly and then just take the shot.
Always be on your toes.
Generally, the available light before and after a downpour is usually very soft, which means nearly no hard shadows are formed. You can use it to create some really flattering portraits.
Nature shots also come alive after the rains. The greens and the blues get accentuated and the colors look vivid. Everything looks crystal clear. Everything seems to glow.
Quick tip
If it is really dark or if it is night time, try and backlit your images with any light source that you may find. It could be a neon sign, a street light, a headlight of an incoming car…..anything. Backlighting rain really brings out the raindrops in the images and makes it pop. If you cannot find any light at all, you can use a remotely triggered flash too. Use it on low power so as to make the effect subtle and not overpower all the other elements in the scene.

This might sound a bit weird but it is really difficult to get the rain actually in your shot. Usually, it just looks like an extra faded layer on top of the subjects, misty and shabby which makes the image look washed out.
Embrace All Nature Provides
Nature provides an amazing plethora of options and opportunities to choose from during the monsoon season. The flowers blossom, the fields seem extra green and when the dust finally settles after the first shower you can look for miles. It never looks so vivid, so vibrant, so alive. Realize all these kindnesses that nature bestows upon us and use them to create great images.
Here are a few pointers for you to consider.
High Contrast Clouds
Just before the clouds erupt into thunder and lightning, there is this short duration when the incoming clouds are just stacking up but it is not raining yet. A high contrast image of the clouds and the horizon can be a really good subject.
To get the light metering just right, use the spot metering or the center-weighted average metering and meter the brightest part of the scene and then just let the clouds get dark. In digital photography, you can always bring back more details from the darker part of the scene than any part which is overexposed. This is directly opposite to what film does. Shoot in RAW, this will give you the most wriggle room during post-production.
Rainbows
Rainbows are easier to shoot than you think. First, try and capture as much of the colors of the rainbow in camera. You can use a good polarizing filter to amplify the colors. A word of caution though, using the polarizing filter wrong may absolutely vanish an otherwise prominent rainbow. Make sure you turn the dial of the filter in the right direction and always double check the images on the LCD screen to be totally sure.
A rainbow generally appears when there is just a hint of the sun during or after the shower. The white light of the sun (sunlight) gets refracted when it hits tiny water droplets in the atmosphere which gives rise to this beautiful spectrum of colors. It is also because of this particular phenomenon that rainbows are nearly always created on the opposite side from where the sun is in the sky. Now you know exactly where to look for them.
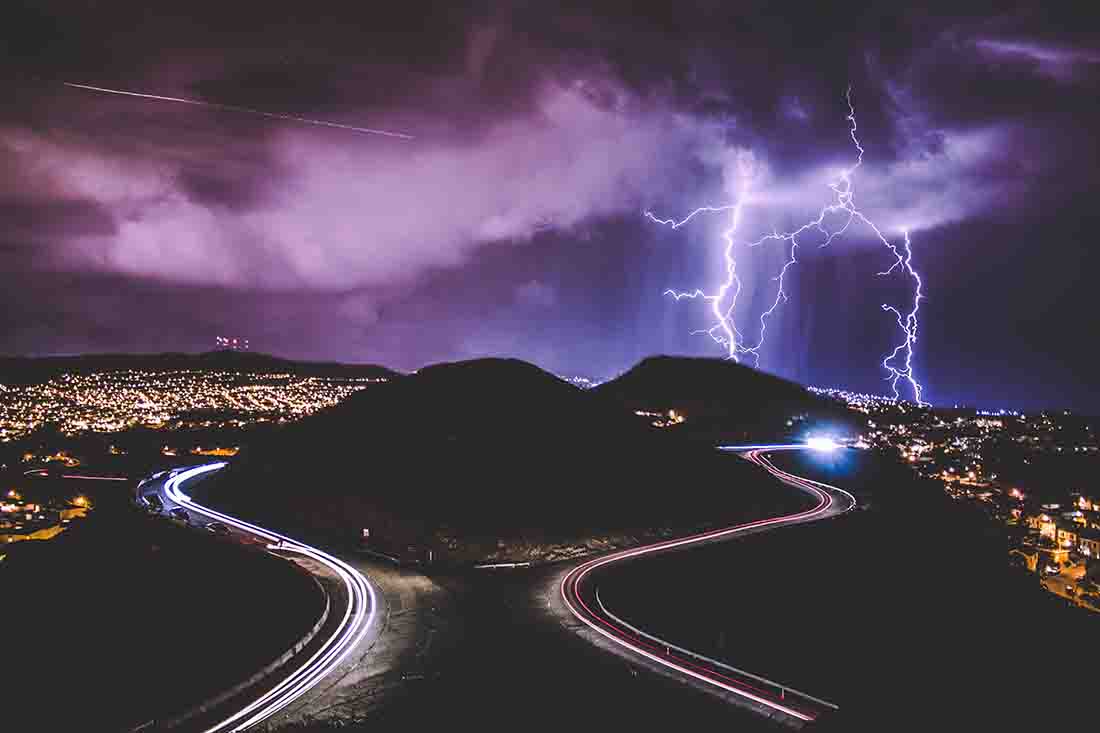
Lightning
Contrary to popular belief shooting a good lightning image is more about experience and assessment of the available situation than just pure luck. Professional storm chasers and lightning photographers do not get “lucky” on a consistent basis, they just know their craft well.
Without going much into the details of lightning photography which sincerely demands a dedicated article on it, let me just give you the basics so that you can just start off from a good position.
- Before the lightning and the rain starts, find a suitable location where you will be able to shoot for long durations without any disturbances.
- Lightning is best photographed when there is the least amount of ambient light and it is really dark. So the middle of a bustling city would NOT be a nice location to shoot.
- Use a sturdy tripod to mount your camera. Since you are going to shoot really long exposures, this is a must.

- Camera setting: Try and keep the ISO as low as possible. An aperture value of f/5.6 to f/8 is a good starting point. The shutter speed is the main determinant here. Try and spot a pattern in the way the lightning repeats. If you see that it is more or less repeating after every 30 seconds, set your camera shutter speed to 30 secs and that would give you a pretty good chance of actually getting one on the sensor. This is pure instinct and back of the envelope calculation, there is no hard and fast “rule” about this.
- Always shoot in manual mode and also use manual focus to get the best possible focus. Autofocus is really not gonna work here.
Bonus Tips
Lastly, here are a few tips that would help you get a few more good images with the gear and accessories you already have.
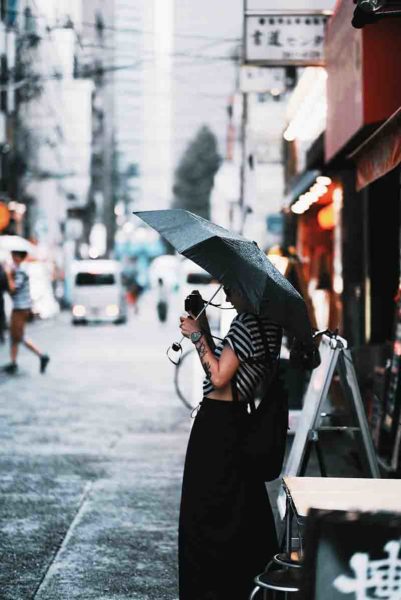
- Always carry an umbrella when heading into a shower. They not only provide a great shelter for you and the camera but you can also use them as a prop to bring out the rain and the wet feel of the scene better.
- If you can, dump a few packets of silica gel into your camera bag during the rainy season even when you have no intention of shooting in the rain. It would help absorb excess moisture and keep your bag dry and crisp, which in turn would prevent fungal growth on your lenses and camera.
- Don’t forget to photograph people and their expressions. It is an absolute goldmine, even more so for street photographers. As someone said ‘when it starts to rain, people get cloudy’.
- If you are unsure about the exposure settings and the light is changing much too quickly for your liking, you can always bracket your shots to have that extra bit of insurance just in case.
- The lens hood of your camera is a good piece to use to keep the pesky raindrops away from the front element of your lens.
- Be a Gordon Ramsay for a day and have a small piece of cloth or a towel nearby to just dry things up. It saves so much time.
- After every shoot in the rain, make sure you get back home and unpack your bag and then just let them dry. Do NOT let water sit on your camera or any other gear for long. Dry them off immediately after you get back. As I said earlier, the moisture if it sets in will give rise to fungus and all kind of electronic failure later. Spend that extra minute.
- Always always always be opportunistic. You never know what would make the next great image. Use all the gear you have on you, the available light, the situation you are in, the mood of the scene, everything to add to the image. Never stop hunting.
Conclusion
If you have made it this far I would sincerely like to thank you for spending the time to read this. I hope you now have some good, definite pointers now so as to how to prepare to shoot in the rain and how to make the best of the opportunities nature offers us. Do not be afraid to shoot in the rain anymore.
Brave the storm’….literally.
So that is it guys, all that is left now is for you is to pick up your camera and go shoot some amazing images in the rain.
Keep shooting amazing.
