Stop motion photography is not new by any means. This wonderful technique of combining multiple still images to create one choppy video has been with us for a long time now.
But it has never grown old!
It somehow has managed to hold its charm in its simplicity.
I don’t know about you but I am still mesmerized by all the shows which I used to watch as a child, even now when I happen to come across one.
So, today let me share with you all the techniques I used to shoot some of my early stop motion videos. In case you are wondering, no the videos were not great. But I had a wonderful time creating them. Maybe you can come up with some better stories and videos.
Ready then? Let’s get on with it…
The First Rule
Consistency is the MOST important rule when it comes to shooting stop motion photography. And it trickles down to everything.
Keep the camera as still as possible, do not let the lights change, shuffle position or flicker, maintain a constant exposure. You get the point.
The only thing(s) which are allowed to move around are the elements in the scene. In other words, the items which you are using to create the animation.
Think about it this way. In a regular video sequence, 24 frames are recorded every single second. Now since the time difference between each of those frames is so small, minute changes in light and camera movements are barely visible.
In stop motion photography, exactly the opposite happens.
Here you compose the shot, place everything where they need to be and then take a shot. Exactly like in a studio shoot. If before taking the second shot anything (other than the animation elements) changes, it is going to look very inconsistent. Absolutely NOT what you want for your final product.
Setup
Like any other video, this too needs a story.
For starters come up with an idea for a small movie which can be completed in say 120 seconds. Start small. It will keep things simple and help you get acquainted with the mechanics of the shoot.
Next, you need to calculate the number of images you need. This is purely dependent on the length of the video you want and the frame rate you choose.
Traditionally for stop motion videos, 10 or 15 fps is used. You can choose either.
Faster the frame rate you choose, more fluid and smoother your video will look and vice versa. Also, keep in mind that a higher frame rate will also require more images to create the same length of video footage.
So if you want a 30 seconds long video, running at 10 frames a second, you will need:
30 x 10 = 300 images/frames.
[Duration of the film (in seconds) x Frame rate selected = No. of images required]
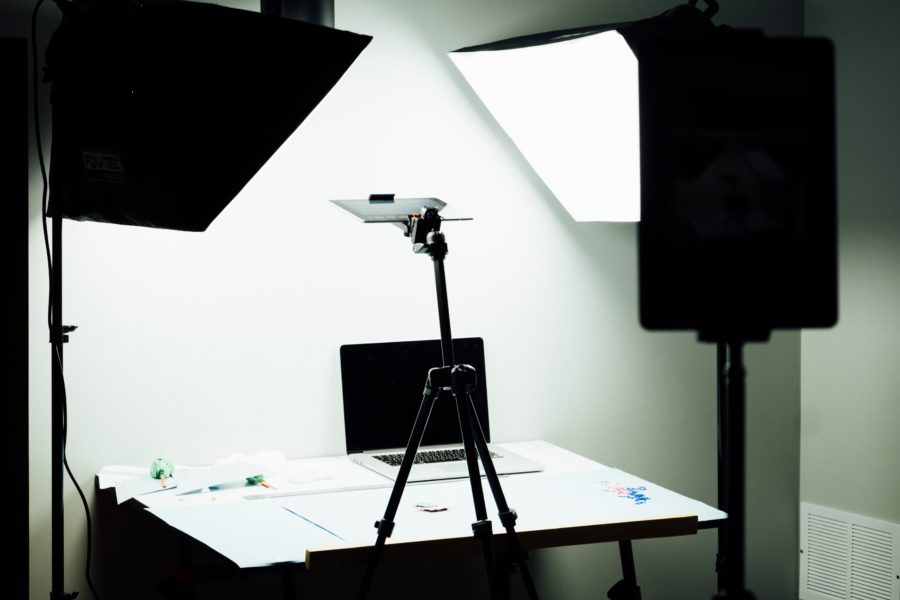
Gear
You don’t need much for this.
A camera and some electric lights are more than enough. You can even use a cellphone or a tablet camera for this but then you will have to compromise a little on the quality of the final video.
If you have manual control on your camera be sure to use them. The idea is to NOT to let the exposure of the shots change over the course of the shoot. Keep it consistent remember.
An aperture value between f/5.6 to f/8 should give you the best performance out of your lens. Like always, select the lowest possible ISO value. Lastly, select a shutter speed which helps you to properly expose the shots. I am assuming you would use inanimate objects for your shoots; hence the shutter speed shouldn’t matter at all.
The final job is to secure the setup positions. This may seem trivial but is of the utmost importance. Once you are happy with the composition of the frame, secure all your gear, especially the camera and the lights. You do not want them to move until your last shot is taken.
Extras
Remote Shutter Release: Like I said, once the setup is pinned down you do not want to touch anything. Even pressing the shutter button may invite in unwanted movement into the frame. The best way to avoid it is either using a remote/intervalometer to trigger the camera or shoot tethered to the computer. You can initiate your camera to take a picture using Lightroom.
Continuity And Speed
Now that we have a good setup ready, let’s flesh out the shooting plan a little more.
The length of the final video we need would give us the number of shots we require for the video to be built out of. Once we have the number it is important to divide the sequence of the events in your story uniformly.
Here is what I mean.
Say your story requires a certain character to move point A to B. So when the story starts, the character is at point A and by the time the video ends he is at point B. In order to keep the story progression as smooth as possible, what you need to do is divide the total movement of the character into bite-size steps. This way the entire sequence of the video flows naturally and doesn’t look odd.
Next comes the concept of continuity.
It goes without saying that all the images that you take should lead to the next one and feel like a cohesive group when stitched together in a video.
Start with an initial setup and then keep making minute changes and photographing them. After every 10 images or so, make sure you go back and look at the images you just took. Do they fit in properly? Toggle through the images back and forth, be sure of it.
If they do…move on. If not, you should go back and fix the issue at once.
It is extremely normal to reshoot a couple of images or the entire sequence if required.
As you progress with the story and take more and more images always keep track of the number of images you have left and the amount of story that needs to be told. You do not want to suddenly speed up or reduce the pace of the story. That would look extremely unnatural.
Post Processing
With the shooting done, now let’s get to the post-processing.
Since most of what we shot was in a controlled environment, only the things that we wanted to change actually did. We probably wouldn’t need much retouching anyways. But I guess you can always use it a little bit to enhance and bring out certain parts of it.
Just make sure that you do not make drastic changes to individual images. Keep them consistent.
The main intention behind editing the images is to chalk out the mood/tone a little bit and enhance the features of the characters if required.
Once you have all the images done and placed sequentially, you can import them down to a video editing software and then begin the stitching process.
All that is now left to do is add music and sound effects and voilà, your stop motion animation is done.
Hot Tips
- While making changes/adjustments to a scene, make sure that you do not cast a shadow on your characters. This happens more often than you think. Move away a safe distance and only then fire the camera.
- ALWAYS use an external trigger to initiate the camera to take a picture. You can use a remote or an intervalometer. Personally, I would say the best way to do this is probably shooting tethered. Not only do you have a better grip on the shooting, but you can also shoot through much faster. And all you need is a long USB cable to do it all.
- Choice of light depends totally on personal preferences. You can use speedlights, strobes or continuous light for this. Just one thing, it shouldn’t change in between shots.
- Never use a partially charged battery for this. It really takes a long time to shoot for stop motion sequences. The last thing you want is the camera dying on you.
- Even with the same set of light, sometimes just by changing their positions may bring about a huge change in the mood of the pictures. Experiment a little before you settle for a particular setup. The direction of the light matters a lot.
- For some stop motion sequence, you may consider shooting in reverse too.
- A good sound design may absolutely bring your animation to life. Do NOT underestimate the power of sound. Do it diligently.
- There are many apps available for free which can help you create your own masterpieces.
Finish
Stop motion is an amazing way to explore creativity if you ask me. It’s building a video using nothing but still images. You get to play God for your tiny little kingdom and its characters. What is there to not like about it?
And I can bet that no one can dismiss the magical feeling when they see their own creation for the first time, come to life.
Do it with your children, do it on your own to kill some stress, do it however you like. In the end, I am sure it will feel good. The only limitation is your imagination.
That is it, guys. That is all the basics you need to know to start off creating some amazing animations of your own. If you have some questions that you want me to clarify for you, shoot them in the comments below.
Keep shooting amazing.
