Filters? Polarizing filter….Do you really need it in today’s day and age of digital photography? Can’t you just mimic whatever it does during post production?
Apparently, you CAN’T.
Why?
Well, that will need some more explanation. Just bear with me a little and you will be in the know soon.
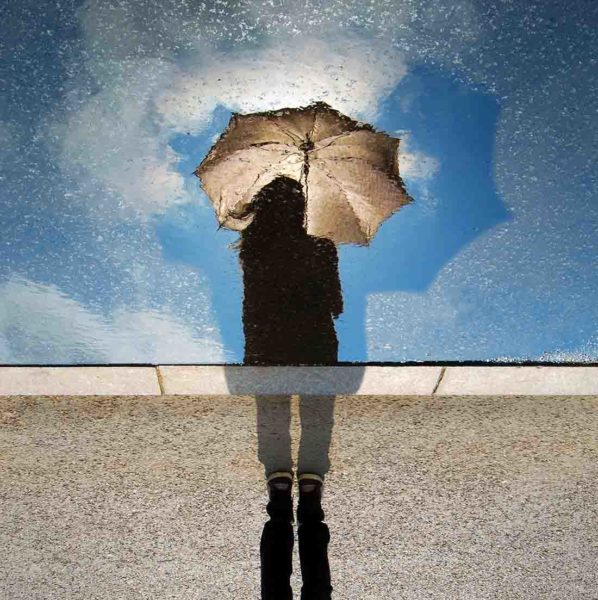
And for anyone who does not know what Polarizing Filter is or what it does, let me just show it to you. It does this.
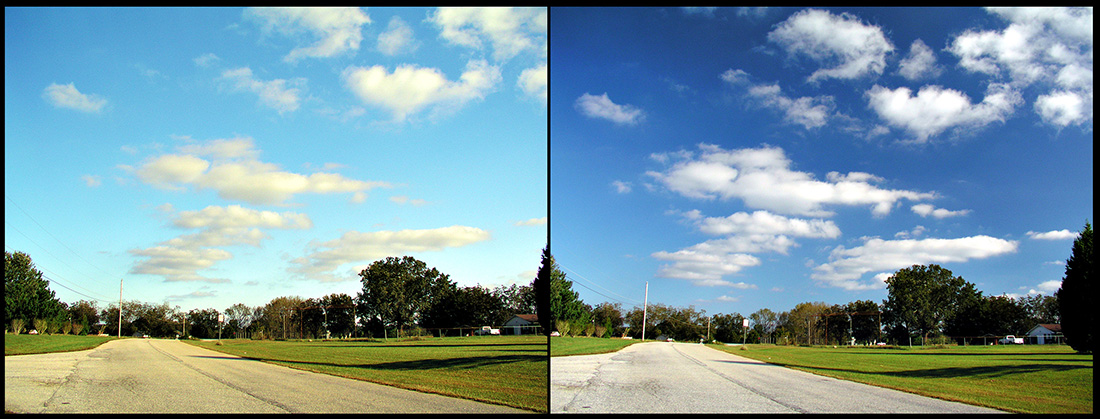
and this
Looks like magic, isn’t it? Well, it kinda is. The magic of science blended with the art of photography.
Okay now, let me just delve right into the meat of it.
What Does A Polarizing Filter Do?
The most important thing a Polarizing Filter does is cut out reflections and glare. You see, much of the light we experience on a daily basis is actually reflected from some object. This may make the object look too shiny and deters us from making out any details that might be present. This is the exact same problem your camera faces.
Think of some places where there could be a substantial amount of reflections; near a water body, a pane of glass on a sunny day, the sky. A Polarizing Filter helps us cut out these unwanted reflections from our images. In essence, it helps our camera look at the scene differently (without the reflections).
How Does That Help?
Apart from just cutting out the reflections that might cause a glare for the camera, a Polarizing Filter also helps in bumping up the contrast and making the scene look vibrant and vivid. It makes the colours a little more saturated and brings this wonderful overall feel to the image that is probably not achievable by any other means.
If you have ever looked at some amazing landscape images and wondered…gosh, why are my images never so good? A Polarizing Filter may be the difference. I am NOT saying that the photograph is good only because the photographer used a filter and yours sucks because you did not, but I have to say that a good quality Polarizing Filter does add to the image a lot when used properly.
You have seen the images above, what do you think..does it not?
Types
Polarizing Filters are primarily of two types:
- Circular Polarizer
- Linear Polarizer
For the purpose of photography, we predominantly use Circular Polarizing Filters or CPL. The reason for this is pretty simple. A circular filter allows us to use our in-camera Autofocusing and TTL (Through The Lens) Light Metering systems, which are very important. I should make it clear that ‘circular’ in this case does NOT refer to the shape of the filter itself but to the method used to achieve the polarizing effect.
Linear Polarizers essentially perform the same functions as CPL but they do not allow the camera’s internal Autofocusing and Light Metering to work. You can use a linear filter on your camera but then you would have to select all the settings manually. The camera’s in-built Light Metering and Autofocusing systems will not work when working with a Linear Polarizing Filter.
Stick to Circular Polarizing Filters (CPL), that is it.
Shapes
Like ND filters, Polarizing Filters also are available in round/circular (NOT to be confused with circular polarizing filters) and square-shaped filters. They are EXACTLY the same. There are two shapes only because some people prefer one to the other. The round filter is generally screwed on to the front of the lens and the square filter is attached to the lens using a holder or adapter.
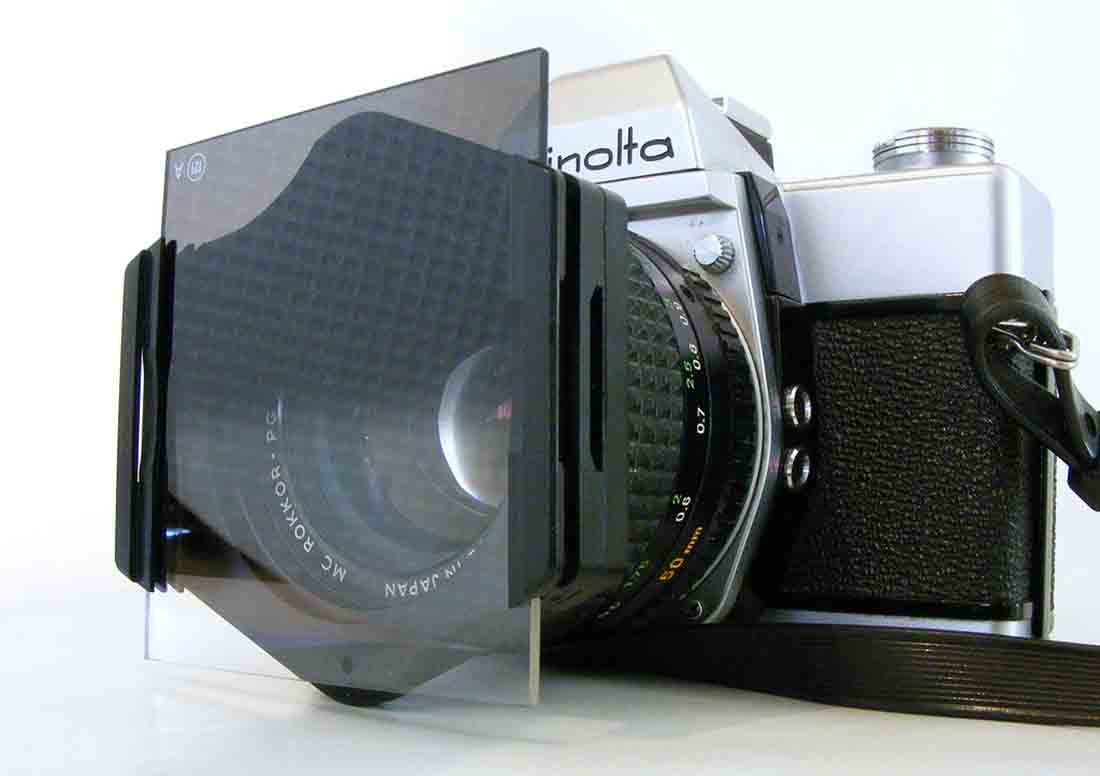
One advantage of using a square filter with the adapter is that it could be used with lenses of different diameters. Just get the adapter the same size as the lens and then slide in the filter.
On second thoughts, you could also replicate the same thing with a large round shaped filter and a bunch of cheap step-up rings just like you did with ND filters. All you have to do is get a Polarizing Filter that fits the largest lens you got. Now use step-up rings to fit this large filter onto any smaller lens. I personally do this. Go for the round filter; they are much easier to handle, store and carry.
Polarizing Filters are generally costly; so you may want to buy only one or two. Hence the added pressure of ‘multi-lens’ use.
How To Use
It is pretty easy and straightforward. Just mount the filter at the front of the lens and then turn it to achieve the desired amount of polarization. There is no right or wrong about how much the effect should be. Just make sure it is to your liking and that is all that matters. However, do keep in mind that the filter blocks one to three stops of light. So make sure you adjust to it by either using a larger aperture or longer shutter speed or just by bumping up the ISO. Like sunglasses, it is not a good idea to use a polarizing filter at night. It would block a substantial amount of light making your job a lot tougher and your images darker.
Another thing to keep in mind is, you get the maximum effect of the filter when the light source is 90 degrees to you. What I mean by this is, say for example you are shooting a landscape, the Polarizing Filter will perform the best when you and the sun are perpendicular to each other. In other words, when you are NOT shooting into the sun or when the sun is not behind you.
The results in the last two cases are not as pronounced.
Small Trick
I did not know this until very recently that the light emitted from our computer and TV screens are also polarized. Which means you can use a polarizing filter to block some or all of the light coming from it and make it look as if the screen is totally off. Try it, it really is fun!
You can also use it to make the sky pop and make the clouds look more vivid and slightly more dramatic. A little part of the light coming from the sun is polarized (apparently bees use this to navigate by) so using a filter helps to reduce that, increasing the contrast and vibrancy of the rest of the image.
If you have a point and shoot camera and are feeling left out….fear not. I have a cheap but not so fabulous idea. This is the same trick I used before I finally decided to get a Polarizing Filter once and for all. This requires you to either have a pair of polarized sunglasses or have the ability to borrow one from a kind friend. I did the second. Hold the sunglass in front of the camera’s lens and cover it as much as you can. Now turn the glass to see the magic. Make sure you use a pair of polarized sunglasses only. Polarized glasses used in sunglasses are the same as camera filters; the only difference is in the application.
Lastly
Like I said at the beginning, of all the filters that you can possibly buy, a Polarizing Filter is one you simply cannot replicate or mimic in post-production. The simple reason behind this is when you are not using a Polarizing Filter, the details that are masked behind the reflections are never revealed. Hence, you cannot record it with your camera. You, therefore, cannot later recreate information from the images that your camera never saw.
When used properly it really does create a special aura around the image, making it all very special. So go out there, kill some reflections and make even more beautiful images. Just do not use it at night and make sure you take it off when you are done. Leaving a filter on a lens for very long is one very expensive mistake which has claimed many….many good lenses. Whatever you do, take off ANY filter once you are done. It WILL jam if you don’t.
Go create beautiful.
Before I go, if you are a nerd and want to really know the science behind the Polarization of Light, I suggest you watch this.
