We will discuss about Aperture, and I will tell you all you need to know to get started…but before that a small detour.
Have you ever wondered, ‘which is the best camera in the world?’ As soon as we hear the question, our mind starts to flutter towards the big expensive guys. Sony A9? Or perhaps, Canon’s new full-frame mirrorless that we have been hearing about (but not yet seen) for some time now? Or SpaceX’s hi-tech ultra modern intergalactic camera that we do not know about?
Those will be very good guesses but unfortunately wrong. Yes, they are all exceptional cameras in their own regard (I have no idea about SpaceX’s camera though, I just made it up). But the best camera is already in your possession guys! Any more guesses? … Yes, they are your humble eyes!
You are starting off as a photographer and perhaps you have not come across too many situations to understand and realize the simple yet amazing power of your eyes; but trust me, as you begin taking photographs and develop your skill set more and more, there will come a day when you will wish like hell for a camera just like your eyes. Nothing else.
More on that thought later, let’s talk Aperture now.
Definition
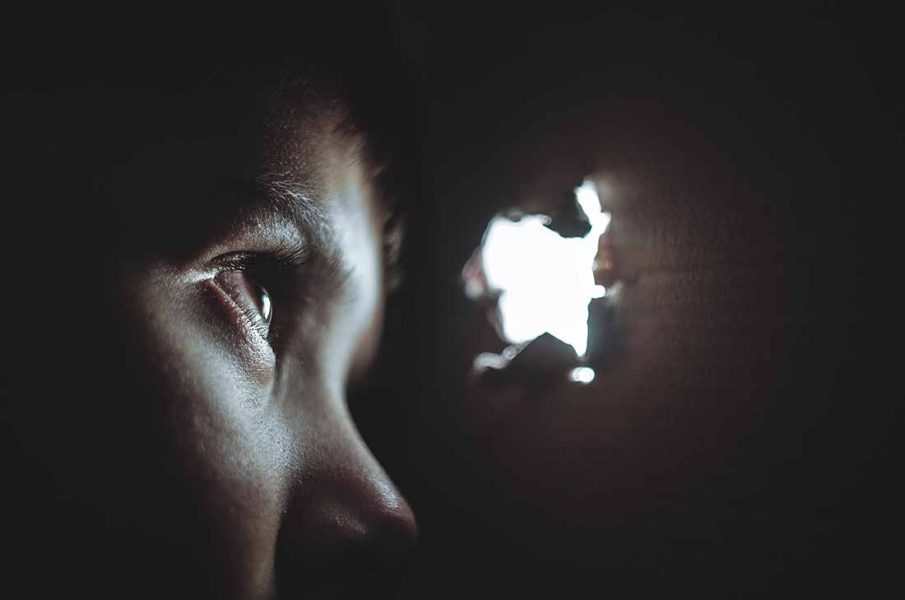
An aperture, in plain simple English, means a hole or a gap. In photography, it refers to a hole/opening at the back of the lens which lets in light into the shutter chamber.
If you already know about the Exposure Triangle…great! If not, I strongly suggest you read about it before you continue with this article. It will help you understand Aperture in conjunction with the rest of the elements of the Exposure Triangle, and you will have a firm understanding of how they fit in together.
You can find the article about Exposure Triangle here: Exposure Triangle | The Very Basics Of Photography.
All set then?….Let’s roll.

Where Is The Aperture Located?
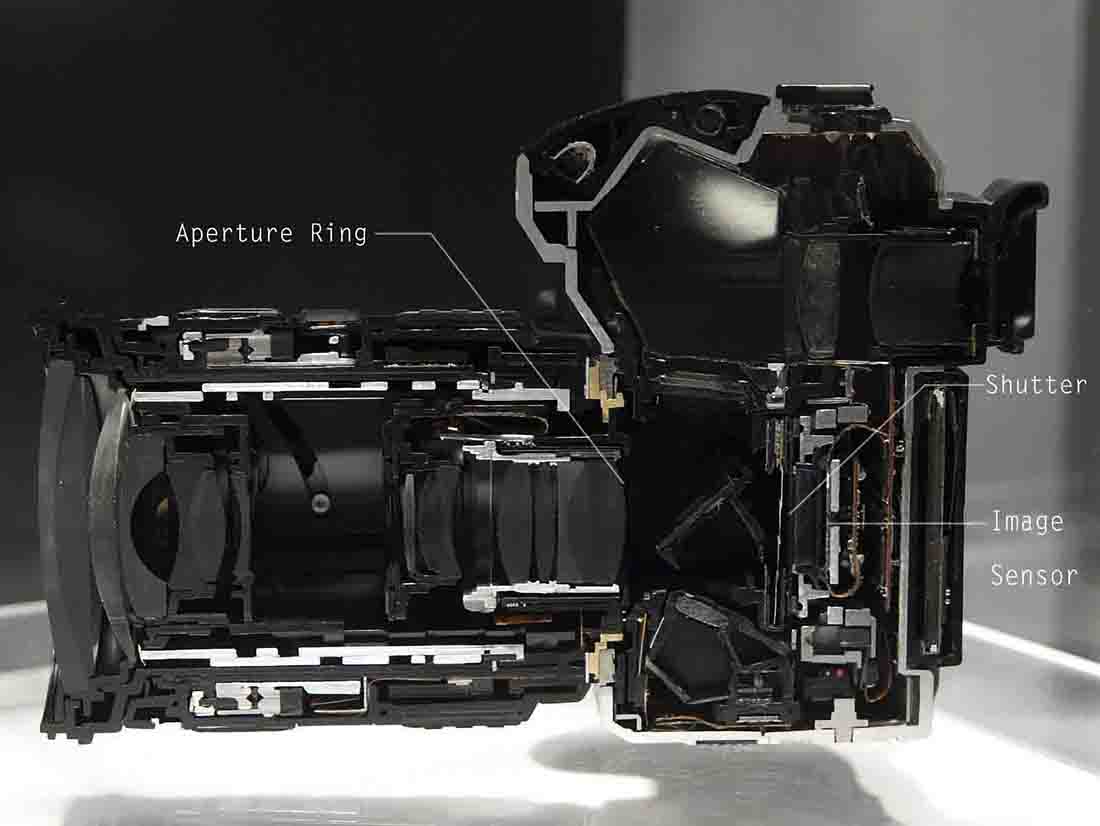
The Aperture is generally located at the back of the lens, where the lens meets the camera. If you have a DSLR or a camera with an interchangeable lens, the small circular opening at the back of the lens that you see while detaching the lens is the Aperture.
What Does It Do?
The Aperture lets in the light that comes through the lens into the shutter chamber. When the photographer decides to take an image, he presses the shutter button to open up the shutter, and then this light falls onto the image sensor which creates the image. Easy!
Why Do We Need To Know About Aperture?
As I mentioned in the Exposure Triangle post, Aperture is one of the MOST IMPORTANT elements that control the aesthetics of an image.
The Aperture controls two very important aspects
- The amount of light that is let inside the camera
- The Depth Of Field (DoF) of the final image
How Does It Control The Amount Of Light That Is Let Inside The Camera?
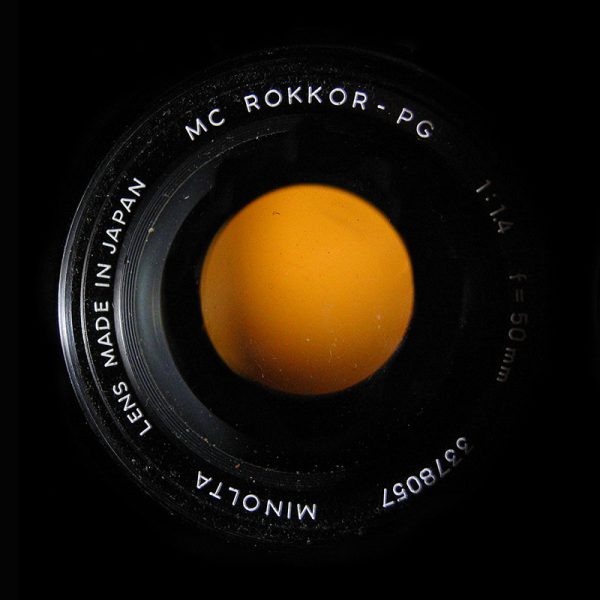
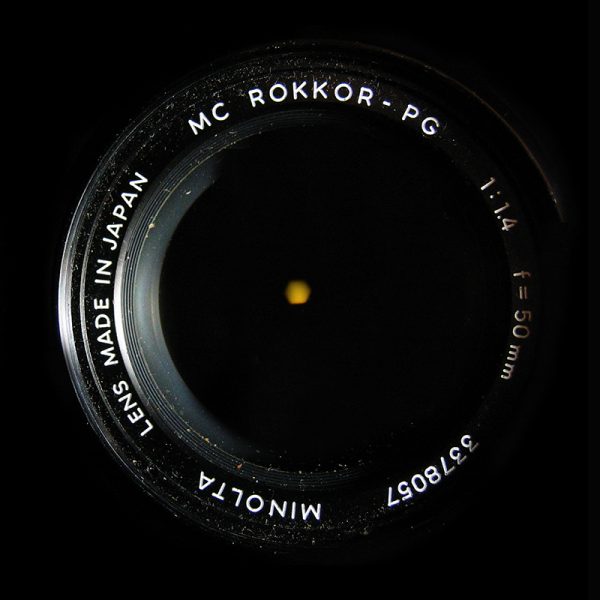
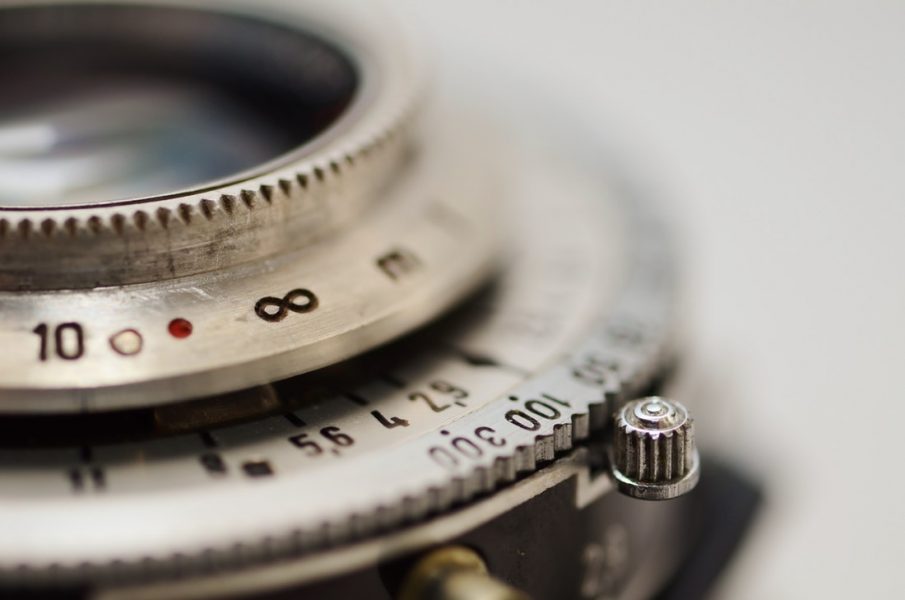
The Aperture changes in size to increase or decrease the amount of light that is allowed inside the camera. Every lens has a set of blades which expands or contracts the size of the Aperture. They look something like this
The larger the opening/hole of the Aperture greater is the amount of light that is let inside the camera, resulting in a brighter image.
Smaller the opening/hole of the Aperture lesser is the amount of light that is allowed in, resulting in a darker image.
Why Not Always Have a Large Aperture Then?
It might look obvious but it is not a good idea to always use the largest Aperture that you can possibly have on a given lens. There are two primary reasons
- The image may turn out too bright
- Larger Aperture has smaller Depth Of Field
A large Aperture is a great idea when shooting in low-light conditions (a nightclub, a bar, dimly lit restaurant) to let in as much light inside the camera as possible. But the same large Aperture may become a problem when you are shooting in bright places (outdoors on a sunny day, well-lit studio, etc). A large Aperture may now allow too much light inside the camera, resulting in the final image to be washed out and faded.
Wondering which Aperture to use so that the image is bright enough but would not blow out the details and make the image look washed out? Give me a minute, I will give it to you.
Depth Of Field (DoF)
The Depth of Field (DoF) is one of the most important factors of an image that the Aperture controls single-handedly. To tell you the truth, Depth of Field is a fancy term for how much of the image is sharp. That is all folks. That is all it is. Simple, right?
If most of the image (foreground, subject, and background) is sharp, we can say the image has deep/large DoF.
If a small part of the image is sharp (say just the subject), while the rest of the image, though visible, is not so sharp, we call it a shallow DoF.
Let me give you two examples to cement your understanding.
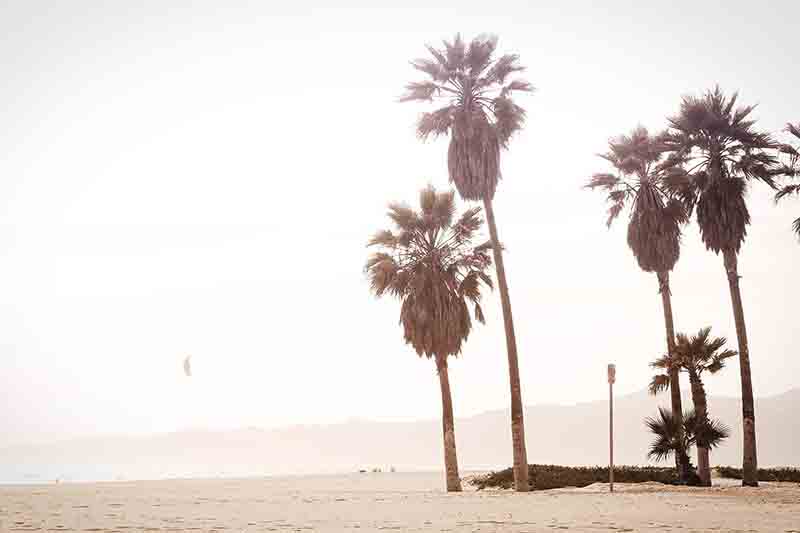
In this image, as you can see, nearly all of the image is relatively sharp. You can make out everything from the foreground to the background. All the rocks and the water in the foreground to the distant mountains, everything is pin sharp. This is a great example of deep/large Depth Of Field (a large portion of the image which is sharp).
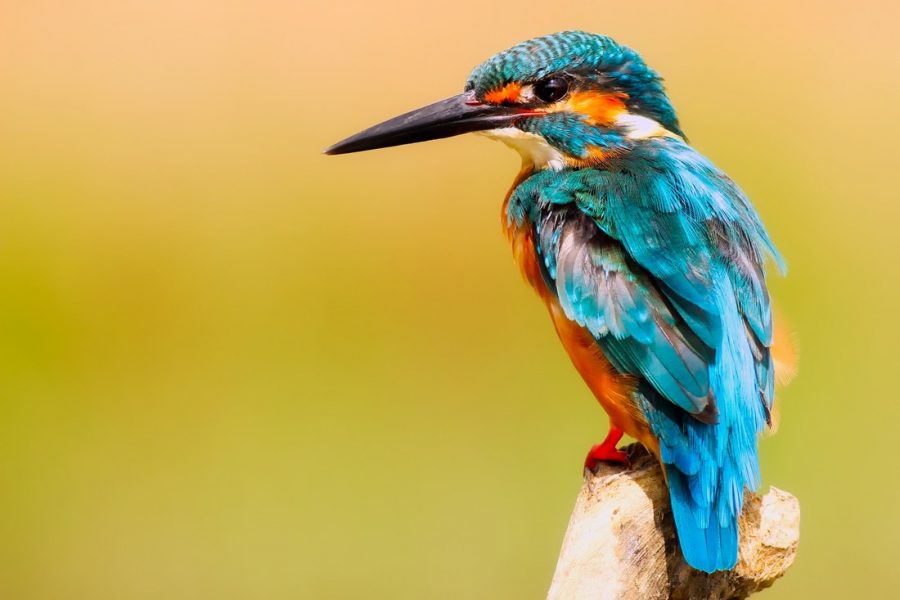
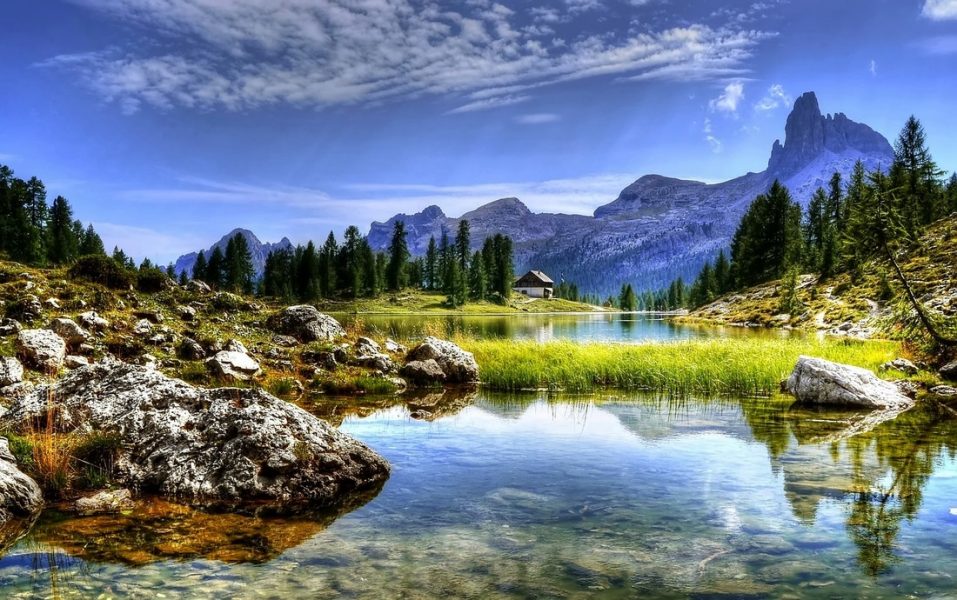
The image above has, what we photographers call, a ‘shallow depth of field’. ‘Shallow’ since so little of the image is actually sharp. Portrait and wildlife photographers particularly use the shallow depth of field to isolate the main subject of the image from a distracting background or foreground.
When a little part of the image is sharp, the human eye is drawn towards it more. This is how good photographers in a way make a ‘map’ for people’s eyes to follow when they look at his images. Isn’t it fascinating?
When I came to know about the concept of Depth Of Field for the first time, I was so taken aback. It has given me a completely different way of looking at images since then. The fact that I can control it to make my images look however I want was like a superpower to me.
It still is pure magic…:)
How Is Aperture and Depth Of Field Connected?
This is the most important question in this entire article, so pay a little attention here.
Aperture and Depth Of Field are inversely related, meaning;
- When you increase the size of the Aperture -> You have a smaller DoF
- When you decrease the size of the Aperture -> You have a larger DoF
So, in effect, when you want to shoot say a landscape and have all of the image, from the rocks in the foreground to the mountains in the distance, as sharp as possible, use a smaller Aperture.
Similarly, when you want to shoot a portrait of a person and want to isolate her from the background to lay greater emphasis, you should use a larger Aperture. A larger Aperture will have a smaller DoF thereby allowing you to only keep the subject sharp, while the rest of the image is left ‘unsharp’.
If you need it, read the last two paragraphs a few times to embed the idea in your head.
I know it is a little bit to process but once you get the hang of it, it would be like second nature.
Now an important thing you should know.
How Do We Measure Aperture?
Till this point, I have been using the terms ‘small Aperture’ and ‘large Aperture’. They don’t mean much in real life, I am afraid. I used them for you to understand the concept of Aperture before we delve deep into it.
In real life, we need to quantify and give each of the Aperture sizes a number, so that we can refer to them.
Aperture sizes are measured in what we photographers call f-stops. They look something like this.
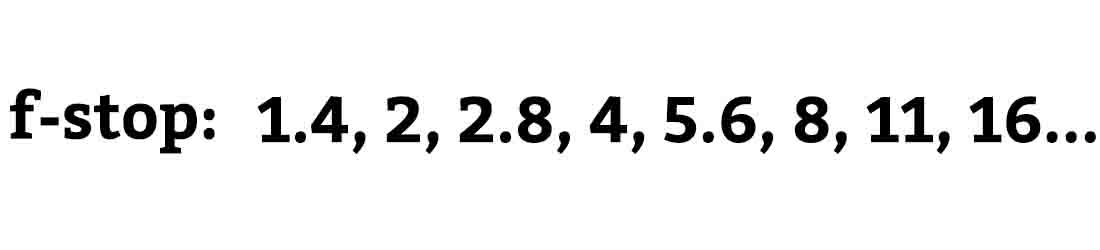
Do they look like a list of jumbled up numbers your Maths teacher might give you to torture you to death? Yes, I thought that too when I looked at them for the first time. I am sorry that I have to break this to you but these are in fact f-stops with which we measure Aperture sizes.
But don’t worry much, I have a nice little trick for you which you can use to bypass the horrible part. Give me a minute here to finish up this part first.
What Do These Numbers Mean Anyway?
F-stops are actually ratios. Hence they look so unfabulous. But you do NOT need to keep that in mind AT ALL. Just make sure you remember this.
A smaller f-stop value corresponds to a larger Aperture size and vice-versa. Read it again.
So an f-stop value like f/1.4 is a very large Aperture size. (This f/ is just the way f-stops are written).
While a larger f-stop value like f/16 corresponds to a very small Aperture size
But You Promised A Trick To Avoid This
I did and here it is. Remember the set of f-stops that I showed you earlier? Did you notice a pattern that emerged there?
If you did….great! You do really have a beautiful mind. If not…it’s fine, I will show it to you.
If you notice carefully, except for the first two numbers, f/1.4 and f/2, all the other numbers are exactly double of the number that is two spots behind it.
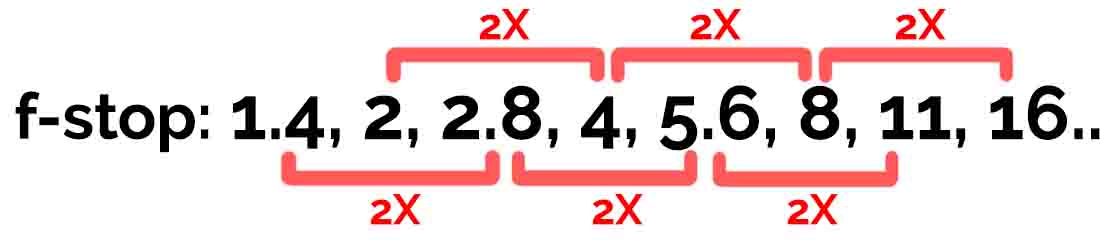
See that? This relationship between the numbers is true for all the Aperture values. So, in effect, all you have to remember is the first two numbers 1.4 and 2; and keep on doubling them to get the next value. Easy peezy!
How Do We Change The Aperture Then?
You can choose any Aperture value you want by either navigating the menu on the LCD screen at the back of your camera; or by using some combination of dials and buttons. This is a little different for every camera but it is quite simple to do. Consult your camera manual to find out exactly how you can do it on your camera. Or maybe just look up YouTube with your camera model for a quick tutorial.
Which Aperture Size Do You Want?
There is no one correct answer for this. Every photograph is different. Every photographer is different. You may want to portray the same subject in a completely different way than how I would want. There is no ‘right’ and ‘wrong’. So, to answer this question, I would say use your best judgment. I can, however, give you some tips on how to form that judgment.
Try Out The Aperture Priority Mode (‘A’ for Nikon, ‘Av’ for Canon)
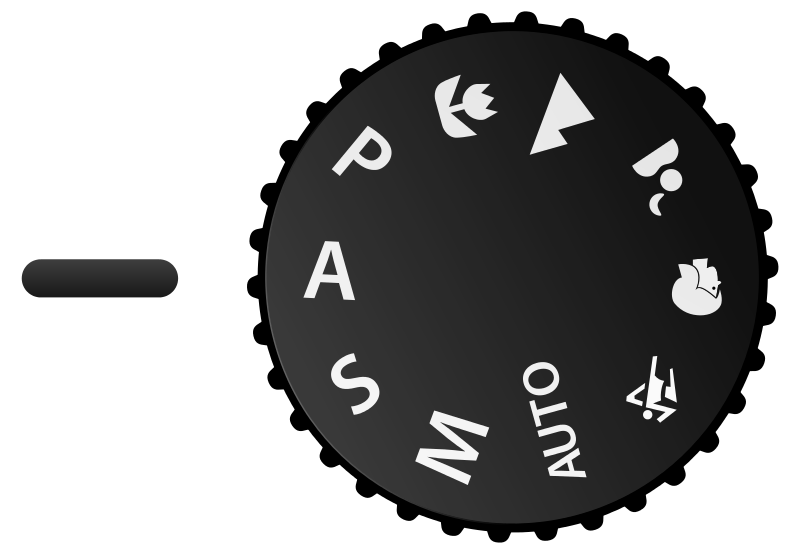
In case you are wondering; YES, Nikon and Canon love to confuse us with different nomenclature for the same thing (‘A’ for Nikon, ‘Av’ for Canon). Using the Aperture Priority Mode will help you understand practically all that we talked about today. This mode does what it sounds like. It makes the Aperture the priority of the settings. Which means that you, the photographer, get to chose a specific Aperture and the camera adjusts all the other settings depending on various factors such as light intensity, light type, type of image you are trying to shoot, etc. to give your images a good exposure.
When I say all the other settings, I primarily mean Shuter Speed and ISO that are the other two parts of the Exposure Triangle.
I can promise you this. If you use the Aperture Priority Mode long enough, you WILL have a commanding understanding of how your camera thinks. You can then take the big jump and use the camera on Manual mode. Make the machine do what you want; how you want; like a true artist.
Look At Other Good Photographers And Their Work
At this stage when you are quite young at the art of photography, I suggest you look at other good photographers and try and understand their perspective. I do NOT mean browse through. LOOK at them carefully and try and find out what you like about them.
Potential Pitfall
There is a potential pitfall in doing what I just asked you to do. It’s copying. Looking at great photographers and their images is a good thing but do NOT make the mistake of trying to emulate exactly that image. Many many people do this. Please do NOT be one more such statistic. Try and understand their style and perspective. Learn from them and try and implement what you learned into your own work.

This might happen at a subconscious level too. Without even knowing that you have started copying your favorite photographer, you might start doing so. I know this because I once did it too, without realizing. Sure my photos were absolute crap and nowhere near the greats but what I was trying to do was indeed scary.
Please be wary of this and keep an eye peeled. Do NOT let this happen.
Tid Bit
I just wanted to finish the story I started with. The ‘eyes story’. As a matter of fact, the Aperture in our camera is actually modeled after our eyes. The Aperture of our eyes is called the pupil. In exactly the same way that you saw the blades of the lens to contract and expand the size of the Aperture to regulate the amount of light that it lets in; the pupil in our eyes also performs the same function so that we can see better.
In dark situations, the pupil dilates and lets in more amount of light in. In bright situations, it contracts to restrict the light. Remember how we squint when facing bright light so that less light reaches our eyes. The pupils in our eyes do exactly that internally.
Just wanted to share this with you.
Finally
So that is all you need to know about Aperture. I hope I gave you all you need without actually dazzling you with information.
If you have ANY questions ping me below in the comments and I will get back to you.
Keep shooting beautiful.
Hand Picked For You
 Understanding image exposure and the maths behind it is the bedrock of photograp...
- Exposure Triangle, you may have heard photographers use the phrase many times an...
- ISO is actually NOT an acronym. It is a word which is pronounced "Eye-So". It is...
- People live in fear of the Manual Mode all their life, never looking at it close...
- Shutter speed determines the time period during which the shutter opens up to le...
- Getting sharper images out of your camera is much easier than it is made out to ...


Thank you for your knowledge re Aperture. I am new at photography and find experimenting with practice shots is the true learning curve for what I THINK IS A NICE SHOT. Some are good and some not so good.