If you have lived on this earth for at least a couple of years now, then I am absolutely certain that you have witnessed some form of high key photography.
Wanna know how I am so supremely sure about it?
It’s because high key photography is widely used in something no one on this earth has ever been able to outrun…..advertisements!
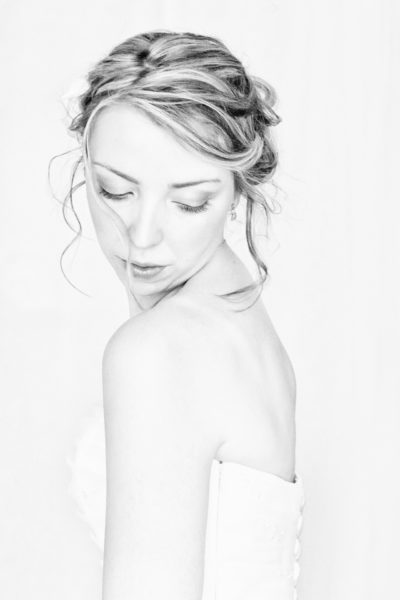
High key photography is a form of creative imagery which primarily involves photographing the subject against a very bright (in most cases almost white) background with very little contrast to create an image that reflects a light, effervescent and joyful mood.
It is no surprise hence that this form of photography is so popular with product and service photography since they always try to marry such strong human emotions with their products.
The Fundamentals
Its pretty simple actually.
Think of high key photography as just a way of remapping the tones of an average image with some minor additional steps.
I say remapping because that is the sense encapsulated in the word high key. Its basically pushing the tones to the right of the histogram, where they get all washed out and faded.
So shadows and dark areas become the new mid-tones, the mid-tones are pushed to become the highlights and the highlights themselves are crunched to pure white.
In a nutshell, the image acquires all the qualities that an overexposed image has by, surprise surprise, actually overexposing the image.

It goes without saying that in all this overexposure and bumping up the brightness of the image frenzy, the details of the subject of the image is however protected. Although the tones which remain are fairly bleak, the details are generally not trifled with much.
That is the delicate balance that we have to walk in this genre of photography.
Just hold on a bit and I will explain how we do all of the above perfectly, so we have a lovely high key image to ourselves in the end.
Prerequisites
As you already saw, the hallmark of a good high key image is an extremely bright/white background with a subject with very low contrast and dynamic range.
To achieve this look, you can use outdoor lighting but it is mostly going to be an uphill battle. Controlling all the factors involved in shooting simultaneously can be a real challenge. Especially considering a light source (the Sun) which you cannot even control.
It is hence my advice to try and shoot these images indoors, in a studio environment where you have the maximum amount of control over the components which influence the forthcoming images.
Now, you can go to great lengths and spend a heck lot of money on lights and all other accessories needed but if you are reading this, chances are you are not a “pro” yet and just want to try your hand out for the first time.
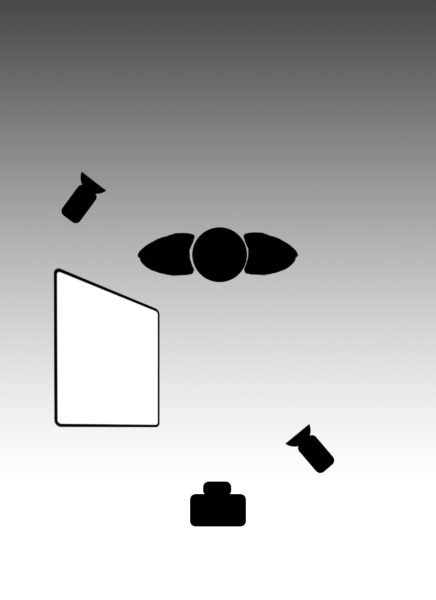
In that case, just follow my steps and I will show you the way of shooting with just two lights and some reflectors.
Background
Like I said, to achieve the high key look, you need a bright, even, homogeneous background.
So no points for guessing, white works the best.
You can use a dedicated white backdrop if you have one or just improvise. A white wall, door, white bed sheet, printer paper stuck to the wall. Anything and everything that makes it look okay in the image is just fine.
Lights
To be honest a four lights setup works the best.
Two dedicated lights to brighten the background like a Christmas tree and two to illuminate the subject. You have the maximum amount of control, and there is quite a lot of space for creativity.
However, today we are going with the cheaper option. Using just two light sources.
One thing to note before I proceed any further.
For lighting your set, you can use either continuous lights or flashes.
The good thing about continuous lighting is that you get what you see. Since the lights don’t change intensity, the exposure remains constant and you can just take it from there. Finding the right set of setting on the camera is a lot easier in this case.
The drawback of the continuous lighting arrangement, which also happens to be the plus point for the flashes is that the continuous lights are generally much weaker in intensity.
Flashes and strobes are hands down way more powerful.
I personally suggest using just two inexpensive off-camera flashes.
The Yongnuo 560 Mark IV and the Godox 685 are two amazing flashes. They are cheap (under a ₹7000 or $100) and they perform just as well as any of the other flashes made by major camera companies such as Canon, Nikon, and Sony.
Place the light sources you finally opt for in the configuration shown below.
 Camera Settings
Now, this is going to vary wildly depending on what and where it is you are actually shooting.
Just remember that in the end, you need a flat, low contrast image, devoid of any shadows on a bright background.
Since we are working with two lights, in this case, Manual mode is what is going to work the best.
Apart from the subject matter of the image and the message you are trying to send across, what you really should be monitoring pretty closely is the exposure. The exposure of a high key image is the single most important part which can potentially make or break the image.
You want the histogram as close as possible to the right, without it actually touching the right wall.
Now the last part is extremely important. You do not want to blow out details.
A histogram with spikes touching the right wall indicates that some part(s) of the image is blown out and that the camera has not been able to capture any details from those areas.
Bad news!
However, there is a small caveat here.
If the background or some part of the image other than the primary subject itself is blown out a little, it’s fine. You really don’t have to sweat about it. In fact, it is advisable to actually blow out the background by one or two stops.
But get this clear, you need to be absolutely sure which part of the image is actually getting overexposed if at all.
Just for the record one last thing.
Even though sometimes the histogram shows that you have indeed breached the line and touched the right wall of the graph, which directly implies blown out areas. The camera may, in fact, record some details on those parts as well. This is because in nearly all the modern cameras we have today, the in-camera histogram is made using the Jpeg version of the image you just took.
Even when you are shooting in RAW!
Long story short, you may sometimes get away with a marginally blown out image even when the histogram confirms that you have actually blown it.
But don’t try your luck too often, you may land up destroying a good image or a few in the process.
Histograms are going to play a crucial role in determining the exposure. You need to know it like the back of your hand. So if you are not very sure about your knowledge about it or just want a refresher, I highly suggest you give this a quick read before you proceed any further. It will save you a lot of time and headache, I promise.
How To Leverage Histogram Explained | Plain & Simple.
If you have a DSLR camera, you will have to go through a lot of test shots to figure out at what exact settings you get the desired result.
Mirrorless cameras have a slight advantage here. Because of the EVF (Electronic Viewfinder), the photographer can see even before actually taking the shot, what the final image is going to look like.
There is, however, a trick to go around this slight shortcoming.
DSLR users can use the Live View option to see directly what the resulting image is going to look like bypassing the OVF (Optical Viewfinder) completely.
This is just a suggestion though. Use whatever floats your boat. Personally, I almost never use the Live View to take photographs. It makes me feel very unstable.
You can start with the basic setup and then make changes on a need-to basis.
The Shoot
Now that you have all the lights and the entire setup in order, let’s get on with the shooting.
Place your subject in position and take a shot. See if the background is looking bright and lovely. You may overexpose the background a little (by one or two stops) here if needed.
If the background is still not looking sufficiently bright, you may want to bump up the power of the flashes or get them closer to the background. Dropping the shutter speed or decreasing the aperture value will also work.
How you choose to allow in more light into the camera is completely dependent on the subject. If you are shooting a person, dropping the shutter speed will do the trick just fine. Just don’t go too slow so as to allow camera jerk into the picture. You may want to follow the reciprocal rule here for reference.
After we have a nice well-lit background, now we come to the subject.
The first and foremost thing that you should get rid of are the shadows.
If you have followed the light placement diagram correctly, the primary flash only illuminates the left side of the model. This may lead to deep dark shadows to show up on the right side of the subject.
To eliminate shadows, just place the reflector to her right to reflect some of the light back on to the model and brighten up the right side too.
This should be pretty easy to get. A few test shots are all you need.
The entire quest here is for a flat photograph. This means an image which is devoid of any shadows that gives a sense of depth and ‘3D ness’ to the image.
The shadow of the nose and the one under the chin are two of the most prominent shadows you are likely to face. Reduce them as much as possible, using the primary flash and reflector.
To further the “no dark spots” theory, you also need to make sure you keep a tight check on all the colors used in the frame. This includes the background, the costume of the subject, any other props used, etc.
Try and use mundane and light colors as much as possible and steer clear from any rich hues. They are simply not going to bode well with the theme we are trying to create and uphold.
Basic Composition
In all this hullabaloo I just described above, do not ever make the mistake of disregarding fundamental composition principles or compromising on the subject matter of the image.
What we are discussing here is just how a specific style of image is made and how to go about making one. What separates your images from the millions of other high key images taken before you is your own creativity and your photographic eye.
Never give up an ounce of your uniqueness to follow some predefined style.
Learn what you can about it and then give it your own twist.
Post Processing
In the editing department, all you want to do is just further enhance and fine-tune the aspects of the image you already took.
This involves making the image even flatter if needed. Get the saturation down a tad bit and also brighten up certain parts of the image especially the background.
Here is a video from one of my favorite photographers, Gavin Hoey, which will guide you through the entire process.
Not All Can Go High
Although some images which were not shot with the intention of turning them into high key images may finally be turned into one in post-production owing to some limitations of course. Not ALL images can be done the same way.
For example, images that are dominated by deep shadows and a high amount of dark tones or silhouettes will probably not be very good candidates for the experiment above.
Barring extreme situations where you simply cannot reshoot the same image again, the best policy to follow is to just use the image editor to fine-tune and accentuate the image you actually took. Manipulating it too much, introducing foreign elements in it or even over-processing the image may sometimes give the final picture a very unnatural and manufactured feel.

So keep the editing at a minimum and try and do the bulk of the work in-camera while shooting. Trust me, it is much easier and will give far better results than hours of banging your head on the computer screen later in trying to “fix” ignored mistakes.
In Conclusion
High key photography is a little extensive in nature. Unlike other styles of photography I generally talk about, this does require you to have a setup, lights, etc.
Albeit the four lights setup is the most preferred for creating these types of images. You can get by using just two light sources and filling in the rest with a reflector (see what I did there?).
You aren’t painting the Mona Lisa. So cut yourself some slack and just go shoot some photos. If you happen to like them, maybe then you can spend some money on the accessories later.
That is it guys, that is all you need to know about high key photography.
It’s a unique style which breaks most of the ‘laws’ in photography, overexposing the image, taking flat shadowless images, etc. but it has its own charm.
I hope you have a blast taking some of your own shots. If you share them with me in the comments below, I will be mighty happy!
Keep shooting beautiful.
Hand Picked For You
- You are shooting backlit when the primary source of your light is directly facin...
- First, we need to understand the basics. The blurry part of the background is no...
- Back button focusing is a way to reassign the autofocusing control from the defa...
- Stop motion photography is one of the most satisfying and creative endeavors a c...
- Auto exposure bracketing is the process of taking multiple images of the same sc...
- To find out the largest print you could make using the files coming out of your ...


