I don’t think I have to point out the meteoric rise of e-commerce and online sales in the last two decades. Whether you are a small business with a shop front or a full-fledged mall, whether you sell needles or airplanes, your presence online is a key factor which tinkers your account books, pretty damn heavily.
In other words, you need to have an online presence, no matter what business you own. Simple as that.
So logic dictates that you also need to be good at something which is practically inseparable from online web pages… images.
And not just for the Internet, you need great photographs for offline marketing, brochures, catalogs, banners, stickers, promotional products. You name it.

I reckon the big guys who could afford an expensive photographer to take pictures of their products have already done that and do not need me at all. So this post is solely intended to help a potential small business owner take great photographs of his/her products or services with the minimum budget required.
Which he can then showcase and get more business hence.
So, shall we begin?
The Game Called Perception
For most businesses, the perception of the company and the products they sell carry a huge amount of weight in determining the prices that they can charge.
Over time the advertisement and the marketing messages create an image in the head of the consumer which could lead them to pay much higher or buy more frequently than what they would otherwise.
It is exactly how you make your customers feel.

How your end customer sees you and sets a value for your product in their mind is indeed a huge, huge deal.
Just place yourself in the shoes of the end customer for one second. Think about a particular product now. Say an iPhone. Just as I say the name “iPhone”, the image of the latest iPhone X would probably pop into your mind and a pretty flashy price tag too.

Now I am NOT saying that the iPhone is not a good, capable device. The only thing that I am trying to show you here is that through its marketing prowess, Apple has been capable of making you believe that their phone is indeed so good that you should pay a $1000 for it.
I can bet you wouldn’t even wait to listen to the specification of a Chinese Android phone if I opened with the line, “this phone cost a $1000 bucks.” Even if the Android phone is just as good and would probably get more or less the same job done but maybe in a different way.
Now Apple has been around the block for quite some time now. You know the brand. It has been headed by a genius like Steve Jobs. Everyone recognizes the half-eaten apple. Your business has just you and maybe your small team.
What chance have you got?
In case you too have a premium product in your niche, how on earth are you ever going to communicate that to your end customers?
Gaining traffic on your site is a hard game. Practically, there are only a few precious seconds before the customer presses the back button and is gone forever. You don’t want that, do you? So it’s imperative that you are able to send the message across, fast and furious that your product is better than the rest and worth the price you are asking.
Photographs are the absolute key to do this.
Identifying Your Customers
To create photographs potent enough to make a sale for you, you need to understand the psyche of your customer inside out.
What do they like to buy?
How much do they earn in a month?
Would they care for the added feature in your product or a similar product without the added function but at a lower price?
Are they predominantly male or female? Or are your products such which are actually bought by women but used by men?
Many questions to gain an answer for!
Only when have you figured out most of them and are able to roughly draw out a profile/avatar for your customer can the product photography planning successfully start.
Depending on the customer and the type of products you are selling, the strategy needs to change and pivot as well.
For example, if you are selling a computer game to a 14 year old, the pictures need to be flashy with a lot of vibrant colors and characters.
On the other hand, if you are selling skin care cream for women above the age of 35, your image should have a lot of muted colors, less contrast, and distractions. You would also need photographs telling the story of the cream and how it might potentially benefit them and keep their skin well moisturized.
The chronological steps to convince a teenager and an adult woman is as different as it could be. In the same vein, images needed to get the message across also need to be very different.
So, the moral of the story is if you want to get “good” images which convert, learn to read the customer as closely as you can. The more you know about him/her, the better routes you will discover to pass the message through.
Storytelling
Unless you are selling something extraordinarily cheap, people do tend to look around to ensure that their hard earned money is not wasted on something which is of poor quality.

Generally higher the price of your product in the market you are selling, the greater conviction does the customer need to make up his mind. You wouldn’t fork out ₹ 1,00,000 for a phone without knowing what specifications it has, would you?
In the same breath, you would also probably look it up online, watch a few YouTube videos, consult some friends, wait for a few days and only then maybe place an order.
You stand to potentially lose a lot of money if it doesn’t turn out to be a nice phone which you may like. So you try and find out more about it.
Sounds familiar?
Companies like Apple and Nike have absolutely perfected the art of storytelling to market their own products. They are so powerful that most of the time they do not have to even mention or show their products in the advertisement at all.
Here is one of my favorite ads from Nike.
If you didn’t already know that Nike sells shoes, at the end of the video you would wonder what that ad was even about.
If you are a new company, the customer needs to know more about you. You need to gain their trust before they buy from you.
So you need to have pictures of actual people working for the company. Various images of the products you offer (we are going to talk more about this in just a second). Pictures of the ingredients you use. How your product may make the life of the customer better, etc.
You need to understand that NO customer wants to buy the product that doesn’t interest them.
What does interest them is how they can use it to make their lives better in some way. So show the customer through the images what’s in it for them.
Tell the story. Tell it well.
Building The Image
Keeping all that we just discussed, in mind, let us just start thinking about actually taking a proper photograph that we can use.
“You don’t take a photograph, you make it”
– Ansel Adams
Forget product photography, for any genre of photography a good picture is always a great construction. Except for genres such as War Photography, street photography, and forms of photojournalism.
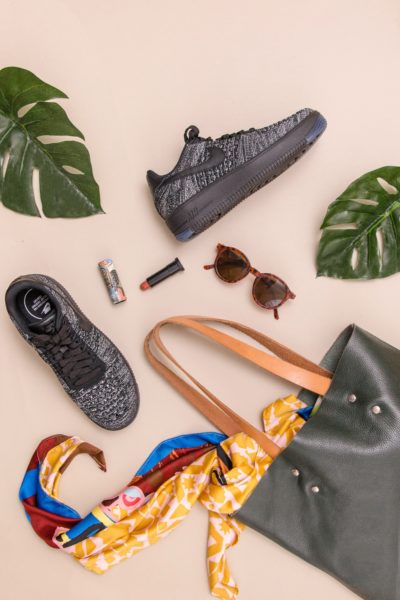
Each aspect of the image, be it the background, the foreground, the props around, the light, the color tones. Everything is there for a reason. No matter how much carefree it looks. From the colors to the position of products in the frame, every small little detail is very much intentional and deliberate.
The photographer is the person who is supposed to gather it all and create a visual which evokes a certain kind of emotion from the customer who looks at it.
Individually the items may not look like much but together they are capable of a lot.
So let me just walk you through so that you know what you should and shouldn’t do for photographs for your specific type of business.
Before I start though, I would like to mention that all the aspects of the photograph I am about to describe below all play second fiddle to the “protagonist” of the image….your actual product.
Your product is the one that you as the photographer should be interested to showcase. ALL the other stuff is there to just help you do it better.
In NO way, shape or form shall any secondary item in the image gain more prominence in the image. So as to make the customer wonder what the image is all about. It should be absolutely clear, what you are selling. Period.
Let’s get to it then.
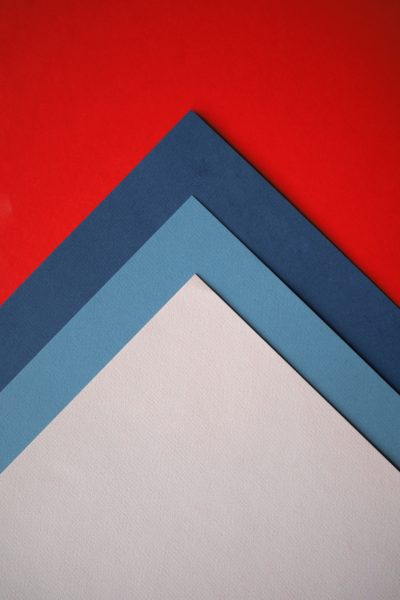
Color Scheme
The first thing that you should pick to make life easy for you is the color scheme.
It’s nothing more than selecting a few colors which work together well to convey the mood that you are trying to get to.
Coolors.co is a good website which might come in handy in making this decision.
All you have to do is keep shuffling through the colors by hitting the spacebar and whenever you like a color just lock it in. Do not however forget to write down the hex code of the colors at the bottom. This will come in really handy later on in maintaining consistency.
Alternatively, you can also draw inspiration from other photographs and images (as long as you do not copy them directly).
While selecting a specific set of colors always make sure that they all add to the product and story you are trying to promote.
For example:
- If your product is a picnic basket, you should choose bright and bold colors. The message is clear on this. It should reflect all the fun and joy that a picnic stands for. Light pastel colors, lighter in shade would probably suit it the most.
Colors are something that affects human behavior a lot. Even without them knowing it.
Bright yellow makes a person feel excited, blue generally symbolizes trust and faith, black evokes a feeling of mystery.

Now having learnt all this, if you go back and notice the colors that brands and companies use, you will see the pattern for yourself.
Most banks use some shade of blue (Bank of America, Visa, PayPal, American Express, Citi Bank, State Bank Of India, Indian Bank). It’s no wonder that Snapchat uses yellow. Its target audience is teenagers below the age of 25. And who can forget the famous story about how Google finally settled for the shade of blue it uses today.
Colors science is a vast subject that I do not expect you to master it over a Sunday afternoon. Just be mindful that the shades and tints you use for your photos do have further implications than just looking good and pretty.
So factor these properties in when making a decision.
Background
Once you have a good base of colors to use, next choose a background which helps bring your product to the forefront.
Keep this as simple as you can.
Say you are selling a pen. A wooden desktop would act as the perfect background. It is where your product is supposed to be in the hands of the end consumer. If you can make it look like it belongs there, half the job is already done.
A background for any image should be such that complements the primary subject without overpowering or distracting the attention from it. You can use a contrasting shade or a color which agrees with the color of the actual product.
A background does NOT necessarily have to be a flat surface on which to place your stuff on and photograph. If your product permits, you can use the concept of a “background” in many creative and innovative ways.
Example:
Say you sell a line of outdoor accessories, bags, shoes, waterproof clothing, etc. What you can do is show people on a boat while they are water rafting using your products. Or you can hang them on a branch of a tree or place them on a large piece of rock.
The bottom line is to drive home the idea that your product belongs there and would be of most value for its users.
Props
After background comes props.
These would essentially be things which either make up the product (its ingredients) or stuff that makes a good ‘home’ for your item to be at.
Let me explain.
Say you sell a body moisturizer for women, which has aloe vera and other essential oils in it. Now what you can do is package these ingredients attractively and use them as props.
People who are potential buyers and want to know more about your product on looking at the image alone will infer that you use good quality, natural ingredients to make your moisturizer.
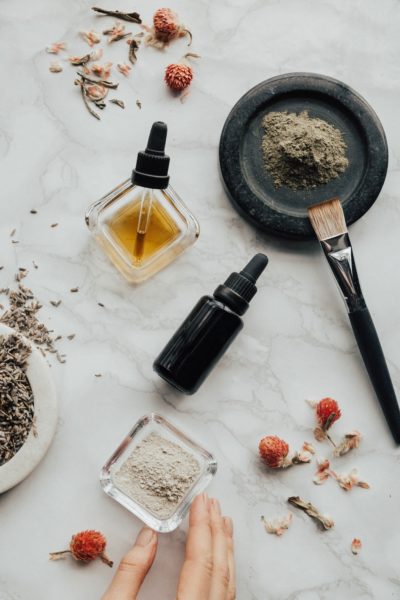
Showing where your products come from and how it is made can be a strong message for your customers to base their decisions on. Storytelling remember?
While selecting props, keep in mind that you can always use more than one type of prop to include multiple angles of convincing for the customers.
In the example of the body moisturizer above, you can use a book which has its page opened which reveals an ancient recipe for a body scrub. Further, you can use a young female hand in the image as if it is just about to flip the page.
Subtle storytelling to convince. That is all there is to it.
Lighting
Most people who are not photographers themselves, almost always heavily underestimate the power of lighting in an image. If you are reading this, please do not make the same mistake.
Photography is nothing but a recording of light.
How you light your setup can make or break the image. Please do take the time to get this right. If anything is worth its time, this is.
To start off you have at your disposal two types of lights.
- Natural Light (my favorite)
- Artificial light
Natural Light
This is the light you get from the sun, in abundance and FREE. A large open window is all you need. But do make sure that you modify the light and shape it well to fit your item.

What I mean by that is you do have to take into consideration a few things while shooting using natural sunlight.
- Never use direct sunlight. It would create hard, dark shadows which are very unflattering.
- Use something to diffuse the light. A white piece of cloth works great for this purpose. You can choose anything for this but make sure that you select something which diffuses the light uniformly. You don’t want patches of light here and there.
- Depending on how you place the product near the window, one of the sides may look rather dark than the other. Here you need the aid of a reflector. No, you don’t have to go out to buy anything. Just try and find a surface which is as large as possible and white in color. Foam core or a sheet of thermocol works just fine. The only thing to remember here is not to use a surface which is colored. A colored surface will reflect colored light and hence introduce a color cast onto the image which might make it look weird. Get a white something, anything!
- You can always use more than one reflectors to bounce light off of, should you need it.
Artificial Lights
If you do have the budget for it, you can go for artificial lights as well. It is a little more customizable and less dependent on the weather (obviously!).
Depending on the size of your products and the amount of money you are willing to part with, there are a lot of choices.
For smaller size products you can use light tents. It’s basically a small enclosure with white interiors. It is a quick solution which acts both as a clean background and side reflector.
For the sake of keeping it as cheap as possible, you can also use a couple of speedlights to light your setup. Typically Nikon and Canon branded speedlights are much more expensive as compared to Chinese counterparts. Save your money and just get a Yongnuo or a Godox speedlight. They are worth every buck you spend on them.
Two of my favorite speedlights are:
Yongnuo YN560 Mark IV
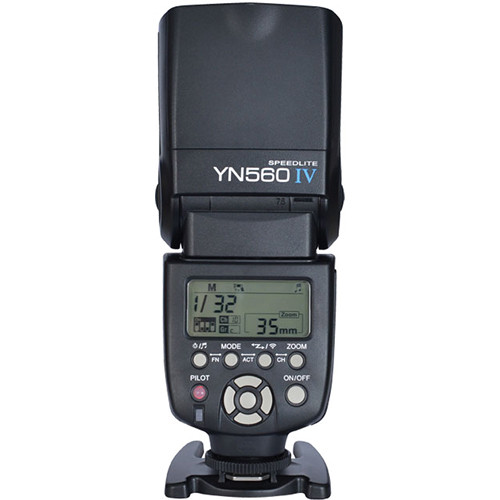
and the Godox TT685.
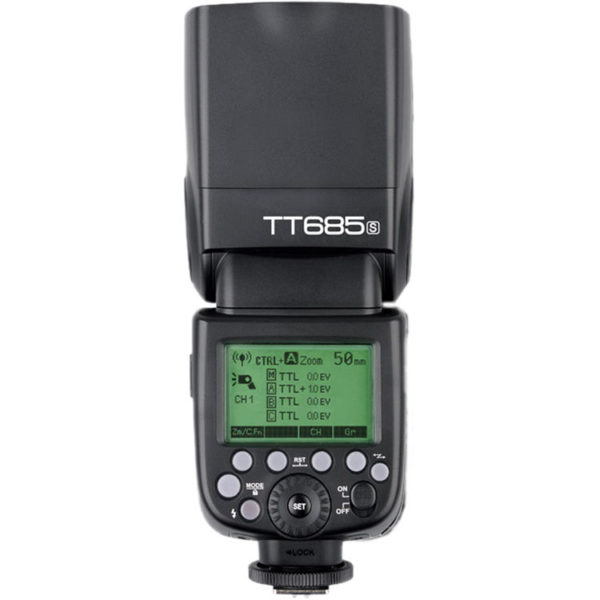
Both of them have radio triggers built in them which means once you buy one you can use it to trigger the second one wirelessly using radio signals. Cool, isn’t it?
Just make sure you get the one which fits your camera. There are different versions for different camera manufacturers.
In case you decide to use artificial light it would be worthwhile to learn to use them well. It’s not very hard to do but you have to give it some time.
How and where you place the light determines how your end images look like. You will have to experiment a fair amount before you begin to understand the flow and master it to make your images look like you want it. I suggest watching a few YouTube videos to get the hang of things initially.
Scale
When your product lives on a computer/cellphone screen somewhere instead of physically in the customer’s hands, it gets increasingly hard to convince him to buy it. It’s as if you are forever fighting an uphill battle to make the customer feel the product.
It’s up to the images now to bridge the gap as much as possible.

Now you know the reason why SO many big companies are trying to perfect virtual realities and 360-degree imaging solutions.
There are numerous questions that may potentially cloud the customer’s judgment, preventing him from pressing the ‘buy’ button. Through your photographs, you need to answer as many of them as possible.
Off the top, some very basic questions are:
- How big is the actual product?
- Where would it fit?
- How does it look?
- How does the packaging look?
- How is it made?
You get the idea.
The question of scale is one of the important ones that you need to address at once.
You may list as many times as you want that the item is of a certain dimension but most of the customers are not going to go through the pain of imagining it. You have to do it for them.
Don’t sweat it so much. It’s pretty easy to do.
Just place next to the product an object which has a uniform shape and size and is well known by the customer and take a picture of it. For example, if you are selling a small piece of jewelry, you can place it next to a coin.
I got a better one.
Remember how Steve Jobs first introduced the Macbook Air by taking it out of an office envelope and then went on to compare the Mac processor board to a pencil to give the audience a sense of the size? This is exactly what he was doing then. Lending a perspective for the audience to understand the scale of things.
The idea is not to tell the customer what it looks like but actually showing it to them.
Striking Balance
Well as you can see, there are a lot of moving parts to keep track of and perfect before you can take a good image.
And the best way that I know to learn this is to just start. Start right now! You DON’T need an expensive setup to get it up and running. Use what you already have.
Overtime as you understand the process of taking good product photos, you can invest in pieces of equipment that help you do it better. Until then all you need is a camera, your product, and a background.
If you do not yet have a “professional” DSLR or mirrorless camera, use your cell phone.
Cell phone cameras are killing it these days. Not only do they have fantastic lenses and processors, they also have amazing software and apps to edit your photos in the camera itself. What more do you need?
Here is an article that I wrote a little while back that shows how you can jack up the power of your phone camera by adding some external lenses. Mobile Photography With External Lenses | Tips & Tricks.
For editing, Snapseed is all the app you need. It is absolutely free, made by Google and is available for both Android and iOS devices.
I seriously want you to understand this.
Good photos are not good because the camera used to photograph it was good. It is ALWAYS because the photographer knew what he was doing.
Take it from me, you can make great photos using stuff you have in your house right now! All you have to do is find creative ways to use them.
Here is Peter Mckinnon telling you more about it
Using all the props, the background, the lights, the product itself what you are trying to do is tell a story about the item you are trying to sell.
Never forget this simple truth.
As long as you can do that, the tools you use to achieve it doesn’t really matter.
Post Production
Once all your images are in the bag, you need to head off and start processing your images to get the most out of them.
If until this point you have heeded the advice I offered you, you probably have got yourself some pretty good images which require very little to no ‘editing’.
This is probably the template that you should always follow. Get it right in the camera itself. You have all the necessary control over the shoot, so why not?
Anyhow, once you have loaded the images on to the computer, edit them as little as possible. Play with the brightness, contrast, vibrance and saturation levels until you have got something you like. However, you should be careful not to overdo it.
Overedited images look fake and unappealing. And trust me when I say that your customers are going to notice it.
If you feel that you do not know what it takes to edit images properly, look up online. There are a tonne of useful videos on YouTube which will get you on track in no time. And all for free.
My personal favorite Photoshop retoucher is Unmesh Dinda from the YouTube channel Piximperfect. Browse through his channel, he will tell you all you need to know.
Perfecting The Routine
Considering the fact that you are probably going to have more than one product to sell and that those products too would need regular updates over a certain time interval. It is safe to assume that you will require many images for your business.
So consistency is something that you should absolutely head for straight away.
It would be difficult initially to settle for one style. But the sooner the better.
Here is a quick list of all the aspects you need to cover:
- Individual shots ( images of the product from all sides)
- Scale shots (images which put the product’s size into perspective)
- Lifestyle shots (pictures which depicts how the product might be used in a real-world scenario/actual use)
- Group Shots (photographs of a few variations and styles of the product together)
- Detailed shot (this is on a need to basis only)
- Images of the packaging.
- Behind the scenes/making of the product.
As soon as you are able to settle for the style/aesthetics, you want to formulate a routine to follow every time you want to shoot and take images. A rigid plan of action will ensure that images which come out in the end also have similar look and feel to it.
The more consistent and regular your style gets, the sooner will your customers also recognize it and begin to attach it with your brand.
Just make sure that you do NOT blatantly copy it from someplace. It seriously is not worth it.
Over To You
That is all you need to know about product photography in a nutshell. It simply comes down to coming up with a simple routine and then following it as consistently as possible.
Photographs are the first thing your customers are going to look at. It is the legendary “first impression” of your business in the mind of your customers. So do it well.
Better the impression you are able to create, easier it will be to convince them to buy your product.
If you went through the arduous task of reading this entire article chances are that you are trying to get some killer shots for your small business. Do not think for a moment that you cannot do this without the help of a professional product photographer. You are more than capable of doing this on your own.

Just get your basics right.
Plan your shoot properly. Gather as much information as you can about your target customer. Age, demographics, likes, dislikes, geographical location anything and everything. Factor all these in while making your decision about the shoot.
Your objective should always be to create an image which evokes a sense of desire in the customer. Something that he/she might want and lust for. Understanding the customer as closely as possible is the key to do this.
As much as we all care to admit, most of the decisions we take online are driven by our subconscious than the conscious mind. Colors, shapes, and sizes that you choose all have a profound effect on how your customers react. Whether on not they press the buy button.
So make those selections judiciously.
If you still have some burning questions, please feel free to ask me in the comments below. I will get back to you as soon as possible. I know how hard it is for you to run your business right now and I am here to give you all the support you need.
Keep shooting amazing.
This is now a teeny tiny blog trying to compete with the big guys. If you liked what you read, please take a second to share it. It would help me a lot. Thank you.
Hand Picked For You
 The basic principle of fireworks shooting is, secure the camera the best you can...
- Orbiting hyperlapse is one of the most cool video trick that you can use for ins...
- Panning in the context of still photography refers to a particular technique whe...
- Have you ever finished editing your photograph and then just as you are about to...
- Many manufacturers, many claims, many weird symbols, and even more numbers. For ...
- Understanding image exposure and the maths behind it is the bedrock of photograp...


I think product photography is an important role of a eCommerce business. We know a photo or image can say thousand of words so that when we are take photo for our product that time we need to follow suitable technique. Thanks a lot, Aperture buzz team, for sharing useful tips for product photography with us.