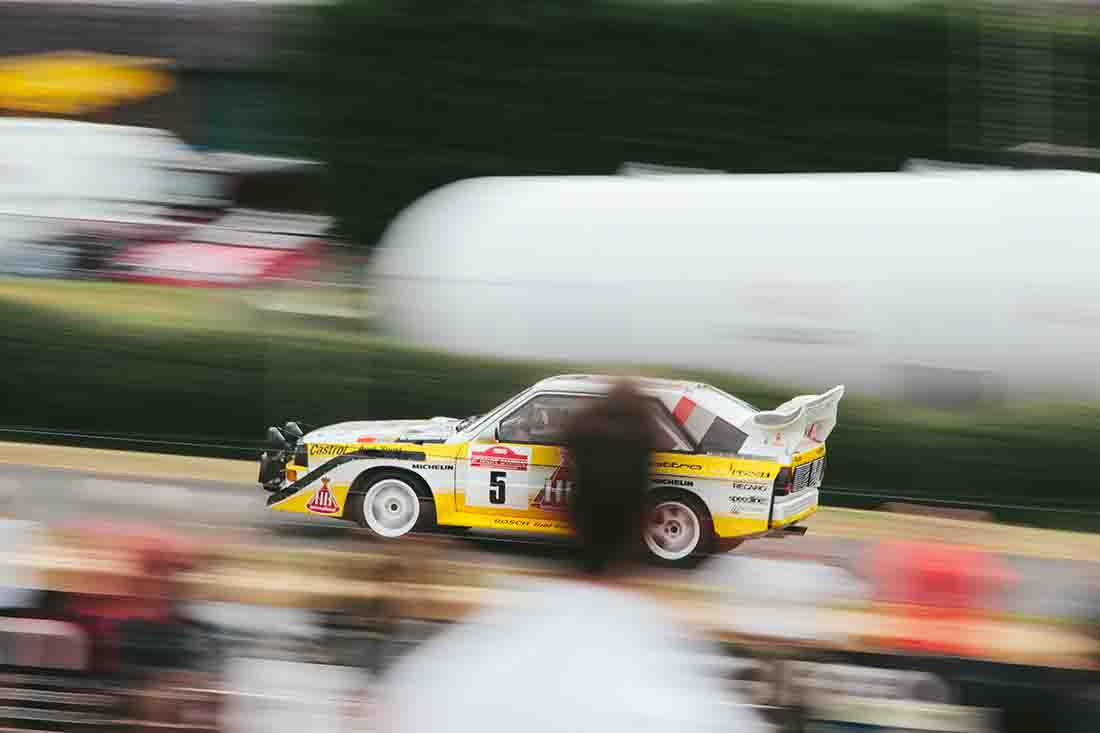
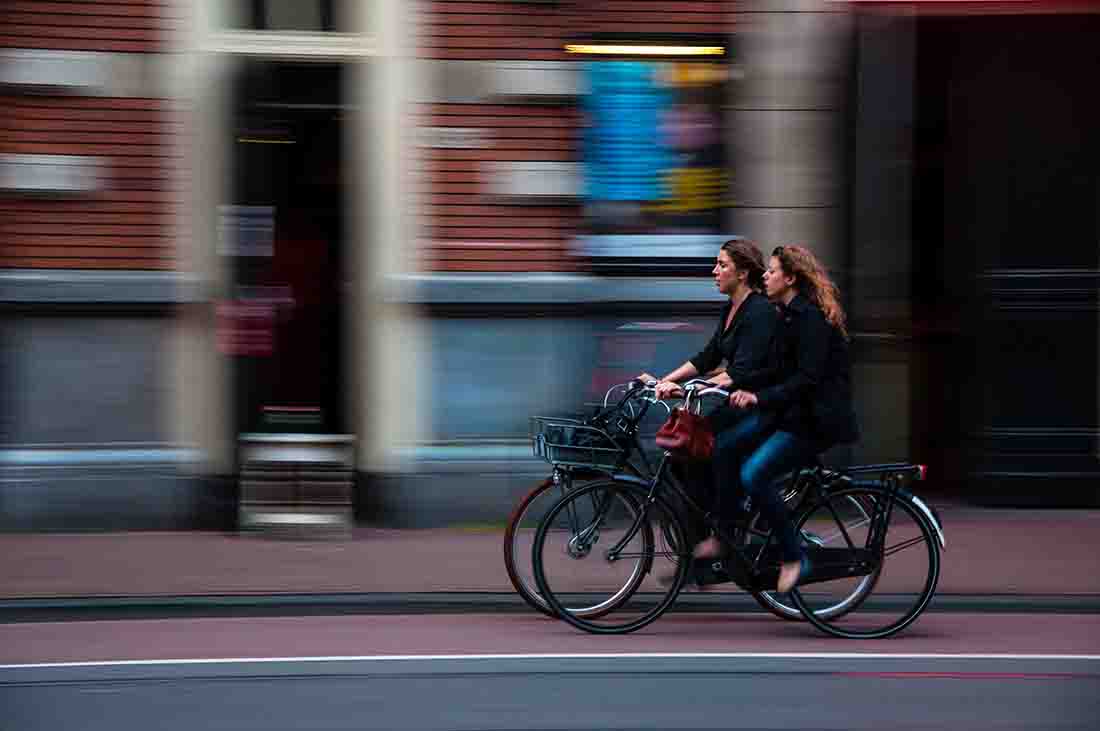
Have you ever looked at a photograph and wondered “Gosh…the car seems to almost fly right out of the image..!” Well, that is because the image was taken in a way so that it demonstrates or magnifies the feel of speed and movement of the actual car into the image. Instead of shooting with a fast shutter speed and freezing the action, it is shot with a slower shutter to show the motion to make the motion count and make it a part of the whole image. This technique of moving the camera in synchronization with the subject to make such an image is called Panning.
Definition
Panning in the context of still photography refers to a particular technique where a slow shutter speed is used in conjunction with a fixed camera to photograph a moving subject to demonstrate or exaggerate motion. The subject, in the final image, remains nice and crisp, while the background it is placed on is generally blurred out creating the sense of motion or movement.
Don’t worry so much that is just the bookish definition. Let me now just break it down for you into bite-size pieces.
First Some Context
Panning is derived from the word ‘Panorama‘. Now try and ask yourself when do you shoot a panoramic image? That is right…..when you cannot contain the entire scene that you want to shoot in a single frame. For example, say you are trying to shoot a beautiful sunrise when the entire horizon is lit up with the red aura of the Sun, but unfortunately all that beauty is not going to fit in one frame no matter how much you back up. What do you do? You shoot a bunch of images and then stitch them up in post processing to create this one long horizontal image that covers the entire scene.

This exact technique is used by filmmakers as well. It is something that you have probably seen a thousand times. Like, say when a character enters a room and then looks around. How is that filmed? The camera is brought up to the door and then panned around (moved left to right or vice-versa from a fixed position) to give the audience the visual of the room.
Application In Still Photography
In still photography, the Panning technique is used a little differently than in filmmaking. The main purpose of using a Panning shot in photography is to show motion. One important thing to remember when using this technique is that the subject should inherently have some motion. In other words, the subject should be moving. Otherwise, there will be no motion to show or exaggerate at all.
Okay, enough theory lets get on with the good stuff now.
What To Aim For
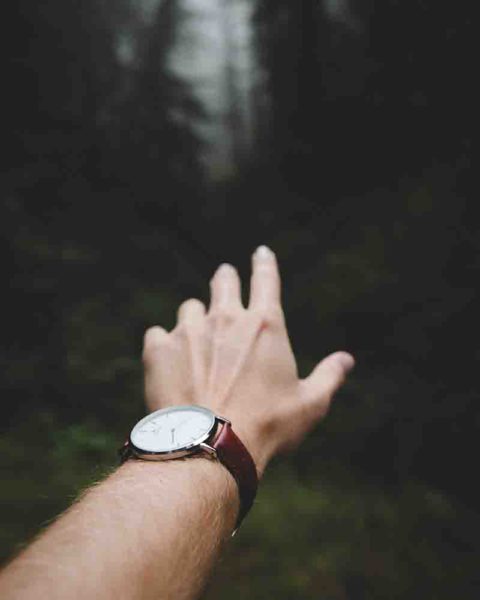

To boil down panning in just a simple exercise, do this. Stretch your hand in front of you and point your index finger towards the sky. Now keeping your eyes fixed on the finger turn from your hips left to right and then again from right to left. What do you see? You see that the finger in front of you always appears to be sharp and in focus but the background turns into a haze…correct? This is exactly the effect that we are aiming for. Just that your eyes are replaced with your camera and your finger with the subject.
Easy!
How To Get The Shot
Panning is relatively an easy technique to get used to. In the beginning, it may seem daunting and hard to master but trust me, it is far easier than it looks. There are just a few simple things that you should keep in mind and then execute to get the perfect Panning shot every time.
Okay, so as you are new to this you need some practice rounds to really hone the art of Panning. The easiest place to find the perfect subject for just this is the highway. I am not joking! It is the highway. Get to your nearest highway and then follow the below mentioned steps.
Optimal Position
Your position with respect to the subject and the way you stand (your stance) are both very important to get a good shot. The Panning effect works best when the subject’s movement is parallel to the camera, if possible in a straight line. This will help the photographer to predict where the subject will be next and hence facilitate better focusing and subject tracking.
It is also important that there be no obstruction between the camera and the subject throughout the pan that might just appear in the final frame. This means that do not let there be a tree or a lamp post nearby which may not be in the first frame when you are starting to pan but may end up in the picture when you are finishing the pan. I have done this great deed many times destroying otherwise good images, so make sure this NEVER happens. You will be kicking yourself afterward otherwise.
Stance
Since a lot of movement is involved in this entire set-up: the subject is moving, the camera is tracking, blah, blah ….blah. It is imperative that some things stay still. Cameras do NOT like shaking at all. So stand with your legs a little apart facing where the subject will be. Keep your knees supple, try not to get them too rigid.
Stand on some level ground that is not sloping or uneven. Now, pretend as if the subject is moving and you are tracking it with your camera. Does it feel shaky? If it does adjust your position a little bit and try again until it is rock solid. Keep your body relaxed, don’t get it all tightened up for no good reason.
Holding The Camera
The purpose of a good grip is the same as a good stance, getting a rock solid foundation for a good tracking shot. Hold the camera grip tightly with your right hand and place the left hand below the lens. Bring your elbows close to the body. The further they are from your body, more difficult it would be to stabilize. Now bring up the camera to your eyes and firmly (but not too tightly) press it against your face. Your camera now has three points of attachment and this should give you the best chance of a steady shot.

If you can try and control your breathing as well when Panning. This will further eliminate any risk of a blurry shot. Take a few deep breathes to calm yourself down before you take the shot. Now when you and your subject are ready, inhale and then exhale slowly as you track the subject along the background.
As a last resort if none of the above make the camera absolutely steady you may use a tripod. Just make sure that the tripod is easy to fix on one axis and then swivel. It should not be jerky when tracking.
You want background blur when Panning, NOT camera shake!
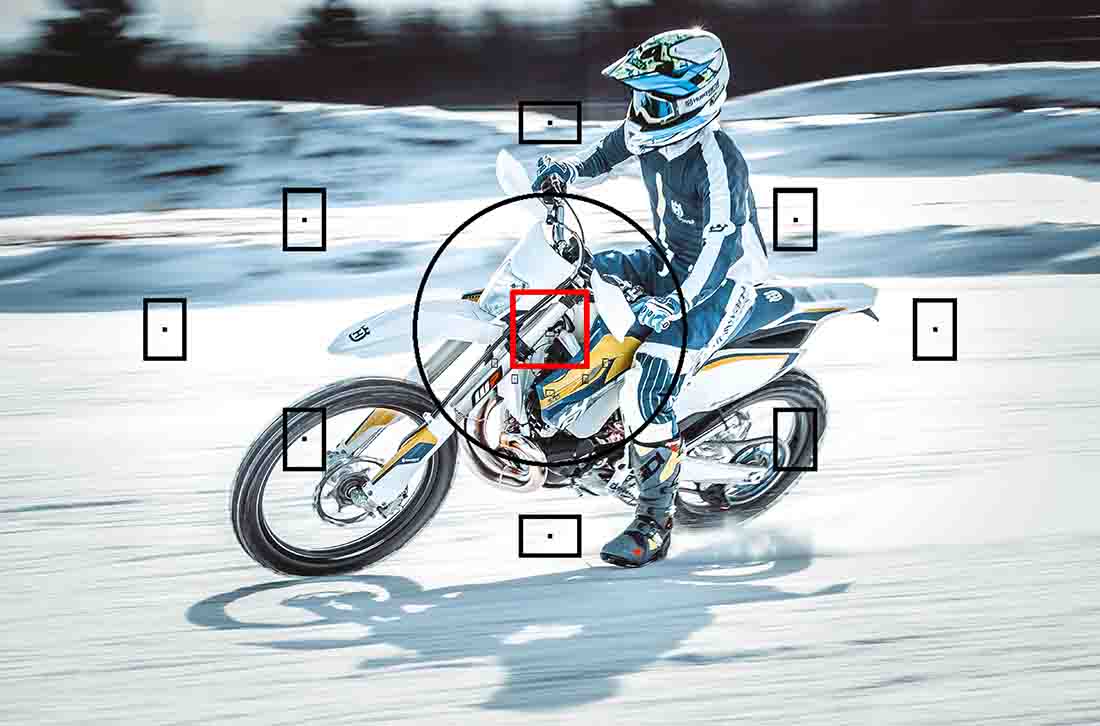
Subject Position
The position of the subject in the frame is of utmost importance. Make sure the subject of the image occupies the same position in the frame throughout the entire pan, i.e., it should not be the case that the subject starts off in the bottom right corner of the frame but at the end of the pan comes up to the bottom left corner. NO! That will simply not work and the subject will turn blurry as well if you do that.
As a bonus tip, I would also ask you to ensure that the size of the subject in the frame also remains the same throughout the pan. Are you thinking how on earth will the size of the subject change? Well, it will if the subject is moving towards or away from the camera. In the first case, it would be increasingly larger and in the second case increasingly smaller. This may seem to be a small detail but it does add up. Remember when earlier I asked you to get a spot which is parallel to the trajectory of the subject? It was because of this.
Camera Settings
In any kind of Panning shot the most important setting to look out for and adjust as the shoot progresses is the shutter speed. The shutter speed is what contributes to the blurring of the background and isolation of the subject from the background giving it the sense of movement.
A good rule of thumb is:
If everything in the frame is tack sharp -> Decrease the shutter speed.
If everything in the frame is blurry -> Increase the shutter speed.
There is no ‘one size fits all’ shutter speed for Panning. The main determinant is the relative speed of the subject to the camera. A racing car may require 1/200th sec, while a person on a bike may need just 1/20th of a second. Faster the subject, faster needs to be the shutter speed to capture the action. This may look counter-intuitive but it is much easier to shoot with a faster shutter speed than with a slower one since you have to keep it steady for less amount of time. You only have to be fast enough to track the subject that’s all.
I will explain the aperture settings in just a bit. Coming to ISO, you want to select the lowest ISO possible that would give you a good exposure.

Lastly, if you are confident enough and have a good hold on Manual Mode, use that. If not, Shutter Priority Mode is a good place to start. You get to select the shutter speed and the camera selects all the other settings for you. You will need to experiment with the settings a bit before you land the perfect shot, so approach it in that way.
Focus
You may use any of the two following focusing techniques depending on the type of equipment you have.
If your camera has good quick accurate focusing then put your camera in Continuous Focus Mode (AF-C) also known as AI Servo Mode (Canon). If it does not screw up the composition you are going for, use the center focus point for your subject. In most cameras, the center focus point is a cross-type focusing point which means it can detect both horizontal and vertical differences in light patterns. This means you will achieve the focus that much faster and it would be much accurate too.
However, if you have an old or an entry-level camera which isn’t as fast and nimble in focusing, there is a trick that would help you cheat a little bit. Pre-focus at the spot where your subject is going to be in advance before the subject actually arrives. For our highway example, pick a spot right in front of you where the car is going to be, say 5 seconds after. Now focus on the tarmac near it and then switch off the AutoFocus completely.
You are now ready.
So now your camera doesn’t need to focus ultra fast at all. All you have to do is wait for the car to come to the chosen spot and then boom, in focus every single time. The only thing to consider here is the distance between the camera and the car. Make sure the car stays the same distance away from the camera during the duration of the pan or it risks falling outside the depth of field.

Aperture
If you consider using the Manual Mode you will be required to select the aperture as well. In case you are new to Panning and are just starting off, I would suggest you use a small aperture (which means a large aperture value).
If you are confused about what aperture to choose when read this article, it will help you out: Camera Aperture | A Comprehensive Beginner’s Guide.
A smaller aperture like f/8 or f/11 has a good amount of depth of field cover for the subject. This means that it is harder for the subject to fall off that and be out of focus. Granted that a larger aperture will have a smaller depth of field which if executed properly will add to the background blur, and make it look even silkier but there is a lingering danger of the subject getting outside the focus as well.
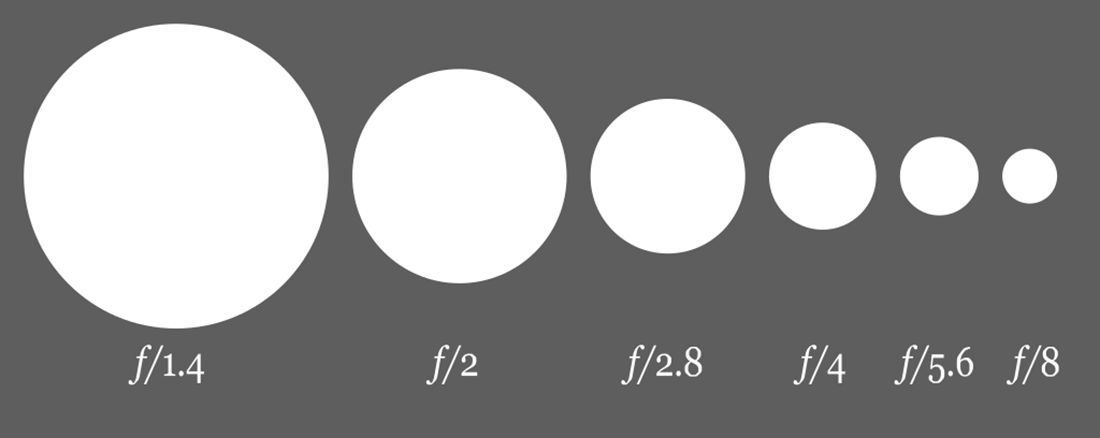
Start off with a smaller aperture and then as you become more confident with your panning and tracking of the subject, choose a relatively larger aperture that just covers the subject and no more.
Tips
- Like any other photograph choose the background judiciously. It is going to be just a blur in the final image but even then it matters a lot. Try to place the subject on a background that has some level of contrast with the subject. A plain or uniform background works the best, without many distractions.
- Use a good long lens if you have one. This will allow you to be away from the moving subject yet fill the frame with the subject.
- Keep the directionality and trajectory of the subject in mind. Shoot the image so that it looks normal. A good way to do this is keeping some space in front of the subject in the direction in which it is traveling. Don’t make it look as if the subject is about to hit a wall or something. However, this is just a blanket advice. If the composition you are aiming for requires something else…..by all means, break this ‘rule’ already.
- When tracking the subject, continue and finish the swivel in one smooth motion even when you hear the shutter finish taking the image.
- If your subject gets a little blurry in parts, do not worry so much. Sometimes a little blur of the subject may add to the overall image feel.

- Everything that we just discussed can be used on any subject moving vertically parallel to the camera as well, for example, a diver. Not everything has to move horizontally to the frame. But do remember that Panning does not work very well with a subject moving towards or away from the camera. In fact, even when the subject does not travel in a straight line or moves erratically, the background blur in the final image looks inconsistent and a little out of place.
- A longer shutter speed means a lot of light is going to enter the camera. When shooting in direct sunlight or very bright conditions, this may be a problem. You may use Neutral Density (ND) Filters to counter this. ND filters just act like sunglasses for your camera and cut out excess light, restoring proper exposure.
- Panning is a trial and error method for even seasoned photographers. Yes, they perform a lot less error than probably you would but even then they do. Do not get disheartened or feel frustrated if you do not get the desired image on the first go. Keep making adjustments and keep trying, I am sure you will get there. Approach this technique with an experimental mindset.
- Have fun guys. You will naturally shoot great images if you have fun doing it.
Conclusion
That is all that you need to know to shoot absolutely stunning Panning images. You don’t need fancy cameras or costly pieces of equipment to do this at all. It is a really good way to add an extra touch of magic to otherwise static two-dimensional images.
So go out there and shoot some Panning shots today. I will be very happy to look at them if you share with me below.
Keep shooting beautiful.
Hand Picked For You
- Understanding image exposure and the maths behind it is the bedrock of photograp...
- First, we need to understand the basics. The blurry part of the background is no...
- Back button focusing is a way to reassign the autofocusing control from the defa...
- In the world of photography, you really wouldn't see T-stops used in many places...
- Auto ISO is a function using which a digital camera can be programmed to shuffle...
- It is a pity that most people miss the incredible gift that is the custom settin...


