Okay, here is the truth about soft, fuzzy missed focus images.
Most of them are caused due to user error and simply bad/wrong technique. I am really sorry to burst your bubble, but this is the unfortunate truth.
Sure, there are situations when your camera may have let you down and you lost a good image because of your camera’s shortcomings, but if you do an objective analysis of the reasons which caused the images to not have tack-sharp focus, I am willing to bet it would be your fault far, far more than that of the camera’s.
So today I thought, maybe I will give you a helping hand and list all the ways you can take full advantage of all the brilliant autofocusing features that come with your camera. And how you can make them work for you to make amazing images.
Autofocus Basics
There is a lot of jargon attached to the AF system on any modern digital camera.
Sure they are all useful options but until you understand their individual properties and the way they work, they simply are another thing to be confused about.
To make the best possible use of the onboard autofocusing system of your camera, you need to understand the fundamentals first.
How does your camera acquire focus?
What are the criteria on which the speed and accuracy of your autofocus depends?
Do all the focusing points, visible through the viewfinder, function the same?

Once you are able to answer all the above questions, you will have truly understood the inner workings of your camera.
You could then use this newfound knowledge to the best possible use and always set up your camera for success.
Just imagine for a second. If you knew that your camera has a much better chance of focusing correctly and then be able to track the moving subject when the scene is properly illuminated, isn’t it likely that you would always try and find such a bright place to shoot at?
No matter how good cameras eventually become, there will always be some shortcomings. If you are aware of these weaknesses, what you can do is find a workaround with the least amount of compromise.
There are a host of options, functions and custom adjustments available, all to make sure that you are able to adapt to the scene at hand and capture it with the highest possible accuracy.
The same camera body is used for completely different purposes by different people.
Some may use it solely for video, others just for still images. Some may just use it to shoot high-speed sporting events like a football game, while someone else may use it to create images in a studio where they have all the time in the world.
The camera has to adjust to all these situations and manage to give its best. It is indeed quite a tall task. It is also from where the need for so many different options and functions stems.
There is no one option that would fit all situations.
Had there been one, the manufacturer would not have gone through the trouble of making so many kinds of them.
But don’t get intimidated so soon. I am here to help.
In this post, I would try and give you a simplistic overview of the entire system of Autofocusing. So no matter what camera you use, you would be able to leverage the basics in your favor.
Like Physics, as they say, the basics do not change.
Let’s start with the easiest one then.
Autofocus Points
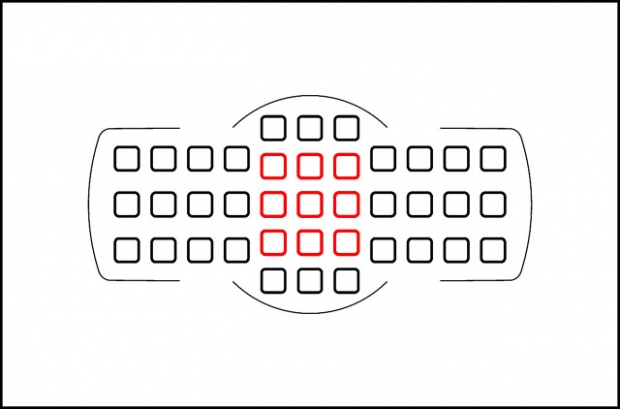
Yeah, you know them quite well. They are the tiny little square boxes on the viewfinder which lights up when the autofocus locks on.
By the way, did you know that all of them do NOT function the same way? Some are indeed better than others. Ever heard about Cross-type and Non-Cross type AF points?
No?
Let me explain.
Types Of Autofocus Points
The following explanation only applies to DSLR cameras. If you have a Mirrorless body, you may skip this section and continue with the rest.
Most DSLR cameras focus using a technique called Phase Detect Autofocus.
I won’t go into much detail here. Just know that Phase Detect works by splitting the incoming image the camera sees into two. Now depending on how far apart the images are from each other and in which direction the lens elements are adjusted to achieve perfect focus, one key thing to note here is that the images are split either horizontally or vertically or both depending on the type of AF points used.
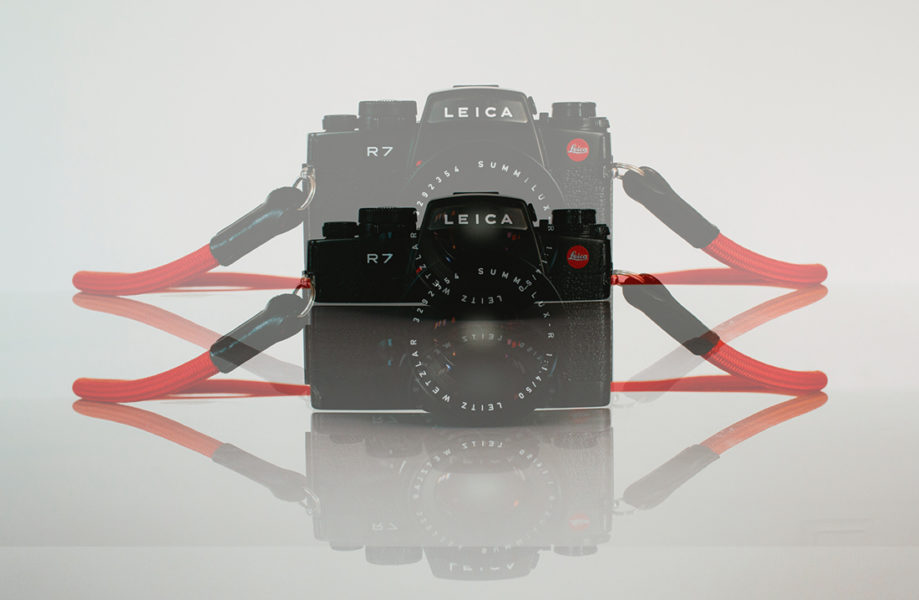
A normal AF point generally splits the image vertically. So the AF module of the camera looks at an image which looks kinda like this:

Trippy, huh?
What the autofocus module has to do now is adjust the lens elements to get the two images to perfectly overlap each other. The simple rule of thumb is this, if there are two images still visible to the AF module, the actual image is not in focus.
Clear till now?
Let’s keep moving then.
The difference between a normal (non-cross-type) AF point and a cross-type autofocus point is the axis over which it splits the actual image.
If you did not understand the last sentence, it’s not your fault. I haven’t yet explained what I mean by the ‘split axis’.
Let me do that now. Take the following example:
Suppose this is what you want to photograph. A wall where black meets white.

Notice that the two colors (black and white) are in a vertical orientation. Each color on one side of the canvas.
If you place a normal AF point at the junction where the two colors meet, the camera may not be able to focus at all.
Why?
It is because most normal AF points can only split the image into two vertical images. So even after the split, the split images look exactly the same to the AF module. Perfectly imposed on each other.
Just imagine making a second copy of the two-toned wall above and laying them one over the other. Would that look any different than how it already looks?
You get the problem now?
The camera autofocus system does not initiate the process to start focusing until it finds two separate images.
Since even after the split the two images seem to be perfectly coinciding with each other, the camera misleadingly identifies it as a perfect focus.
Cross-Type AF Points
The advantage of using cross-type autofocus points is that they have two split axes. One horizontal and the other vertical.
So now each image is split into four. Two horizontally and two vertically. After the split is done the resulting image looks something like this to the AF module.
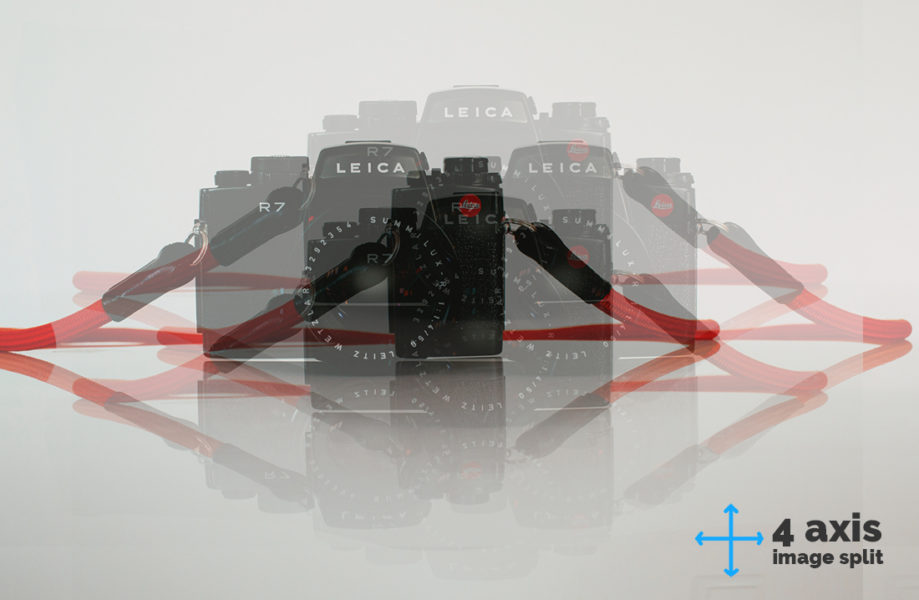
Disorienting isn’t it?
Don’t worry, you would never have to see such an image.
Now if you notice a little carefully, you will notice that the image which was split in two when a normal AF point was used, is now split in four. It is actually an amalgamation of the two images below.
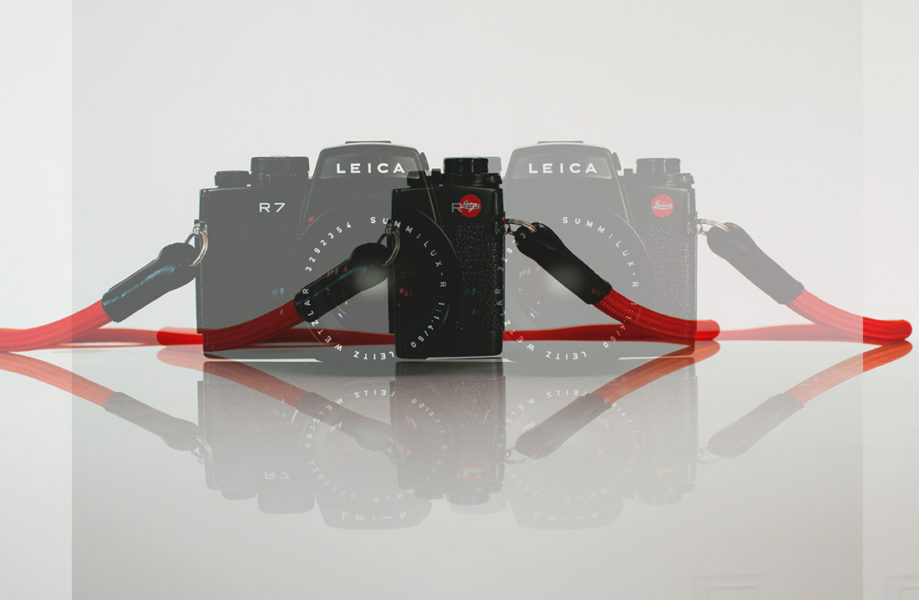
You get it now?
But how does this help?
Splitting the image across two axis helps in overcoming autofocus false positives as we experienced earlier with the two colored walls. It may also sometimes help the camera focus faster and more accurately.
Try It Yourself
If you have a DSLR camera right now, pick it up and try to focus on something which is just a single vertical line using a normal AF point.
The camera probably wouldn’t be able to pick up on the focus at all.
The trick to focus on the same vertical line using the same AF point is to just turn the camera 90 degrees. In other words, turn your camera in portrait orientation and try to focus again.
Since the vertical line has now become horizontal from the camera’s perspective, it would be able to split the image in two and easily find focus.
Fascinating isn’t it?
This is what I was talking about. Once you understand your camera and realize it’s strengths and weaknesses, you could come up with a solution for nearly anything.
Let’s trudge on now.
Autofocus Points Distribution
Now that you realized that the type of AF points in your camera matter much more than their sheer number, there is one more aspect about AF points that you should have a good understanding of.
How the available autofocus points are distributed within the frame.
This may not seem to be of much importance, but it truly is.
Unlike Mirrorless cameras these days, most DSLRs have all their AF points clustered around the centre of the frame. This makes focusing on a subject which is slightly off centre a little cumbersome. Especially so when the subject happens to be moving.
You cannot use the autofocus to focus on any subject when it falls outside the cluster of the AF points. It is as simple as this.

To focus now, either you have to change your framing, which is not advisable at ALL. Or use the Focus and Recompose technique to acquire focus.
Trouble!
So when looking up a camera next time, make sure you get one which has the highest amount of Autofocus frame coverage. Higher the number, higher the area of the frame covered by the AF points.
Active Autofocus Points
Does your camera have a few hundred AF points to choose from?
Have you kept all of them active thinking that it would make the focusing fast and snappy?
The number of autofocus points used at the time of shooting an image does matter a lot. But I think most people make a massive mistake in assuming one critical thing.
They think that the ‘number of autofocus points’ means the number of points in the frame which are active at the point of shooting.
While this is an understandable mistake, in reality, this is not the case.
The ‘number of autofocus points’ in most cameras today only refers to the number of selectable autofocus points from the total number available on that particular body.
Not so clear?
Okay, let’s suppose a camera body has 100 selectable AF points spread around the frame. When you choose say 11 points, you are NOT stopping the camera to use 89 other points that it has at its disposal. All you are doing is restricting yourself from choosing from within 11 points now using the selector/joystick on your camera.
Why would anyone want this?
I know this sounds counterintuitive but it does make sense and it helps. Let me explain why.
Many photographers who depend on their ability to be able to quickly select an autofocus point using the selector, choose a far lesser number of points for their camera than is available to them.
The reason is simple enough and it is speed.
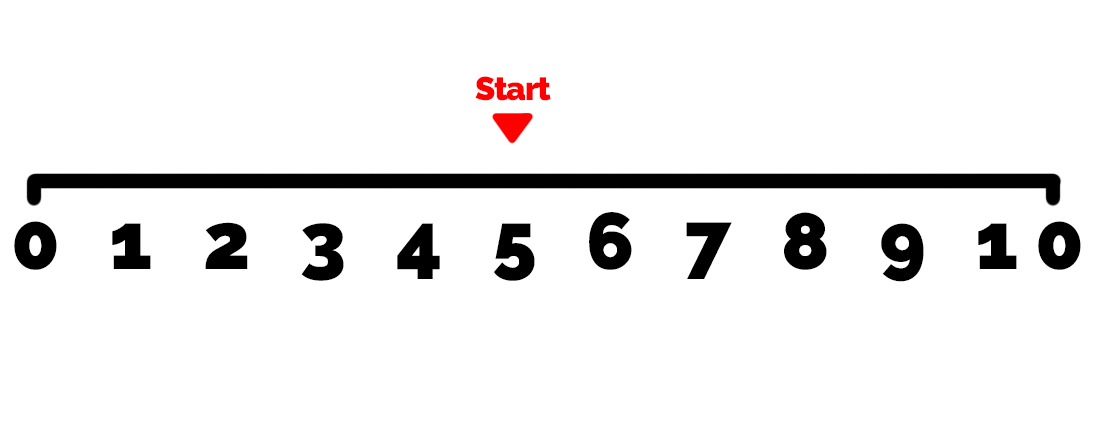
Think about this. Say there are ten numbers written one after another. With each click of your mouse, you are able to jump to the next number. And every new try starts with the number at the middle ‘5’.
Now if you want to travel to the number ‘8’. You will have to click your mouse 3 times.
Similarly, if you want to travel to ‘2’, you would need 3 clicks.
So far so good?
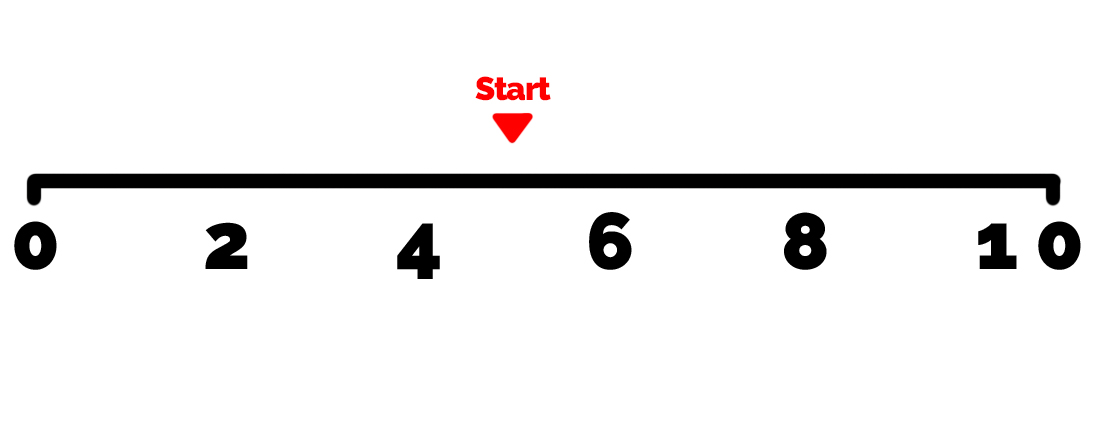
Now imagine that every other number is omitted. So even if the range remains the same (0 to 10), in the number line the total number of numbers written would be half now.
You are getting the picture now, aren’t you?
To travel to any number now from the start point. You would need half the number of clicks that you previously needed.
If you write every 5th number, the selection process will be even faster.
This is exactly what is going on when you select the number of autofocus points in your camera. The range remains the same, only the number of selectable points are determined.
The lower the number of points you have, the faster you would be able to travel from one side of the frame to the other.
This makes the act of focus point selection extremely fast.
The only downside to selecting a lower number of points is the accuracy of the position of these points in the frame. If you want to select a very specific point in the frame on which to focus on using the camera’s autofocus then selecting a lower number of AF points may not be an option for you.
Once again just to reiterate. Lower the number of selected points, faster the manual AF point selection but with less accuracy so far as the position of the autofocus point in the frame is concerned.
Note: The word “accuracy” used above only refers to the position of the AF points, NOT the quality of the focus thus achieved. Please be wary of the distinction.
If you are new to photography, I would suggest using a small two-digit number of AF points ( 10 to 30). If you know the Focus and Recompose technique, you can easily navigate quickly to the closest autofocus point and then reposition your composition so that the selected AF point exactly coincides with yourself 6y target area of the scene.
Using a lower number of AF points in conjunction with the Focus and Recompose technique gives you the best of both worlds.
Single and Continuous Autofocus
First and foremost do NOT confuse single Autofocus (AF-S\One Shot) with the single-shot shooting mode on the camera.
This is by far one of the things that I have seen new photographers get confused the most about.
AF-S refers to the autofocus protocol followed by the camera. In this, the camera focuses on the subject once and then locks on until the image is taken.
Single-shot, on the other hand, refers to the camera drive mode. The camera drive mode determines the number of images the camera takes as the shutter button is pressed down. If you select Single Shot, the camera would take only one image and then stop even when you keep the shutter button pressed.
On the other hand, if you choose Continuous Mode, the camera keeps on taking photographs for as long as you keep the shutter button pressed down. You may also know this mode as the ‘Burst Mode’.
AF-S and AF-C refer to the autofocus modes of the camera and how they function. Single Shot or Continuous Shooting mode refers to the number of images the camera takes in.
Since this is a post about Autofocus Modes, let’s dive a little deeper and learn a little more about Autofocus-Single (AF-S) and Autofocus Continuous (AF-C) mode.
Autofocus Single (AF-S) / One-Shot
The AF-S mode is specifically designed to photograph static subjects.
When engaged, the autofocusing system of the camera focuses only once and then locks on. Let me explain this a bit further.

Say you want to shoot an image of your beautiful wife. She is sitting at the table.

So you pick up the camera, point it towards her, and place an AF point over her face and half-press the shutter button. The AF module does all the splitting we talked about earlier and then finally acquires focus.
Once this focus is secured, as long as you keep the shutter button half-pressed, the camera would NOT focus again.
This means that if your subject (in this case your wife) or you the photographer move slightly in relation to each other and the camera loses focus, the final image will not be focused properly. When on the AF-S mode, the camera focuses only once.
Depending on what aperture value you use to take your images and how much depth of field it creates, slight relative movements may or may not result in an improperly focused image. For more information about this, read Subject Distance & Aperture Value | This Is What You Should Know.
This post was getting really long, so I divided it up into two parts.
Please click here to continue reading: The Only Guide You Need To Master Digital Camera Autofocusing [Part 2]
Hand Picked For You
![The Only Guide You Need To Master Digital Camera Autofocusing [Part 2]](data:image/svg+xml;base64,PHN2ZyB3aWR0aD0iMSIgaGVpZ2h0PSIxIiB4bWxucz0iaHR0cDovL3d3dy53My5vcmcvMjAwMC9zdmciPjwvc3ZnPg==) Autofocusing systems on cameras today come with a lot of functions. For a new ph...
Autofocusing systems on cameras today come with a lot of functions. For a new ph...- Focus and recompose is a technique used by many photographers to acquire focus f...
- Understanding Autofocus Modes is crucial for you to master your camera and take ...
- Back button focusing is a way to reassign the autofocusing control from the defa...
- It is a pity that most people miss the incredible gift that is the custom settin...
- Leaning to clean your own camera is a very valuable asset to have. It should not...
![The Only Guide You Need To Master Digital Camera Autofocusing [Part 2]](https://sp-ao.shortpixel.ai/client/to_webp,q_glossy,ret_img/https://www.aperturebuzz.com/wp-content/uploads/2020/03/daniel-cheung-dDppsuM_UpE-unsplash-300x200.jpg)


