Definition: Rule of thirds is a basic, beginner level composition technique that is primarily intended to divide the frame into three equal horizontally and vertically segments using two pairs of equidistant straight lines. The points of interest are then placed along those lines or their intersections, so as to make the resulting image look more balanced, dynamic and overall aesthetically pleasing to the eye.
Seriously that is it, that is all you need to know.
If you have understood what the above paragraph meant, you can skip this article altogether. The rest of this piece is just an explanation and the who, how, why about the first paragraph itself.
Derivation
Photography, by and large, has borrowed a heck lot of things from the art of painting. The “Rule of Thirds” is one such loan.
A guy named John Thomas, in the year 1797 was the first person who used this exact phrase (Rule Of Thirds) in his book Remarks on Rural Scenery to propose the idea of dividing the space of the frame into three equal parts, instead of placing the subject dead center in the frame and breaking up the space into two (either side of the subject), which was the prevalent norm.
According to him, the ‘three parts’ formula was a much more harmonizing proportion than precise half.
Interestingly this was approximately 19 years before the first photograph of a camera image was made. The book was all about paintings. Thomas was indeed talking about paintings and NOT photographs per se.
It was later that this “rule” like many other principles and guidelines that applied to paintings came together bundled in and then filtered into photography as well.
Should You Really Care?
If you are a beginner and NO the amount of time that has passed between when you bought your first camera and today doesn’t count. What counts is the dexterity and the level of authority you have over the art of image creation. If you do not possess that level of control then you are still an amateur.
What was I saying again?

Oh…right…If you are a beginner, then a resounding YES! You should definitely use the Rule of Thirds. It is by far the easiest and the quickest way to make your daily snapshots look much…much better. I will tell you what to do exactly in just a second.
If however, you have been shooting for quite some time. I imagine you already know the nuances of this particular “rule”. My only suggestion, in this case, would be to know exactly what the Rule of Thirds actually strives to do and how it affects your images. So that you know when to break free.
Bottomline: Use it at your own discretion, only when it adds to your images.
Okay then, let’s get to the brass tacks…
The Rule Of Thirds
The Rule of Thirds is basically a dumbed-down, distilled, composite version of many principles which actually pertained to paintings. Primarily the rule serves two main purposes:
- It breaks down the frame into three equal horizontal and vertical segments. The imaginary lines which are used to divide the frame act like guidelines to further fine tune the composition so as to align the image more towards the 1/3rd concept (more on this later, hang on).
- Help the eyes of the viewer navigate the image by better cultivating the natural “hot spots” of the image.
Explanation time!
Concept Of A Third
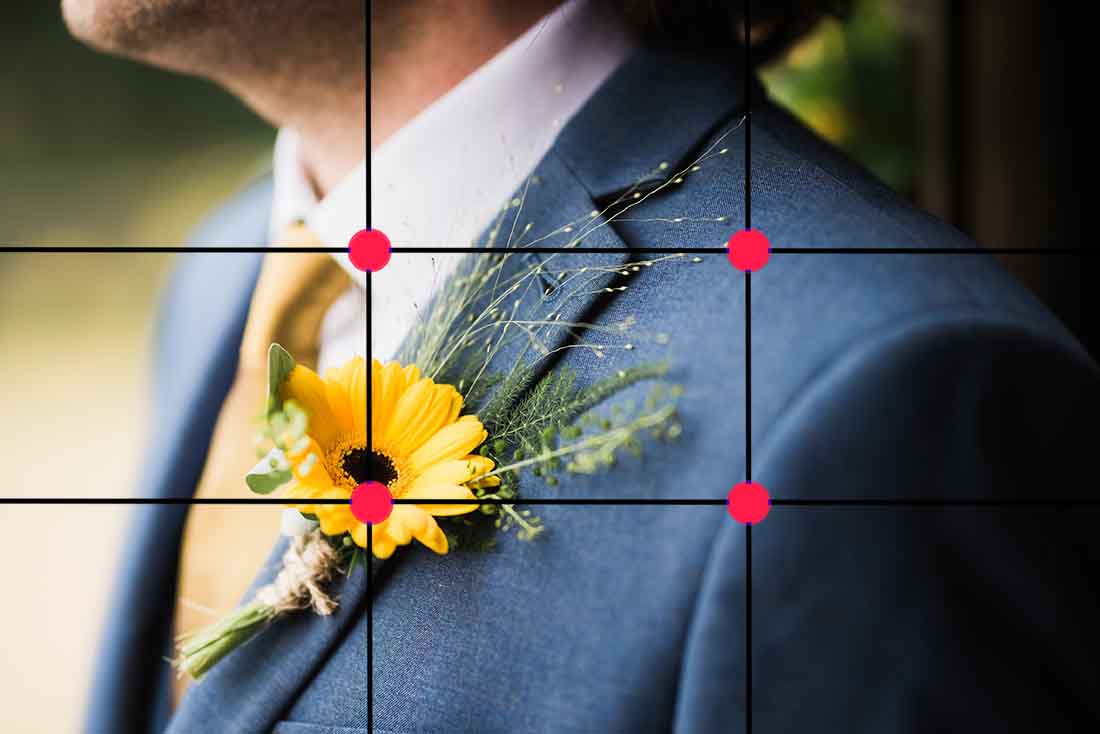
The Rule Of Thirds divides the frame into three equal horizontal and vertical segments. To do this it requires two horizontal and two vertical line segments respectively. Just imagine a simple grid-like structure, like the image below.
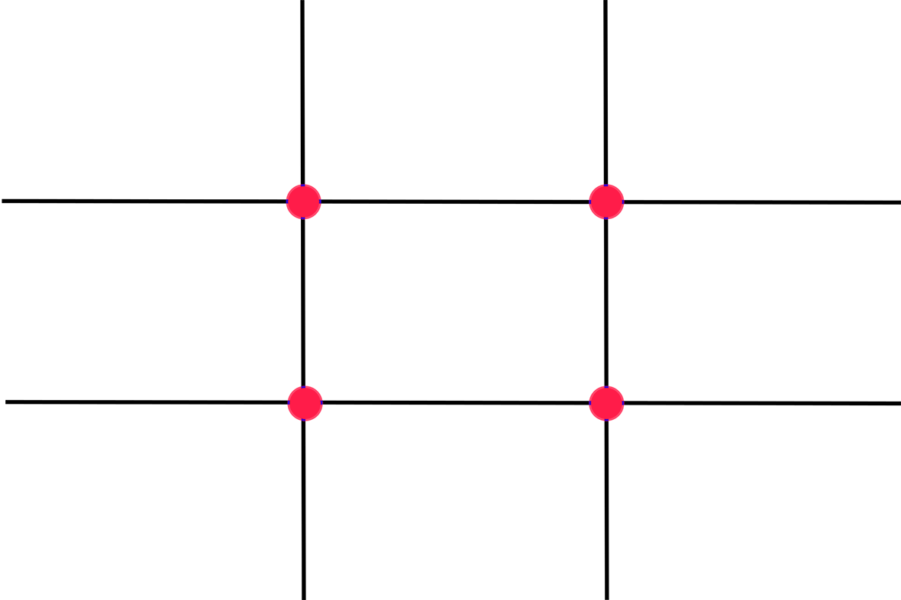
Now depending upon the elements in your scene and the camera orientation of your choice, you can use this grid to divide the frame into three equal parts. The ‘rule’ suggests that instead of dividing the frame in two by say placing the primary subject smack bang in the middle and creating two negative spaces on either side, the image looks far better when the subject is placed near the edge of the frame and there is one large negative space instead of two.
The above technique comes real handy when composing landscapes. An average landscape contains a certain part of land and sky OR water and sky. Using the Rule Of Thirds to break up your composition into three equal pieces you can devote the lion’s share of the pie to the particular element that you want to amplify more than the other.
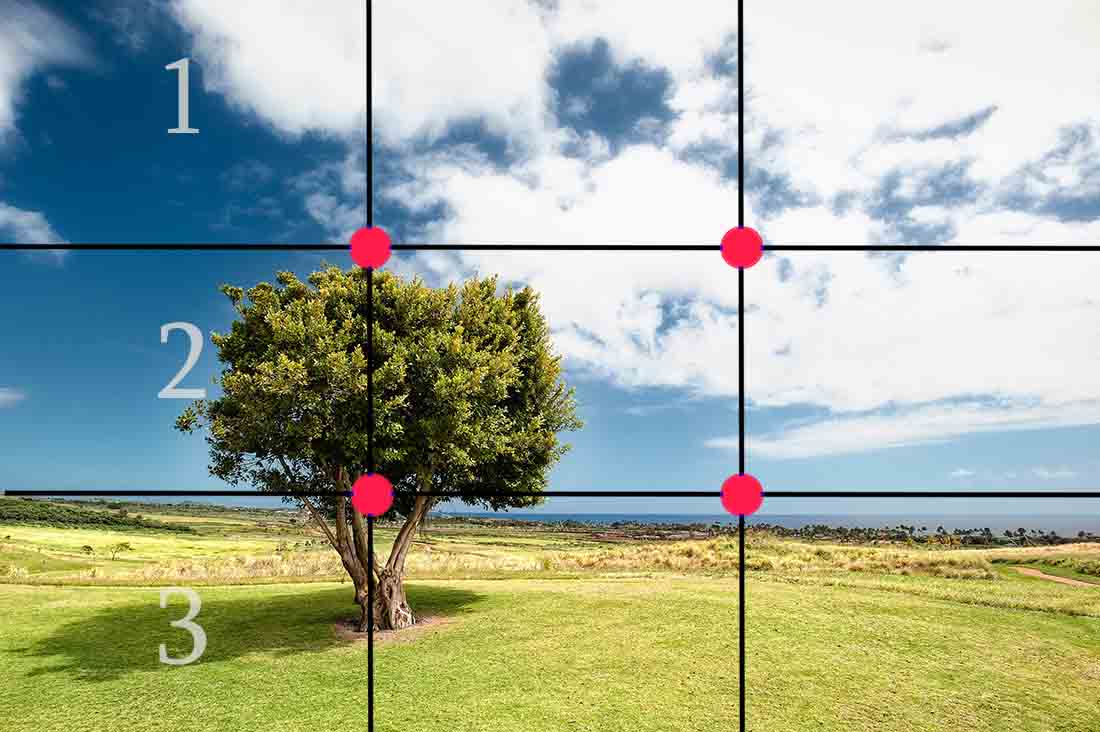
For example, if you want to emphasize more on the sky in an image (maybe because you found a nice cluster of clouds). You can devote the two top segments of the image to the sky only and keep the horizon aligned to the bottom line. This would give your sky a nice wide expansive feel, something which you may be aiming for.
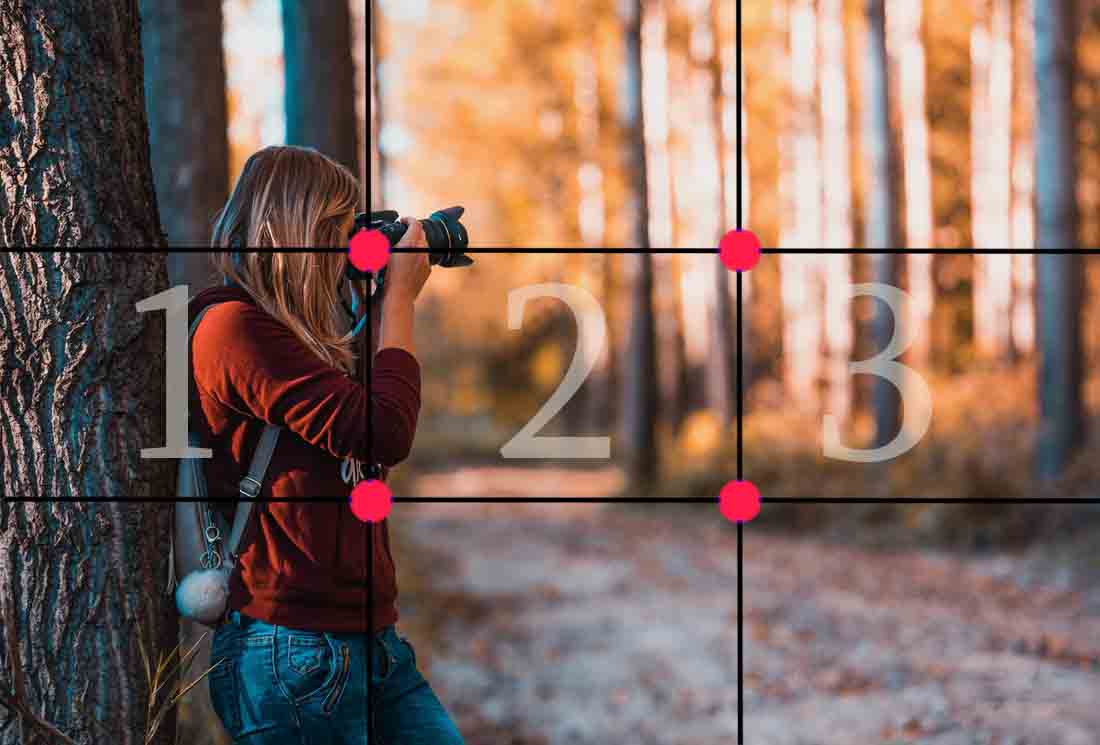
You can do the exact same thing with portraits as well. Here is an example.
I hope by now, you have understood the basic underlying principle that guides it all. Instead of two, make it three and combine them to make better-composed images.
Hot Spots
According to many studies (both scientific and otherwise), the human eyes are naturally attracted to certain parts of an image. Even if we do not make a conscious decision to look at an image in a particular way, subconsciously we always tend to do that.
So theoretically, if we knew where these points lie on an image, we could use it to further enhance the expression of the photograph…..right?
That is exactly what the Rule Of Thirds also strive to do. The four points of intersection between the vertical and horizontal lines are actually the ‘hot spots’ or the prime points where we humans tend to focus more. Think of these points like a visual magnet always trying to pull our attention.
So now all we have to do in order to comply with the Rule Of Thirds and take maximum advantage of the great insights it has underneath the simple theory is to just readjust the composition of the image so that the key elements of the image is placed on or near the ‘hot spots’. For example, if you are shooting a portrait, make sure the eyes of your subject is near any one of the intersection.
This part of the Rule Of Thirds is just used to take advantage of the subconscious of the human eyes. It’s like perfectly predictable hunting. If you know with absolute certainty that the rabbit is going to pass through exactly that narrow channel between those two rocks, just setup you snare there an forget about it. You don’t need a second one.
Important Decision
It looks deceptively simple and easy to implement when I say that all you have to do is place the key elements of the frame in close vicinity of the ‘hot spots’ and viola!…… your images are gold.
In reality, it is not THAT simple.
Yes, you have to do that to comply with the “rule” and it does help make better images but (and this is a big BUT) there are a thousand other factors at play. The foreground, the background, the expression of your subject, the lighting, the colors, the timing and many many more.
Let me give you a very easy example that you can ponder over right now.
Say, you are shooting portraits of a woman. What are the ‘key elements’ here? Is it the woman? Or her just her eyes? Or both the woman and the car she is standing next to?
And let’s not forget, this is a fairly easy example. What would you consider as the important points of the image when you have multiple subjects in the same frame. Just imagine a wedding. You have many people, all together in the same shot. What do you place where?
So you do see where I am going with this right? In some situations, it is pretty easy to figure out what is the most important part of the image and then just place them according to the rule we just learnt. However, in many situations (which is most of them) the answer is not that clear and vague at most.
Application
Since the Rule Of Thirds is basically a guideline that deals with visual art. You can, in fact, use it in more than just photography. It is in fact already used quite heavily in multiple forms of visual art forms. Now that you know about it and have a pretty good idea of how it looks, I think you can discover such instances on your own.
Feature films, Web Designs, paintings all use the Rule Of Thirds to some degree from time to time. Just rewatch your favorite film his afternoon and I am sure you will find many scenes where the “rule” has been used.
But I Already Took Many Images
If you just came to know about the Rule Of Thirds and have been shooting for quite some time without knowing or implementing it at all, just take a deep breath. I have an easy fix for you.
It is a little dose of post-production cropping.
Granted that all your images will not offer itself to be cropped so as to fit the ‘rule’ but many would. Salvage as many as you can. In fact, this can be a very good litmus test for the ‘rule’ itself. Find say five images which you can crop in Lightroom and somehow make it adhere to the rule. Now compare the images. Something like a before and after look. Does the before look better or the after?

You being the photographer may have some biased views about your own images. Okay, so go ask a few friends about which one they like best. There you have a very solid way of verifying and testing the rule before you decide to embrace it for all eternity.
Cookie Cutter No No
Art has and never will have a definite formula to follow. You are the artist and there should be a signature way of how you work. You need not be a photographer to follow this. Whatever artform you pursue this simple logic still applies.
Ape NO one! No humans, no machines and certainly no stinking “rule”.

The only point of me introducing you to the Rule Of Third is to tell you how and why this ‘rule’ is used. When you know the actual reason about how a certain rule came to being and more importantly what purpose it ultimately serves, you can use the knowledge and just make better images.
Use the underlying knowledge that is and not necessarily the ‘rule’ itself.
The reason I asked a beginner to follow this blindly and a little-experienced photographer to use discretion is because a beginner would not understand the merits and the demerits of the Rule Of Thirds right away. Once he uses it for some time he will eventually figure out when it works and when it doesn’t. Since overall the ‘rule’ does add to the images more often than not, following it initially should give him a good starting point.
My simple advice is this. After reading this, DON’T just go on a rampage and crop all your previous images to place stuff at the intersection and condemn any other photographer who doesn’t do that. Instead, understand the principle and use it only when it makes sense.
The ‘rule’ too was made to make our images more balanced, dynamic and harmonizing. To better and creatively use the negative spaces and take the most advantage of the ‘visual hotspots’. If trying to follow the rule strips the image of these very attributes, it defeats the whole purpose.
Conclusion
That is it, guys. That is all you need to know about the Rule Of Thirds. Use it to your heart’s content and let me know how the results turn up. I would be very interested you can come up with images where this rule doesn’t work at all. If you get them, make sure to share them with me.
Keep shooting amazing.
HazaaaaH!
Hand Picked For You
 In the simplest way possible, white balance is the process of reproducing the co...
- Shutter speed determines the time period during which the shutter opens up to le...
- Understanding image exposure and the maths behind it is the bedrock of photograp...
- Release Mode Dial are commonly found in Nikon manufactured cameras which allow t...
- The reciprocal rule in photography is a simple guideline which suggests shutter ...
- Getting sharper images out of your camera is much easier than it is made out to ...


