The LCD at the back of your camera is not an adequate representation of the images you take for many reasons. For starters, it’s really small. Everything displayed on it is even smaller. Even with the ever-increasing resolution of the camera itself, the resolution of the display at the back rarely gets an update.
For me, the two most important drawbacks of the traditional display at the back of the camera are:
- It is not at all an accurate representation of colors and exposure of the shot. (You do need to consult the camera histogram to be absolutely sure of this).
- Without magnifying the image a sufficient amount, it is nearly impossible to tell if you nailed the focus, especially when working with smaller aperture values.
I am not discounting the luxury we digital photographers now have, of checking the images instantly. It’s just that, for some genres of photography, the cons of the LCD may add up to such an extent that having it may only serve to make sure that the images are actually being recorded.
So is there an easy way to overcome these shortcomings?
Absolutely! And all you need is a long USB cable and a computer, which I believe you already do.
So let’s get started, shall we?
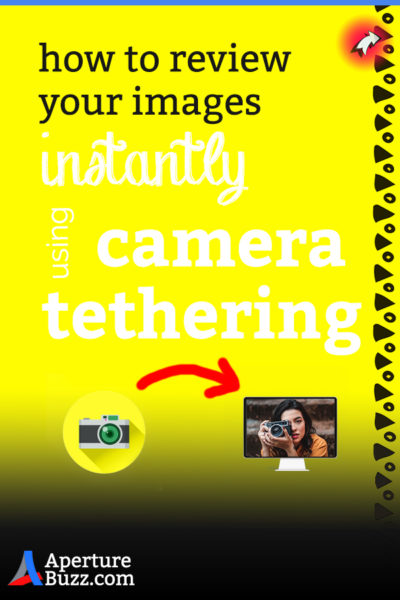
Camera Tethering
Camera tethering is nothing but connecting your camera to your computer to facilitate the usage of the larger display and the advanced features which come with the editing software you use.
Confused? Okay sorry, let me go through it step by step. 
Like I mentioned before, all you need is a long USB cable. This is the only piece of physical hardware that you would need to connect your camera. I will explain how to hook it up in just a second.
Once plugged in, you can use photo editing software like Lightroom and Capture One to easily import images, live as you take them. So now instead of viewing your images on the small display at the back of your camera, you can use the larger display you have on your laptop or computer.
For as long as you are tethered to your computer, all the new images get synced to your computer as you keep taking them. Completely eliminating the process of you having to physically take the memory card out and download all the files onto the computer.
Sweet!
Should You Really Care?
Well, that depends.
No, I won’t just give you a vague rationale for it, I will indeed show you when it does work wonderfully and when you probably don’t even need it.
It’s A Setup
Although small and involving only a handful of things at a time, tethering a camera to a computer is technically a setup. This also means that it isn’t very mobile. It can only be used where the subject AND the photographers do NOT have to move around fast or frequently.
Some easy examples where camera tethering works beautifully are
- In studios
- Landscape photography
- On location product photography
You get the idea…
Your camera will be physically tied to your computer and the distance for which you would be able to move around is determined by the length of the cord you use.
Often photographers who use tethering also use artificial external light sources, tripods, etc. So ‘take and go’ genres of photography like Wedding and Street photography are simply never going to work.
More Leverage
If you have been shooting for some time, I am sure that often you must have felt that your RAW images look way too flat and boring.
Well, that is because it is unprocessed by definition.
When shooting RAW, the camera captures as much details as possible and then just shows you the resulting image on the display at the back.
In a scenario where you are shooting for a client in a studio or teaching a class, where you are required to show live examples and demonstrations, the flat looking RAW files wouldn’t probably be your best option.
Wouldn’t it be nice to process the images just a little bit? Save it from looking so uninteresting by adding some of your own style, BEFORE the client looks at it?
Well then, now you can.
With camera tethering you can now, process your images exactly as you want it before it shows up on the large monitor. All you have to do is make your custom preset and apply it to the images using the settings. You only have to do it once and all the images thereafter will come out with the presets applied.
Just make sure that you are shooting RAW images. Shooting Jpegs may result in permanently applying those presets on the images with some image processing software.
Even when you are shooting alone and do not have to show the images to some third entity immediately, you can use dedicated presets to keep a closer eye on aspects of your images like exposure and color reproduction. You can also use the histogram in the software to monitor these too. It is much more accurate since it takes into account all the data pin the RAW file instead of just the smaller Jpeg (like your camera does).
To know more about how the histogram works and how you can use it to nail your exposure read: How To Leverage Histogram Explained | Plain Simple.
Speedier Workflow
If you shoot in a studio environment and fit the prerequisites for tethering, buying just a long USB cable to tether your camera is probably the best cheap investment you are ever going to make.
Now everyone knows that getting it right in camera is the best way to shave off an enormous amount of time later in post. With a larger screen and the added power of your image processing software, you can closely monitor your incoming images on the fly as they come in.
If any minor adjustment is required, it is sorted out then and there, giving you the best possible chance of bagging the best images.
And it doesn’t stop there.
You can save some more time by cataloging the images, on spot. Lightroom is an excellent tool for this.
You could draw up all the images you took in the session. Look at them individually on the larger Retina display, compare them with each other and even make selections based on your or your client’s choices.
So even before you leave the studio, half the job is done. All your images are downloaded, partly processed, cataloged and selected. Next time you just have to fine tune the editing a little bit and off to the printers.
Easy, peasy! More time you could spend elsewhere…
How To Tether
Yeah, let’s get down to the brass tacks now.
Tethering your camera to the computer requires nothing more than a long compatible USB cable. Now depending on the model and make of your camera, you may need a mini or micro USB to a full-size USB cable.
10 to 15 feet long is the standard size that is mostly used for this purpose. However, you can use a longer or shorter version depending on your requirements.
Software
There are two pieces of software which are most widely used for tethering purposes.
- Capture One
- Lightroom
Both of them come with more or less the same set of features but in different packages and names. Lightroom was historically a LOT slower in processing the images and bringing them up on the screen but with quite a few updates now, it has become relatively faster.
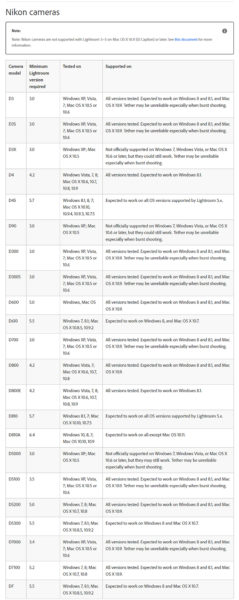
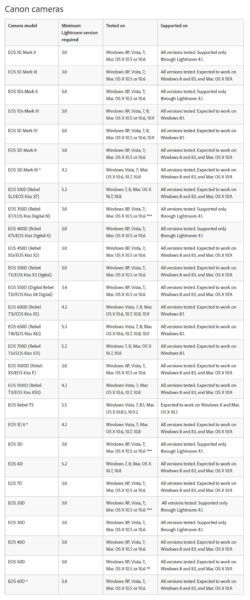
Here is a detailed list of all the camera bodies Lightroom currently supports:
Nikon Manufactured Camera
Canon Manufactured Cameras
Having said that if you think that you would need to depend heavily on tethering for your line of photography, I would highly recommend Capture One for this. Not only is it a lot faster in this regard it also has a few extra tricks up its sleeve which can really come in handy on a day-to-day basis.
The Actual Process
Once you have the cable sorted out, connect the camera and the computer together. Now switch on the camera and then fire up the software of your choice.
Here is a quick demonstration of how to start up the process the first time.
Lightroom: File > Tethered Capture > Start Tethered Capture

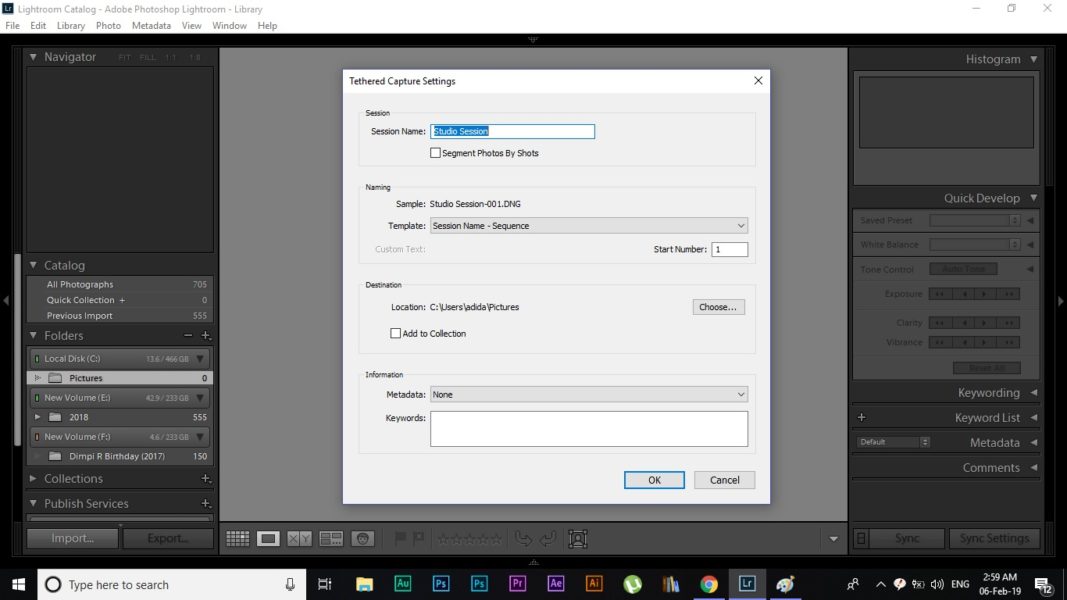
You can name a sequence as you like. Select a nomenclature routine for the images that you want work on. Choose a preset (if you want) and finally the destination in the hard drive where you want the images to be stored and you are off.
Very very easy.
For Capture One, follow along with this video tutorial:
This processes for both the software is as simple as it gets. It’s practically plug and play. If you already have any one of them, I urge you to use them at least once to get the feel of it.
If you don’t happen to like it, you don’t have to use it ever again.
Last Few Words
The basic setup is one that is easily affordable and virtually a no brainer for virtually any studio photographer. Especially if you already happen to use either Lightroom or Capture One. Nearly all major DSLR and Mirrorless cameras are currently supported by both the software. (Sometimes even when they actually don’t list them).
After using it a few times, if you actually deem it to be worthy of using, you can always beef up the system further by upgrading your equipment. Say like a good, heavy tripod with a ball head. Solid state drives (SSD) for your computer, a good quality graphics card maybe. A good platform for your computer and then maybe a high-resolution 4K monitor.
Since speed and accuracy is what we are shooting for here, knowing your Lightroom shortcuts can help you immensely to get through the incoming images quickly and then get them well displayed on the screen both for review and comparing purposes.
Oh! I almost forgot once you are connected to the computer through the cable, you can shoot remotely too. A new minibar would appear on your screen which would display all the current settings of the camera. If you want, you can use it to trigger the shutter as well.
This last feature comes in really handy when you do want to touch the camera as LITTLE as possible. Say when shooting a stop motion animation, or when the camera is mounted somewhere where it is really difficult to get to.
That is all you need to know to start shooting tethered folks. I hope I have been able to lay out the process to you as simply as possible.
If you are still on the fence, I would strongly urge you to at least give it a try once.
Keep shooting amazing.
This is now a teeny tiny blog trying to compete with the big guys. If you liked what you read, please take a second to share it. It would help me a lot. Thank you.
