Yeah, I know the name, Inverse Square Law.
Sounds really spooky and unlike anything you need to know to shoot good images.
But if you manage to ignore your fears surrounding this topic for some time, I can promise you a beautiful and an important insight into light and its characteristics.
Photography is nothing but recording light in an artistic or creative way, remember? If you do not know how light behaves, how are you going to effect change?
And the best thing about all of this is, you only have to understand this just ONCE!
Once you get this simple theory and understand the nuances you can use it for ANY light, FOREVER. How does that deal sound?
If this tickles your curiosity and makes you want to learn more about it. This way, please…
What Is It All About?
The Inverse Square Law codifies the way the intensity of light falls off as we move away from the light source.
That’s it. No mumbo jumbo.
Okay, you already knew that. You hold a book close to a torch and the light shines brightly on it. As you move the book away from it, the light gets incrementally less intense.
The law we are discussing here just illustrates how much the brightness falls for each unit of distance. So instead of playing a guessing game each time, once we learn the law, we can effectively calculate the numbers correctly up to the decimal points.
When Do We Need To Know This?
Theoretically, the Inverse Square Law can be applied anytime we deal with light. Which is ALWAYS by the way.
Practically, this bit of knowledge comes in most handy when using external, artificial light sources like flashes, strobes, etc.
Artificial lights are generally used to tailor the lighting to suit or invoke a specific mood or atmosphere. If you, as the photographer, have no understanding of how the light is going to behave once you switch it on, how on earth are you going to shape it and create the effect you want?
To be honest, you can do without this law if you only shoot using natural light or sunlight. You will understand why in just a bit.
The Nuts And Bolts
Okay, now we know the what and the when of the Inverse Square law. Therefore, it is time to delve a bit deeper and understand what it truly says.
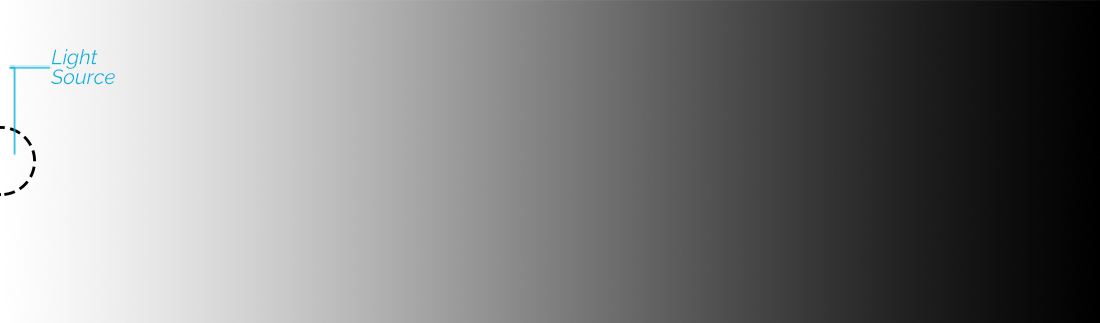
Look at the image above.
It is an image that shows light fall off from left to right. The brightest part of the image is on the left side and as you move right, the intensity of light drops.
The big question is by how much?
The fall in the intensity of light as you move away from the light source is defined by this formula:
Intensity = 1/Distance²
No, no don’t freak out. This formula simply states that as the distance doubles, the intensity falls by 3/4. In other words, only a quarter (1/4) of the amount of light reaches the second point.
Confused?
Back To The Diagram
We mark the distance this time.
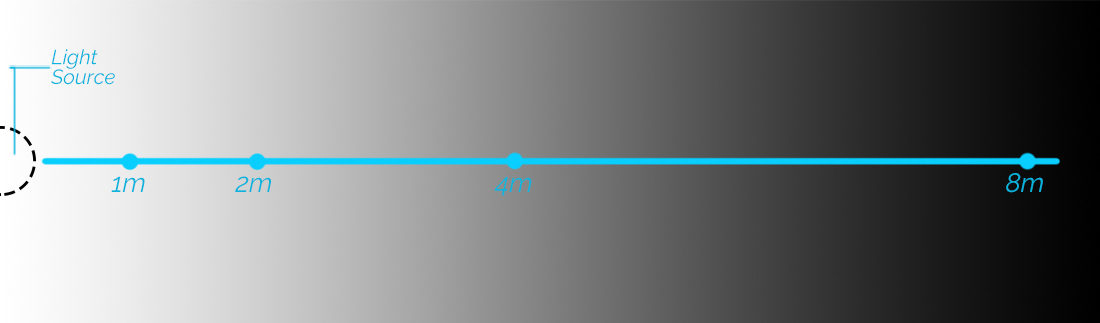
Let us start at 1 meter away from the light source. Imagine that your subject is placed 1 meter away from the light source as you are about to take an image. This is the spot against which we measure all the other spots. In other words, we treat the amount of light here as 100%.
It goes without saying that the light this close to the source is going to be blinding for your subject. Let’s say you decide to move your subject 2 meters away from the light source now.
You just doubled the distance between the subject and the light source. From 1 meter to now 2 meters away.
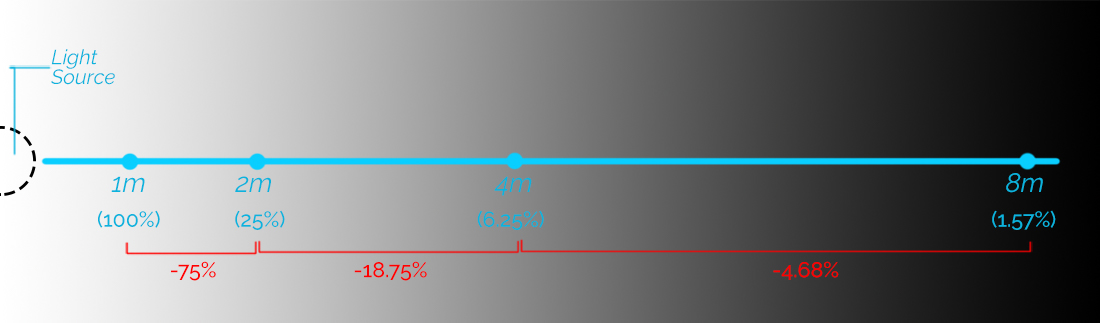
So, as per the Inverse Square Law, the amount of light reaching your subject 2 meters away will only be a quarter(25%) of what it was at 1 meters away.
Interesting, isn’t it?
So what happens if you move the subject further away?
The same rule applies.
Let us imagine that now you move your subject 4 meters away. This is again doubling the distance as compared to the last point.
Exactly like last time, the intensity of the light also falls by 3/4 as compared to the last spot.
If the spot at 2 meters away received 25% of the original power, the amount of light reaching the spot 4 meters away would be 6.25% (25% ÷ 4).
If you are wondering how I am coming up with the percentage values for the intensity of light. Well, I am just expressing the fractions in terms of percentage values.
You could do this too. Just multiply a 100 with the intensity formula.
- 1 meter away: 1/1 * 100 = 100%
- 2 meters away: 1/2² *100 = 25%
- 4 meters away: 1/4² * 100 = 6.25%
Easy, right?
One Important Thing You Missed
Apart from the change in brightness, light demonstrates another key characteristic that we did not talk about yet.
Could you guess what that is?
Okay, let me fill you in. It is the distribution of light.
Let’s look at the last diagram from the section above.
As you can see, the light fall off across the frame from left to right is very dramatic close to the light source at 1 meter away. If you place a subject at 1 meter away from the light source, the left side of the subject is going to be very bright while the right side very dark, if not totally black.
This is because the light, a meter away from the source falls off very quickly.
But this behavior changes with distance.
Look at the far right of the frame now. Be careful to notice the light fall off value. Do you notice anything different?
Yes, exactly!
The rate of light fall off reduces as light travels further away from the source. In other words, the evenness of the light improves.
From 1m to 2m, the light loses 75% of its intensity. From 2m to 4m, however, it loses only 18.75%. The amount of light lost per unit of distance falls as we travel further from the source. Just remember that the calculations are with respect to the initial point we are measuring from and NOT from the first point at 1 meter away.
Basically, if you are a sufficient distance away from the source, the light fall off from one side to the other could be so small that it would be barely visible.
Practical Uses
Done with the theory. Now let’s talk about some real-life scenarios where this knowledge about light brightness and distribution theory could come in real handy.
Contrast Control
The basic understanding of light and its properties could set you up very well if you use artificial lights (flashes, strobes, etc.).
The one important aspect of images that you could control using this technique is the amount of contrast in them.
How?
Contrast is defined as the difference in brightness between the brighter and darker areas of the image. So if there are two points in the image whose brightness varies a lot, you have a lot of contrast and vice-versa.
Now, let’s go back to the previous diagram where we talked about the light fall off. You will notice that as you get closer to the light source, the light fall off rises dramatically. This means across the frame the amount of light falling on the nearest point will be substantially more than the furthest point. Your recipe for creating contrast.
Compare this with a situation where you have the subject a fair distance away from the light source.
Since the light fall off is now very little as compared to the previous situation. The difference in brightness between the nearest and the furthest point in the frame would be much less. Thereby producing an evenly lit, less contrasty image.
Background Mixing
Going hand in hand with the contrast theory, we could also use the Inverse Square Law to fine-tune the perfect amount of background we want in the image. And it’s tone and color too.
Imagine you are shooting a model with a light source illuminating her from the front.
Now using the same theory we just used to create sharp contrasts, we could dial it up a notch and throw the background in complete darkness.
You could also use this to turn the background certain shades of grey just by altering the distance between the light source and the background.
Finishing Off
Come on now. Wasn’t it simple?
I told you, you were worrying about it for no reason. For posterity’s sake, just remember light over distance becomes less intense and more even.
Before I finish off, I would like to draw your attention to a few things.
- I used meters to measure the distance between the light and the subject. You could use any unit you want. The results remain the same. Doubling the distance will result in the intensity of the light to fall by 3/4 parts.
- Sunlight has no fall off. The light before reaching the earth has already traveled such a great distance that there is virtually no fall off over the entire planet. You could have two subjects placed hundreds of kilometers apart with no difference in brightness whatsoever. Remember I told you that if you only use natural light, you need not worry about this law much? This is why.
- Not that you need to know this for photography but the same inverse square law can be applied to gravitational force, sound waves, radiation, electricity, etc. I thought you would like to know this too.
That is it, guys. That is all you need to know about the Inverse Square Law, and how to use it in practical daily situations.
Keep shooting amazing!
