Have you ever felt that the Instagram crop takes away from the brilliant image you just took?
And that you have to cut out pieces of it that you really don’t want to.
It might seem very natural to some but for the other half, the 5:4 crop may seem a little restrictive. After all, when you take an image you take it mostly using a 2:3 ratio. Most dedicated cameras use the 2:3 ratio.
Have no idea what the ratios mean?
Let me explain.
Aspect Ratio
Ratios are nothing but a relative relation between two things.
In our case, the ratio establishes the relationship between the length of the height and the width of the image.
For example, a 2:3 ratio means that the width of the image is always 1.5 times the height. (Why?….because 2:3 can also be written as 1:1.5. In other words for each unit of height, the width increases 1.5 times).
Here you should be careful about two things:
- The order in which you write does matter. A:B is not the same as B:A. In the same way height:width is different than width:height. Make sure to write them in the correct order. If you wish to change the order at all, make sure that you change the order of the ratio as well. A:B = 10:50 is the same as B:A = 50:10.
- The ratio remains unchanged as long as the figures are multiplied or divided using the same number. Hence 2:3 = 4:6(multiplied both by 2) = 10:15 (multiplied by 5) = 20:30 (multiplied by 10). Ratios are typically not written using a decimal point, hence the lowest integer numbers which reflect the relationship used. It is for the same reason that we use 2:3 instead of 1:1.5 (divided both by 2) although they actually mean the same.
Now, we can use this new-found knowledge about ratios in the world of photography.
Unless you are using a really old specialty camera, you are probably always shooting using a 2:3 ratio.
Do you know why?
Because the shape of the image sensor inside your camera is such. The ratio of the height and the width of the sensor is 2:3. And this is true for all sizes of sensors available today. Full frame, crop sensor, micro four thirds you name it. It is precisely because of this reason, that the images which come out of it are also shaped similarly.
Makes sense?
The Instagram Crop
Now any photo you take with a camera which has a 2:3 sensor inside is going to give you images that are all of the same shape.
But Instagram only allows images which are one of the following ratios: 5:4 or 1.91:1. Most people (me included) use 5:4.
And I am sure by now you have definitely realized that any image which does not conform to one of the above aspect ratios is automatically resized. You don’t want that now, do you?
Instagram is an app which is purely designed to be used on a mobile smartphone. The crop, too, is no exception.
Because most phones are vertical in nature (not horizontal), it makes sense to shape the images on the platform similarly to make the most of the screen real estate.
Plight Of The Landscape Images
The big question now is what do you do with the pile of images you just took with your camera in landscape orientation?
If you absolutely have to share your landscape-oriented images on the Internet, there are two primary ways of doing it:
- Don’t do it on Instagram. I know, I know this option is not very popular considering how humongous Insta is right now and the sheer number of people who use it daily. It is really difficult to keep away from it.
- Crop your landscape-oriented images in 5:4 ratios and you are free to share them. It goes without saying that many pictures would lose a lot if critical parts of it are cropped out.
So, you see you have to make major compromises either on the platform itself or the images you want to share. That doesn’t seem like a fair bargain!
What if I tell you there is a third way, where you will have to crop a much smaller part (and I mean it) of the landscape image and share it on Instagram without a hitch.
Sounds too good to be true?
But it’s possible. Here’s how you do it.
Seamless Panorama Multipost
Instagram, sometime back, offered a way to post multiple images at once which are all grouped together.
To go from one image in the group to the next, the user has to swipe left instead of up. On the grid view, however, only the first image carries a little symbol which indicates that there are other images grouped with it.
We can use this grouping feature to our advantage and use it upload beautiful horizontal images that look absolutely stunning.
Ready to do it then?
Here we go.
Okay before we begin, I would like you to know that I am going to show you how to do this is in Photoshop. Please don’t freak out, it’s just three steps. Just a few mouse clicks are all you need to do.
You can use the same principles and apply them to the images you want using ANY image editing software you are comfortable with.
For people who want to get the entire thing done on a cell phone, there are apps both in the App Store and Play Store which will do just a good enough job. I have some recommendations too at the end of this post.
Now we start.
Creating Multiple Images From One
In essence, what we are trying to do here is cut one photograph into many pieces. All of which when placed side by side create one nice, seamless, long horizontal image.
The trick here is to stick to the mandated 5:4 ratio for each piece of the image we cut.
Let me tell you the process and I am sure you will follow. It is very basic actually.
First some maths. The easy type, just additions.
The ratio of height and width of every image we upload to Instagram has to be 5:4. So for each piece we cut, we need to stick to this.
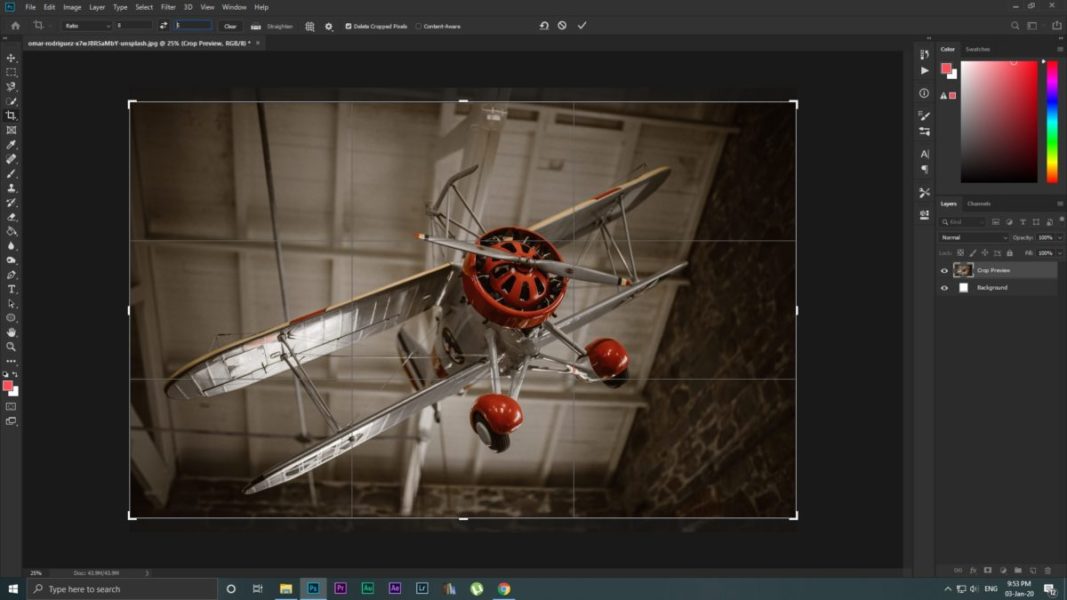
Step 1: Global Crop
Like I said earlier, using this method you will have to crop out some portion of the image but it will be substantially less as compared to a typical 5:4 crop.
Here is how you determine the ratio you need to use for the global crop.
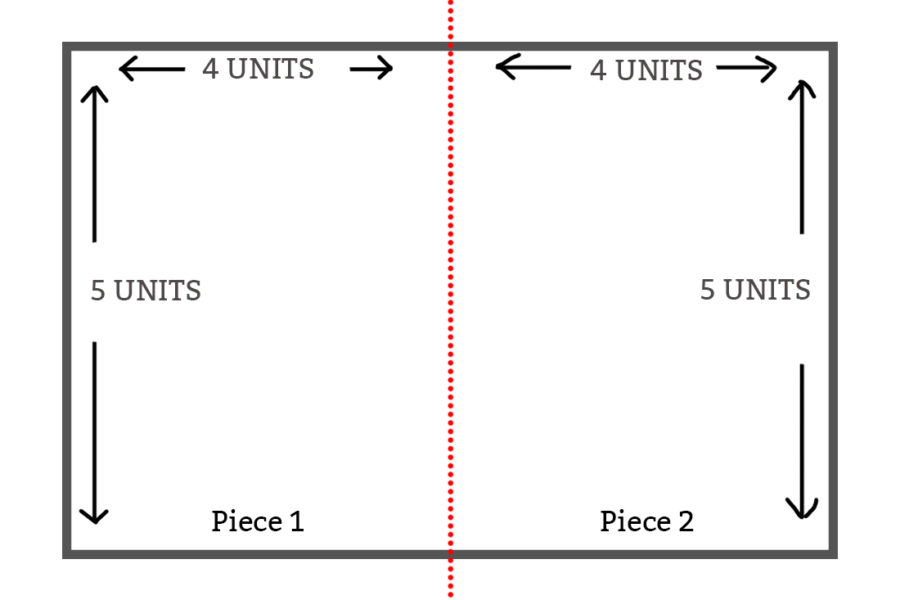
As the height component always remains constant, you can use the value 5 for it. For the width, however, you will have to add 4 for every piece of the image.
In other words, if you want your image to be cut up into 2 final images which are going to be uploaded to Instagram, you have to crop the image using a 5:8 crop.
If you wish to cut up the image into 3 final images, you will need to crop it using a 5:12 crop.
Step 2: Cutting Up The Image
Now that you have the initial global crop applied, all you need to do is cut up the image into uniform pieces and you are done.
In Photoshop, navigate to ‘View’ then ‘New Guide Layout’.
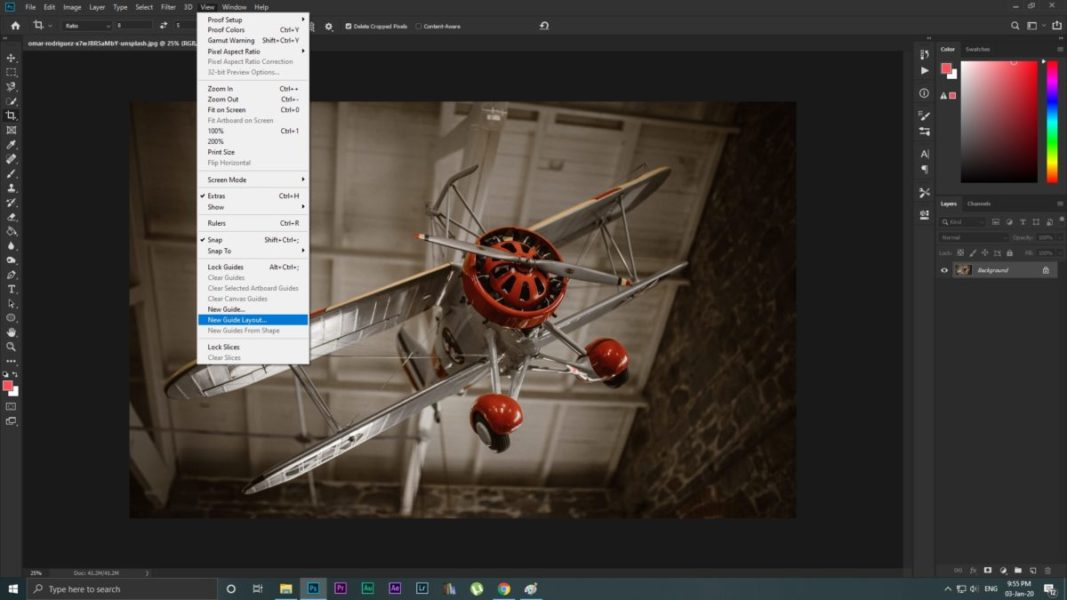
Tick the ‘Columns’ tab and then put in the number of final pieces of the primary image you want. Make sure this matches the value you used for the global crop earlier. What I mean is, if you used a 5:8 crop earlier you need to put in ‘2’ here as well to have two final pieces of the image.
Let everything else in the dialog box be blank. Press ‘Okay’.
You should now have some blue lines going through the image at equal intervals which shows where the image would be cut finally.
Marking done.
Now right click on the crop tool on the left toolbar. Select the slice tool.
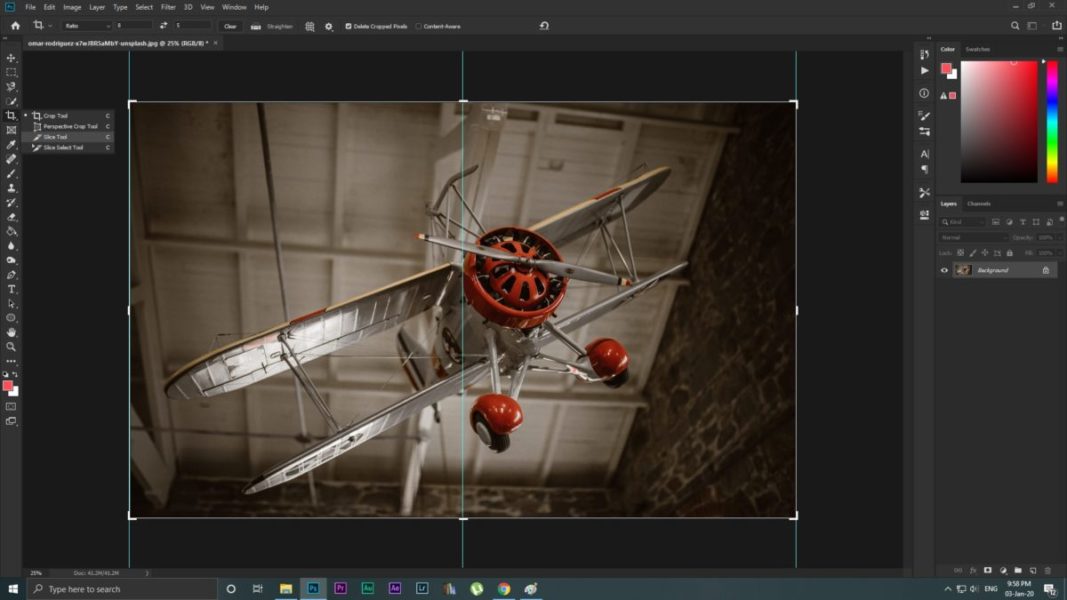
Now a new option would come up at the top called ‘Slice From Guides’. Click on it. Your images are now sliced up.
Step 3: Saving The Pieces
For the final step, click on the File > Export > Save For Web. A new dialog box will open.
Select the format to be Jpeg. Push out the quality to be ‘100’. Tick Convert to sRGB.
Finally, resize the image. Put in 1350px for the height and let Photoshop calculate the width. Press ‘Save’.
Photoshop will now create a folder and put in all the pieces of the images you just created.
Done!
Uploading To Instagram
All that remains is to upload your new masterpiece to Insta. The moment you have been waiting for, for so long has finally arrived.
Transfer your images to your phone however you usually do and then fire up Instagram.
Alternatively, you can also upload to Instagram straight from your computer or laptop. Yes, you read that right, no phone needed! Wondering how? Read: How To Upload High-Quality Photographs To Instagram | Optimizing Secrets.
Press the upload ‘+’ button and then select the piece of the photograph which would make up the absolute left part of the image. The order you choose the images in is important here.
Now click the bottom left expand button so that you can add the next piece.
Click the button now which looks like two squares stacked together and select the next piece in the line. Maintain the order.
When you are done, press ‘Next’.
At this point in time, you will see the pieces arranged together to make a long horizontal image with some white lines going in between.
Have no fear they would not be there for long.
The rest is exactly the same as any other image you posted on Instagram. Write up a killer caption, sprinkle some tags, and we are done.
Post your image and enjoy the masterpiece you just created.
For Phone Only Users
You guessed it right there is an app,which cuts up your images and does all that we did in Photoshop right in your phone.
There is a free app called Planoly available on both the Apple App Store and Google Play.
It makes cutting up the image and uploading it to Instagram stupid easy. Here is a video that will walk you through all the steps.
I hope now you have everything you need to create a great multi-post panorama for Instagram.
Not only do the final images look gorgeous but they also get uploaded without making a great compromise.
That is it, guys. Easy, wasn’t it?
Keep shooting beautiful.
