Tilt-shift lenses are pretty much the closest thing we photographers have to pure wizardry, Hogwarts style.
In simple words, these lenses are constructions of sheer brilliance in optical engineering which allows it to almost defy physics and steal little glimpses while nature tries to figure itself out.
We all have used regular lenses with focal length and aperture values written on them right? Tilt-shift lenses have these numbers too but in addition to them, they also have some extra features which make them truly unique and noteworthy.
Granted you don’t need them at all for your day to day regular shooting. But in some special scenarios, without these specialty lenses, it would be almost impossible to get the shot.
So what do you say let’s dive a little deeper into this and see for ourselves what wonders this queer lens has in store for us.
Tilt-Shift Fundamentals
Let’s start with the name first.
Why is the lens called a Tilt-shift?
That’s easy to answer. Its because this lens has the innate ability to tilt from side to side and shift up and down on an axis.
Finding it hard to picture it? Let me help.
First and foremost you have to come to terms with the fact that unlike any other lens, the Tilt-shift lens has external moving parts.
Problem again?
Okay, baby steps. Imagine a regular lens. Now imagine that the lens barrel is divided into two equal pieces. The halve which is attached to the camera is the same as any other lens but the other half has the ability to move around a bit.
The two halves never physically detach from each other. The movement is facilitated by some carefully engineered levers and turnable dials.
What Are The Movements Like?
Any modern Tilt-shift lens generally has the capability to move in three primary ways.
Read this part carefully. It’s important that you understand the difference between the movements now. Also, all these movements ONLY pertain to the first half (front) of the lens.
Okay, so first there is the tilt.
This is basically a side to side movement. Just by undoing the lock and rotating the dial, you can let the front half of the lens sway from side to side. The amount of tilt is measured in degrees.
We will get to how you could use these movements. Right now just concentrate on understanding the nature of the movements themselves.
Then there is the shift.
This is an up and down movement.
Very much like the tilt feature, you can just turn a dial and push the part of the lens either up or down. The amount of movement is measured in millimeters.
Lastly, there is a rotate.
Generally, Tilt-shift lenses have a tab which when pressed allows the entire two halves to rotate around the lens mount. The lens, however, stays attached to the camera as usual.
You can rotate all 360 degrees while you keep the tabs pressed. Using the rotate feature in conjunction with either tilt or shift or both, you can set yourself up for a myriad of potential scenarios.
I know this is a lot of movement thrown at you, all at once but trust me this gets easier from here on.
Now that we know how the lens makes all its moves, it is time to find what all these moves actually amounts to.
Tilt
Again, just to remind you, the tilting motion refers to a side to side movement of the front half of the lens.
The primary reason for tilting is to change the plane of focus with respect to the image sensor of the camera.
Let me explain this a little.
For a regular lens, the plane of focus is ALWAYS parallel to the image sensor of the camera. You could focus on something close or something far away in the distance. You could choose any aperture value you like, but the plane of focus is always going to be parallel to the sensor.
If you are having a hard time imagining it, let me help.
Imagine a straight line next to the front element of the lens. You should note that this line is parallel to the sensor plane. This is your focus plane. You could push is far or bring it close to the camera as you want, using the focusing ring on your lens.
Now imagine a second line (red in the image below). This line marks off the depth of field you have at your disposal. All the elements falling in between the blue plane of focus and the red depth of field mark, would be sharp in your image (in focus).
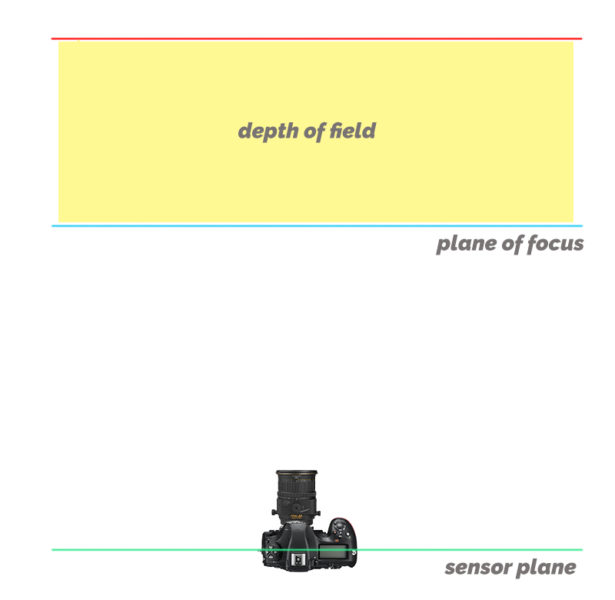
You may again push the red line away or bring it closer to the blue line. Precisely making a deliberate choice to include or exclude elements of your scene from the depth of field.
To increase the depth of field (increase the difference between the red and blue lines), use a higher aperture value. Higher the aperture value you use, further the red line moves away from the blue and greater the amount of depth of field you have at your disposal and vice versa.
There is another component that determines the size of the depth of field and it is the subject distance.
It’s basically the distance between the sensor of the camera and the subject you are focusing on. I hope you are aware of this. If not, I strongly suggest you give this a quick read before following on.
Subject Distance & Aperture Value | This Is What You Should Know
So, as you can clearly see, as far as focus goes, we can choose
- How far the blue line is pushed away from the sensor and
- How far the red line is from the blue line.
Controlling both the line simultaneously, we can include or exclude objects in the scene from being in focus.
Everything we talked about until this point is what happens on any regular lens. Now we deal with the tilt part.
Using the tilting feature of a Tilt-shift lens, we can alter the plane of focus (the blue line). Since the depth of filed mark off line is always parallel to the plane of focus that too changes simultaneously.
Alter how?
The easiest way to explain this would be to imagine the plane of focus (blue) line to always be parallel to the front element of the Tilt-shift lens.
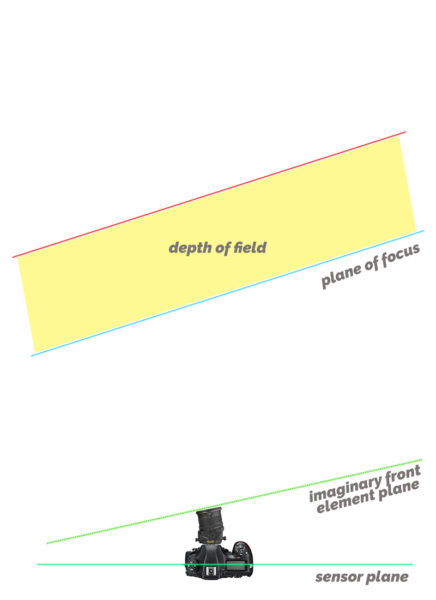
Whichever way you tilt the lens, the plane adjusts accordingly. Same direction.
Easy enough?
It is important to remember here that ONLY the plane of focus is what changes with the tilting of the lens. The depth of field (distance between the blue and red line) is NOT affected due to the tilting movement.
How Does This Affect The Image?
By the virtue of being able to alter the plane of focus, now, we no longer have to be stuck to any plane parallel to the sensor. We can choose a plane to focus on even when the said plane is NOT parallel to the sensor plane.
What does this even mean?
Look at the image below.

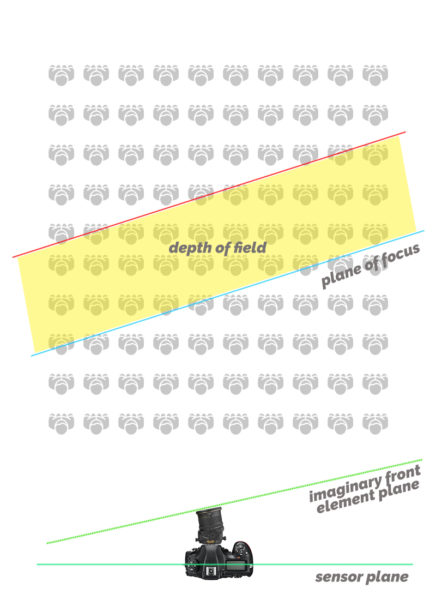
We have a camera and a few rows of people.
Using a regular lens, you may choose any particular row to focus on and the number of rows behind it to keep within the depth of field. It goes without saying that these subsequent rows would also be in focus.
There is one important thing that you should note here. No matter which row you choose to focus and how many rows behind it you decide to include, you cannot exclude any one person from a row from being in focus.
In other words, once you choose a row, every person in that row is in focus. Now no matter how long this row becomes, all the people standing in the row would be in focus.
Now, let’s play with the plane of focus.
As I said earlier, by tilting the lens we can change the plane of focus, independent of the plane of the sensor. So we no longer have to have a plane of focus which is parallel to the sensor plane, we can move it around. Shape it up as we want.
Keep in mind here that the plane of focus, however, ALWAYS stays parallel to the front lens element.
So What Can We Do With It?
That is the million-dollar question now, isn’t it?
By changing the orientation of the plane of focus we can now do something that simply cannot be done using a regular lens.
Continuing from the previous example, we can now exclude people from the depth of field, even when they are in the same row.
Wicked, is it not?
So now just by adjusting the tilt on the lens, you can shape the focus plane as you want. This just brings in a whole new creative latitude that you can use to make some really interesting images.
Uses
In the most basic way, the tilt feature allows us to selectively include or exclude objects in your scene from being in focus.
Let’s see how using this may feel like in real life.
Include More
Just to keep things simple, let’s assume that aperture value is the only determinant that determines the depth of field available.
Let’s say for every additional stop of aperture value, the depth of field increases by 1 meter and vice versa.
So, f/1.4 produces a dof of 1 meter, f/2 produces 2 meters, etc.
Now say you want to take an image from a high up vantage point of the city. You want all of the elements sharp and in focus.
Under normal circumstances with a regular lens, you would have to use a high aperture value, something to the tune of f/16 or more. to create this image.
The aperture value needed to keep all of the frame sharp is so high because a lot of the depth of field is “wasted”. Since the plane of the city is not parallel to the plane of the sensor at the time of shooting a lot of depth of field is lost focusing on air above the city.
Maybe the depth of field created by say f/8 is sufficient enough to envelope all the objects in the scene but since the dof created by a regular lens is at an angle with the city, it only is able to cover a small part with it.
Enter Tilt-shift lens.
The problem is not the amount of depth of field created by a regular lens but the angle at which it meets the scene. All we do, using a tilt-shift lens is bend the plane of focus a little backward and presto-manifesto we solve the problem.
Tell me that wasn’t easy.
Exclude More
Using the same principle we just used but in the opposite direction, we can even remove specific objects from the depth of field. Objects that would be otherwise in focus.
Here is a good example of such an image.

You can easily make out the thin band of focus running through the middle of the frame. In case you are curious, this effect was created by tilting the lens upwards.
Why Not Use A Higher Aperture Value?
Yes, that seems like a legitimate question.
If turning the dial a couple of times more and selecting a higher aperture value solves the problem, why go through this arduous journey of tilting lenses and bending planes.
It’s because sometimes it simply isn’t an option to pump up aperture value at will.
Let’s say you want to shoot the same cityscape but at night. Not much light is available. And to make matters worse you forgot your tripod at the hotel.
Now what?
You have a fast enough lens, which can shoot at f/1.2 but that wouldn’t produce the necessary amount of dof to cover the entire scene. So you are forced to use a higher aperture value, say f/16 like before.
But had this been a tilt-shift lens you could have transformed the focus plane and made good use of every inch of the depth of field created. Not wasting any!
This would result in far more efficient use of the generated depth of field and also allow you to cover the same set of objects using a smaller aperture value which would, in turn, admit more light in the camera. Now you can easily utilize the fast lens to actually shoot fast.
This efficient use of the dof may come in handy when shooting videos too. As you know, when shooting a video, it is advisable to use a shutter speed that is roughly double the frame rate (fps).
So if you are shooting a clip at say 24fps, you need a shutter speed of around 1/48th of a second. In essence, this locks in the shutter speed. You cannot use it anymore to change the exposure of your video.
Now again if a low light situation comes up, you cannot drop the aperture value because of the required depth of field and you cannot slow down the shutter speed because now you are tied to 1/48th of a second (owing to the 24fps you chose earlier). You could pump up the ISO but that would only add to your woes and introduce noise in the equation.
Tilting may again come to the rescue and help shoot using smaller aperture values. Same logic as before.
Okay now let’s deal with the other half of the story.
Shift
The shift movement, unlike the tilt, moves the entire front half of the Tilt-shift lens up or down.
And the primary problem it tries to solve is distortion in images.
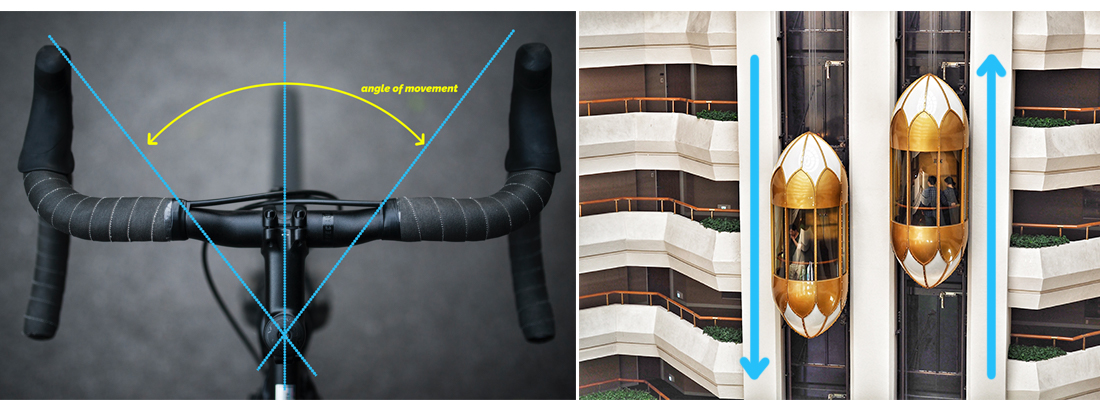
If tilting the lens was like turning a bike’s handle, where you get to choose a particular direction to turn towards (right or left) but the movement is fixed around a centre point; shift is more like an elevator. It goes up and down but along a fixed vertical axis.
A lens shift has NO effect on the focus plane whatsoever.
Before we learn about how shifting affects the image, we need to first understand what distortion is.
Distortion
Image distortion in photography refers to the tendencies of straight lines looking bent towards the top or bottom of a photograph, especially when using a wide-angle lens.
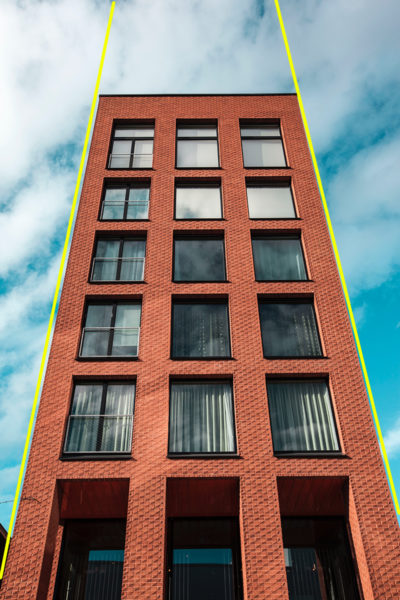
I can absolutely assure you that the building above maintains the same dimensions (length and width) from top to bottom. But even then, when the structure is photographed from a low vantage point, it seems as if the top of the building is tapering off.
It is for this exact same reason that houses and buildings seem to look as if they are about to “fall back” when shot from a relatively low angle.
The reason why this happens is simple enough.
Objects closer to the camera look much larger than objects further away.
More the disparity between two identical objects in the scene owing only due to the distance between them, greater is the amount of distortion and vice versa.
In the case above, since the base of the building is much closer to the camera when the image is taken, it looks much larger as compared to the top which is far away.
Generally, distortion is directly related to the focal length of the lens used. Wider the lens, greater the apparent distortion becomes.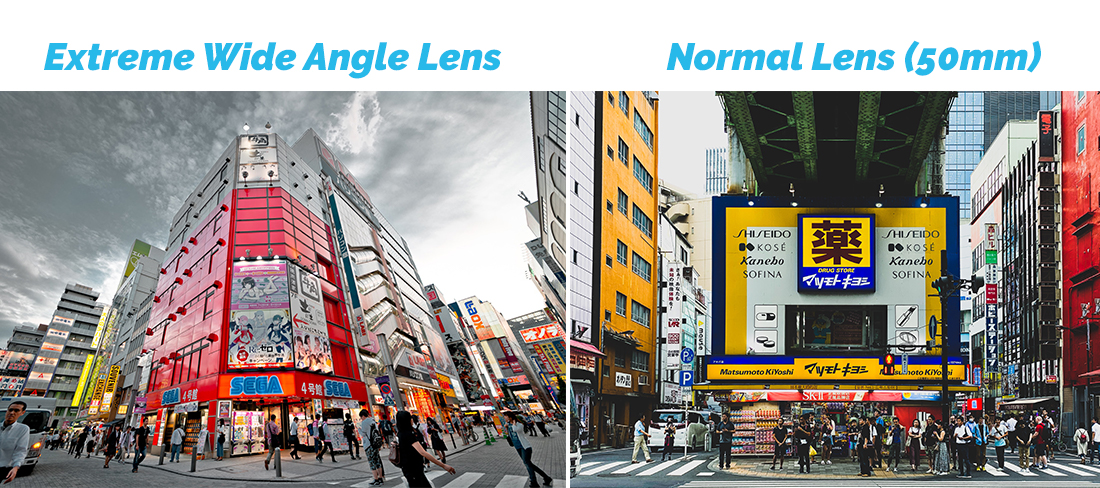
Big problem huh?
The Obvious Solution
If the relative distance and the vantage point is what gives rise to the problem of distortion, wouldn’t it solve the problem if we could change them?
So, instead of taking the image from the bottom of the building looking up, if you took the same image from a height that is roughly about half the height of the building, wouldn’t that be better? In terms of distortion that is.
Since now both the top and the bottom of the building would be equidistant to the camera, both would “suffer” the same degree of distortion making the structure look straight up.
This is perfect.
But wait.
Coming back to the real world, how often do you think you would actually find an adjacent building right next to the one you want to photograph. And more importantly also the access to the quintessential window that would make the perfect composition?
Yeah, that not going to often happen!
So, crooked building for life?
Shifting Lens To The Rescue
Like I said before, the primary reason why we use the shift movement on a Tilt-shift lens is to keep distortion to a minimum and preserve straight lines as much as possible.
When you shift the lens up or down, a lot of optical gymnastics happens inside the lens. All of which culminates in producing an effect that mimics a change is perspective.
How the lens does this is beyond my understanding.
In simple words though, this means; when you shift the lens up, the lens makes it look as if you physically shift to a higher vantage point. Even though you are shooting from the same exact spot.
By carefully managing the amount of distortion in the scene, the shift up movement produces an effect which helps you get an image as if you took the shot from way higher.
Spooky isn’t it?
You can go the other way round too by shifting the lens down.
Uses
The shift feature is primarily used by architectural, landscape photographers. Basically people for whom the shape and angle of the visual lines matter a lot.
When no other suitable vantage point is available/accessible. A Tilt-shift lens is pretty much the only tool that can be used to prevent edifices look as if they are a second away from toppling over.
High-Quality Panoramas
Oh yes, this one too.
You could use incremental shifts to take a bunch of images that could later be stitched up together to make a beautiful, highly detailed panorama.
To create such an image follow the following procedure.
- Line up your camera with the center of the scene that would represent the center of the final panoramic image. This means that if you want to shoot a panoramic image which has a tall peak in the center, make sure the camera aligns with this peak when the lens is NOT shifted on either side at all.

- Next shift the lens to either the extreme left or right. Totally your choice
- Now take an image and shift the lens. Just make sure that the current image has some amount of overlap with the last image.
- Keep repeating the process until you reach the other side.
- Your source images for a panorama are ready. Now you got to stitch them up to make one large image. For that, follow the video below. It explains the steps really well.

Even though you are using a specialty Tilt-shift lens, make sure that you follow the basics to get some good source images.
First and foremost choose a composition that would work well in a panorama. Use a good quality, sturdy tripod that keeps the camera level as you shift your lens from one side to the other.
Choose an aperture value that suits the ‘look’ that you are going for. Most panoramas are shot where everything from the foreground to the background is sharp. If this what you are aiming for, an aperture value between f/8 and f/11 should do the trick for you.
You will need to crop the edges of the final image created in Photoshop, so make sure you shoot a little wider than you actually intend to keep.
Last but not the least, keep the focusing consistent. Before you capture the first frame, focus on the subject you want. You may obtain the focus either by using the Autofocus or simply doing it manually. Once you are happy with it, lock off the focusing so that the camera does NOT refocus during any of the subsequent images.
If you focus by half-pressing the shutter release button, once you get the focus, turn off Autofocusing completely. On the other hand, if you use Back Button Focusing, all you have to do is not touch the focusing button till the last frame is recorded.
Rotate
The last trick up the sleeve of a Tilt-shift lens is its ability to rotate the entire two sections around the axis.
This means that once you turn the lens 90 degrees the shift movement which initially moved the lens up and down would now be transformed to a side to side movement.
The same is true for the tilt motion too. Once the lens is turned (90 degrees), the initial up and down sway of the tilting movement can be altered to go side to side.
This is just to accommodate shooting vertically oriented images.
Rotation of the lens also allows the photographer control of a higher degree of the tilting and shifting maneuvers of the lens. Using the rotate feature of the lens in conjunction with the already existing tilt and shift movements,, the photographer has a three-axis control over the image. He could now precisely control the plane of focus and the amount of distortion to accurately match the feel of this image.
If this doesn’t count as a superpower, I don’t know what does!
Winding Up
Tilt-shift lenses truly are a wonder to behold. They simply make the unthinkable happen.
If this is the first time you are learning about them, I am pretty sure you have never thought of minimizing distortion in the camera itself let alone bending the plane of focus.
Yes, you may not need it for your everyday shooting but it is nevertheless fascinating.
Only reading about Tilt-shift lenses may not do justice to the actual magic that these lenses are capable of creating. I highly suggest you watch this video, where a true master of the tilt-shift lens, Vincent Laforet explains all the features and what you can do with them.
Note: Technically you may use software transformation to correct for image distortions. This means you can use a regular lens to take an image (with distortion), and then later in post-production using a photo editor such as Photoshop, correct the crooked lines.
In case you are interested in how to actually do it. Here is all you need to know:
But it needs to be mentioned here that a tilt-shift lens is a way better way of minimizing distortion. As they say, do as much as possible in the camera itself.
Oh! Before I forget…yes, you can use your existing Neutral Density or Polarizing Filters with these lenses. Of course, the thread size has to match, but that is all. There are no special filters for Tilt-shift lenses.
I hope this post has brought to light some of the amazing features of Tilt-shift lenses and how you can potentially use them to make some great looking photographs. If you do a lot of architectural images or if you just want to create a miniature look of a scene try it out sometime.
You don’t have to buy one to have some fun. Rent it for a day, try it out. I am sure you will have a great time.
Keep shooting beautiful.
This is now a teeny tiny blog trying to compete with the big guys. If you liked what you read, please take a second to share it. It would help me a lot. Thank you.
