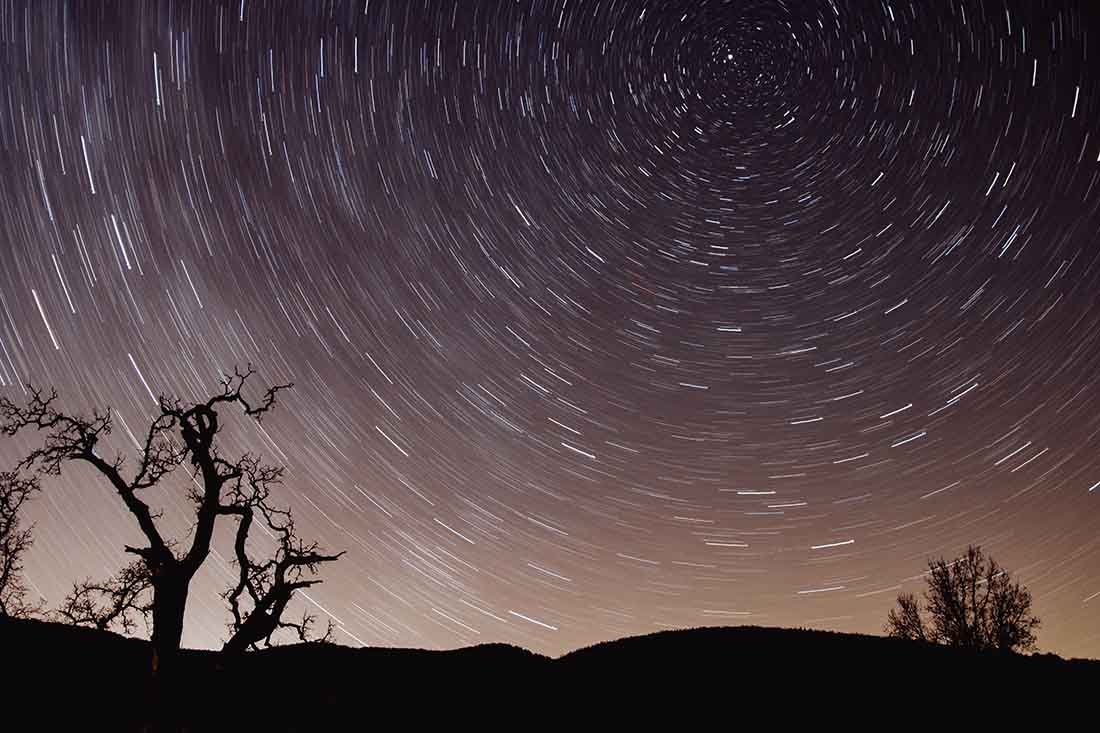
Have you ever wanted to create an image so beautiful and surreal that it almost looks photoshopped or simply ‘out of this world’? Well then photographing star trails is one for you. Don’t sweat it so much it is much easier than it looks and YES, you can shoot it with any camera which allows manual controls and any half decent lens. You do NOT need any fancy equipment at all for this one.
Before you throw this idea out just because it seems too good to be true, let me just give you a sincere outline of the entire shooting process.
Yes, the equipment doesn’t really matter. Any camera which allows manual controls will suffice. A wide-angle lens with a large aperture (eg f/2.8 or lower) is preferred but is not absolutely necessary. If all else fails, just get your hands on a cheap 50mm, or 35mm f/1.8 lens and they would work better than you ever thought. You will, however, need something firm and steady to attach your camera to, so a tripod is a must. Lastly, an intervalometer really makes the entire shooting process a lot easier, without it, it can still be done, you just need to improvise a little. I will get back to on this.
So….interested? I promise you, you would love this one. If there were any image that commands such an aura and instantly creates a sense of amazement and makes people gasp for air, this is it.
The Objective
Now that you are hooked, let me get on with the interesting stuff. This part is mega important so please pay attention.
Even though we use the term ‘star trails’, it is not the stars which move along the night sky creating these long trails. I assure you the stars are absolutely fixed. The rotation of the earth along its axis is what creates the illusion of the stars moving. It is the exact same phenomena because of which the Sun seems to rise in the east and set in the west. And as you already know the Sun is stationary as well (it is also the largest star of our Solar System).
What is our goal then?
All we want to do is photograph the stars, track their movement and then somehow condense it down to a single image. That is it, that is all we are after. All the procedures, camera settings, location scoutings and careful analysis that we are about to submerge ourselves into now is just to do that.
So let’s begin, shall we?
Location
Since we are trying to shoot objects which are literally millions of miles away from us it is actually a tough sell. So what we want to do here is remove any possible impediments, making the process all the more smooth and easy for us.
What do I mean by this? Well, let me explain…
If you already live in a city have you ever tried to look up the night sky and look for stars? I am sure you found some here and there but I can guarantee that it didn’t even come close to the sheer number of stars that you can find on any given star trails image posted online.
This isn’t happening because of the difference in location of the photographer and you chose. It is happening because of the difference in shooting conditions in these two locations. You see the city where you live is actually full of light pollution. This means that there is an abundance of high-intensity light all around at night. Since it is a city, it is also fair to assume that there is a fair amount of air pollution, smoke and other pollutants in the air. The light emanating from the city when falls on these tiny microparticles floating in the air create a facade which makes it really difficult to see through. Hence, even though the stars are right there above the city, you are unable to see their feeble soft light as it is insufficient to pass through the layers of light and pollutants.
If you look a little deeper you will find that almost all of the star trail images are shot in absolute wilderness NOT in cities. This is also the reason that many space research organization and universities focused on astronomy have their ground telescopes located in places which are as remote as possible, take for example the Mauna Kea Observatories in Hawaii or the South Pole Telescope. You literally cannot get any remote than this.
The Ideal Location
The light radiating from the stars far far away reach us after traveling through millions of miles and finally through our own earth’s atmosphere. We cannot do much about the first phase but we can find favorable conditions to work with so that the resistance offered by the atmosphere is the least.
Like I said before you need to drastically reduce stuff between you and the stars. The better you do this, more stars you find and better the final image looks.
Here is how we do it.
Find A Location Devoid Of Any Light
This is by far the most important factor which would directly dictate how your final image looks. A very easy way to find a place near you which has the least amount of light pollution is to look online. Blue Marble is a pretty good website which illustrated the extent of light pollution in the night sky around the world.
Since any form of artificial light at night means people or some form of industrial activity what you need to do is get far away from mankind as much as possible. In other words, find a remote area which has no people or factories and is as desolate as possible. Middle of some desert or a population less mountain would serve just fine.
The bottom line is that it needs to be dark, so dark that even you cannot find your own hand. In a minute I am going to explain to you the settings you would require for a picture like this. It is a really long exposure. Any light, be it a little street lamp or a momentary bright light of a passing by car is going to show on the frame and will surely ruin the image.
Pitch black it is!
Avoid Humidity
Humidity is nothing but water vapor or moisture floating in the air. It is also the mother of various form of precipitation such as mist, dew, fog, and rain. I don’t think I need to tell you how these elements reduce visibility. Ever been to the airport and have had a flight canceled or delayed since it was raining cats and dogs? Well, that’s why.
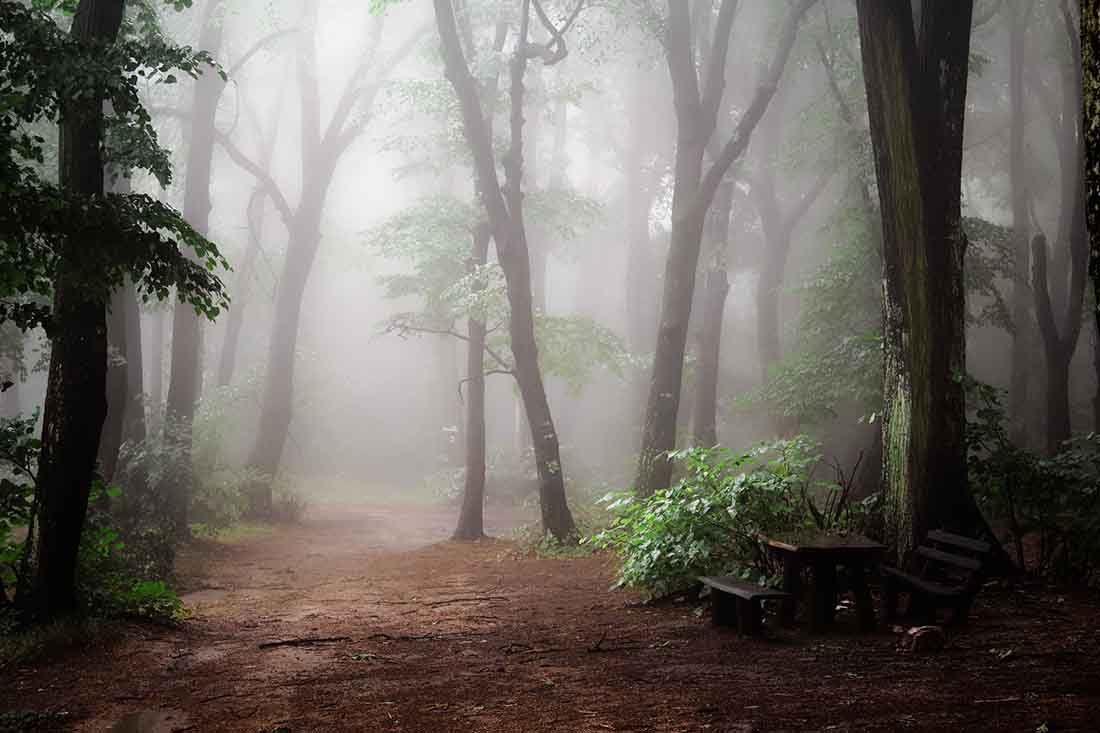
Humidity in any form seriously undermines the ability to shoot dimly lit stars since they obstruct so much of the incoming light. But how do you get around this problem?
It’s simple really. Find a really cold place. The colder the place the drier the air should be, in other words, less humidity. If possible find a place which has a temperature below 10 degrees Celcius. And don’t miss out on any desert if you have one nearby you. Even if they are hot like crazy during the day, they are also cold as hell at night, perfect for your purpose.
Track The Moon
Artificial light is not the only light you need to kill. If you are not careful enough the moon is going to ominously shine pretty bright on you and your dear camera and murder any photos you take that day. You absolutely need to plan for this contingency. Generally, it is suggested that you select a day when less than 25% of the moon is visible. The reason behind this is that the moon helps light the foreground of your shots quite evenly giving the image some nice depth. Personally, however, I would always want a New Moon night with absolutely no light coming from the moon at all.
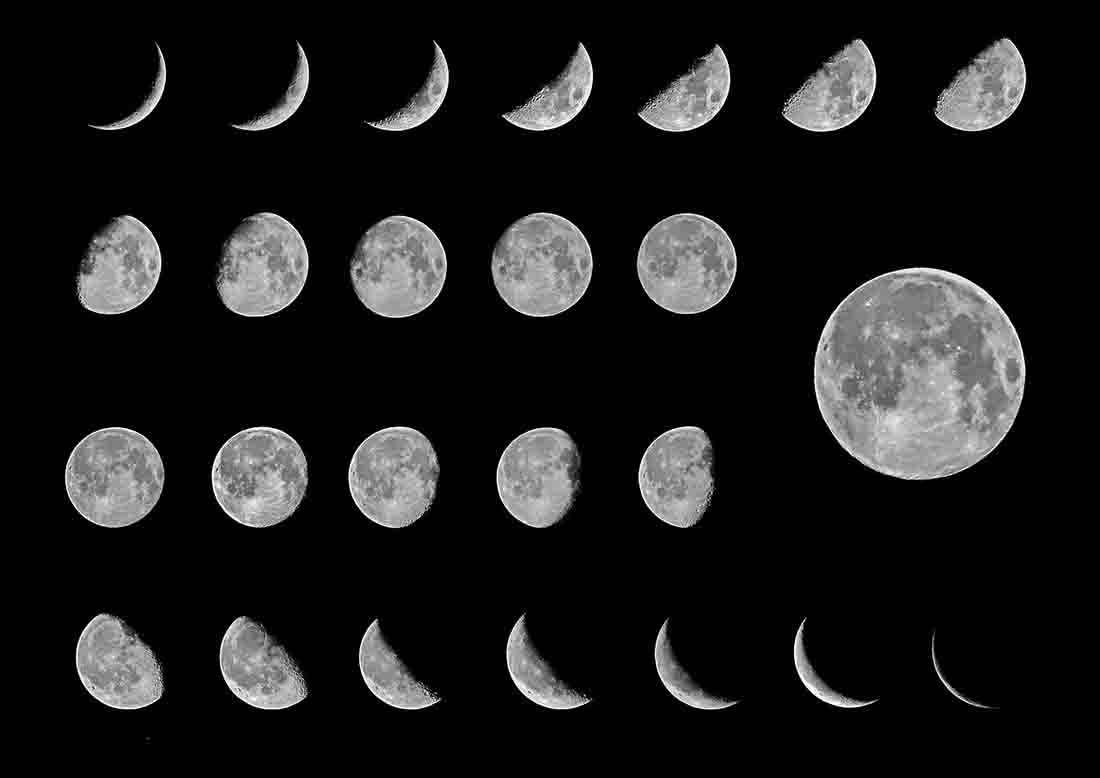
There are some serious caveats when selecting a day when the moon is not totally out of the scene. For example, you are forced to shoot in the direction opposite of the moon to avoid overexposing your image. This in some cases may forcefully make you choose a different composition than you want to. If all you want is lighting the foreground of your image, light painting is a much better and controllable effect to have. The moonlight significantly brightens up the sky thereby reducing the contrast of the stars making them look dim or in some case absolutely invisible. That is not a good tradeoff if I ever saw one.
The Photographer’s Ephemeris is a fanstastic website which would give you extensive details on the position, timings, direction and other details about the Sun and the Moon anywhere on the planet. Using it you can easily plan the perfect day for your star trails adventure. Use it to the full.
Just a little extra note, Google Earth goes quite well in conjunction with the Photographer’s Ephemeris, do give it a try.
Cloud Cover & Air Pollution
For the cloud cover part, you gotta check every now and then to get a realistic and true value. Most of the weather apps have some form of cloud cover data built in. But something that I have found in my experience to be pretty inconsistent is the forecasting part. If it is anything more than a few hours ahead, it is not going to match up very well.
Since humans are the one who is to be blamed for killing the planet so-not softly with various forms of pollution (air included), getting away from the homo sapiens should sort this out. However, since we are terrific at the job of polluting you may have to drive for some time. A good tip to avoid air pollution is to move to higher altitudes. Since the air becomes much thinner there, the density of pollutants also decreases substantially. Thinner air also causes less diffraction of light making the images look more prominent and punchy.
So uninhabited, eerily desolate mountain top it is! Start looking for one now.
Gear
Okay here is the deal. The best images (in terms of image quality) are probably going to be the ones which are shot on a full frame camera with a really wide angle lens. The large sensor of the full frame camera would help bring down the required ISO resulting in a less noisy image while the wide angle lens would make the image look expansive and large.
But the full frame + wide angle lens combo is going to be costly. So for us lesser mortals who probably cannot afford such expensive gear there is a plan. Let me tell you that now…
All the camera equipment you will need are these:
- Manually controllable camera
- An inexpensive prime lens ( 50mm or 35mm f/1.8 would work amazing)
- Tripod
- Intervalometer
- Time ( a lot of it)
This is the most basic kit that you would require to shoot a brilliant star trail image. Now the natural question is, by shooting with such inexpensive gear what is it that you stand to lose?
Well…..not much. You see the large sensor on the full frame camera does help a lot in bringing down the ISO value thereby reducing the resulting image’s noise but since you do not have one such camera what you can do is increase the exposure time instead of bumping the ISO value. I do agree that a full frame camera performs better in low light conditions but nowadays even APS-C cameras give quite a good run for the money. So don’t discount them.
The wide angle lens would probably make the scene look a lot more expansive than the 35mm lens you are about to use on your cropped sensor camera but that should not deter you much. Yes certainly you would be able to shoot a much narrower strip of the scene but there is a secret weapon that you can use here……composition. What you lose in the field of view you can easily more than compensate by creating a better-composed image. And let me just tell you, a better-composed image is a million times better than an extra wide or superior image quality photograph.
If the gear is what mattered, the rich would always be the most creative people. Never forget the fact that YOU make the images…YOU! The camera is just a tool you use to record it….never let it take precedence over your creative process. Do not let inferior gear make you feel any less powerful.
Setup
This is a fairly simple and straightforward process. All you have to do is look for the best possible foreground and angle to shoot from, attach the lens to the camera and set it up on the tripod. Just a small tip here, always look for the best possible position to shoot from and only then start building your setup on it. I have been the guilty party in many instances where after traveling long arduous hours though not so pleasant conditions I just reached the spot and wherever I plunked the tripod first start shooting from there. The location that I explained above is not going to be a very pleasant one, so make sure that you do not repeat the mistakes that I have made. After going through all the hardships of reaching there, make it count.
Oh…I almost forgot, jam in your external intervalometer as well into the camera. If you don’t have one I would highly recommend one for shooting star trails. You do not have to buy the branded ones made by your camera manufacturer. Just get a cheap Chinese one and you will be just fine. All the intervalometer does is send a small periodical charge to the camera that triggers the shutter, so there is no danger at all.
However, if you do not want to get it for just this, you have to get a bit creative. Carry a bit of strong gaff tape and use it to push a small pebble onto the shutter button of your camera. This should keep the shutter button pressed for the duration of the shoot and fill in for the intervalometer just fine. But I would say this once again though, I don’t think it is a very good idea. Intervalometers are cheap, just get one and it would make your job so much easier.
Camera Settings
Now that you have the camera set up on a tripod, dial in these settings….but first things first. Take off the UV filter if you have one attached to the lens. One by one now switch OFF the following in your camera, Long Exposure Noise Reduction, any form of vibrations reduction (VR) or optical stabilization (you are on a tripod now, you won’t need it) and the Auto Display which shows each image after it is taken on the LCD screen. Lastly, switch off the AutoFocus and you are done.
Here are the settings that you need to dial now.
- Aperture: One stop higher than the lowest aperture value your lens offers. For example, if you have a f/1.8 lens, dial in f/2.5. This would in general result in a better quality image and also reduce chromatic aberrations. If you do not know how to add or remove a stop of light I highly suggest you read this, Camera Aperture | A Comprehensive Guide For Beginners.
- Shutter Speed: For star trails, 30 seconds is a good number to start with. We can always fiddle around with it later to fine tune it further and adjust to the available conditions.
- ISO: After you are done dialing in the aperture and shutter value, start off with an ISO 1000 and take a test shot. If the image looks dark and if the stars do not shine through keep bumping up the ISO in small steps. Now depending on the type of camera that you are using, there will be a noise tolerance level. For a full frame camera, even ISO 6400 is not a lot but for a smaller point and shoot ISO 1600 is really pushing it.
Use your best judgment for this and try and keep the ISO as low as possible. If for an APS-C camera even ISO 1600 doesn’t seem to make the image bright enough, decrease the shutter speed to around 40 or 45 seconds and take a test shot. - Light Metering: Use the Matrix Metering (for Nikon) or the Evaluative Metering (for Canon).
- Intervalometer: Set it up for a 30-second exposure and an interval of one second in between. A larger interval will cause the trail to look discontinuous.
- Make sure to put your camera into Continuous Drive.
Since you would be in pitch black darkness, the LCD may not be the most reliable representation of the image the camera is actually taking. Depending on the brightness level or the color representation capabilities of your back of the camera LCD screen, the same image could look wildly different on different screens. The best and foolproof way to really looking at the resulting image is to look at the histogram. Not only will it tell you all you need to know, it would also give you good pointers so as to how to nail the settings on your camera that suits the present scenario.
Finally, focus using the Live View on your camera. Just switch it on and magnify on any one of the most prominent stars, turn the focus ring and adjust it as required. Once you are happy with it take a test shot and then zoom on it a little so that you are absolutely sure of the focus.
That’s all you have to do.
Trails Shapes & Sizes
The patterns of the trails and the sizes you capture are largely dependent on the latitude you are on and the direction in which you point your camera. Star trails come in various shapes and sizes, some look like arcs, some are concentric circles or even vortexes.
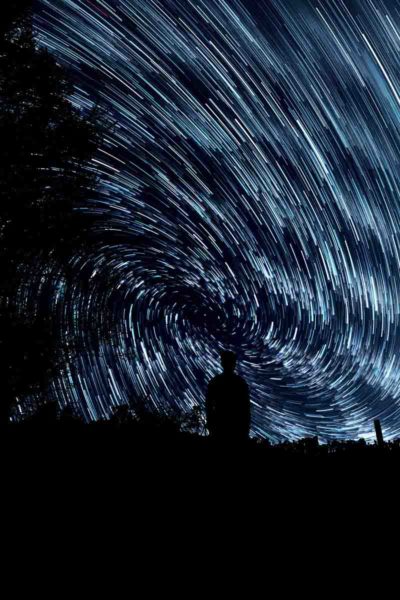
To shoot a concentric circle star trail image the first thing that you got to do is find the North Star or the Polaris (this is only visible if you are anywhere on the Northern Hemisphere). Don’t worry you don’t have to go learn astronomy for this, like everything else in life now, there is an app. Look for Star Walk 2 or Sky View in the app store, they are free. Now all you have to do is point your phone camera towards the sky and it would identify the stars for you.
The reason we are looking for the Polaris is because it is the only star which doesn’t move at all (rather appear to not move). So now if you point your camera at the Polaris and give it a central position in your composition all the other stars would seem to “go around” it, thereby creating the concentric circles.

An easy rule of thumb to remember is that whenever you point your camera to the north or south, you will have arcs of some kind. Pointing your camera in the east or west direction will generally get you linear, straight star streaks.
Duration
The period of actual shooting depends largely on the amount of trails you want and your composition. Latitude also plays an important part in it. Higher the latitude number, further away you are from the equator which directly means that it would take you more time to create a trail than if you were on a lower latitude.
A good two to three hours shoot should be good enough for most images. I should let you know here that there are two primary ways of shooting a star trail image:
- Only ONE exposure, generally calculated in double-digit minutes.
- Hundreds of shorter exposures which are stacked together in post-production to create a single long trail.
For the purposes of this article, I have till now only discussed the later. For me, it is a much better way to approach the shooting process and you as the photographer have much more control over the final look of the image. If any calamity should strike like if someone flashes a torch at the camera or an airplane happens to photobomb your frame you can just trash the image from the list and still end up having a great image. The single shot approach is not so lenient and benign.
It is also easier on your camera’s sensor. Long exposures make the sensor work double hard and heat it up quite substantially. A 30 sec exposure followed by a second gap is much better than a 15 or 20-minute continuous exposure. Since you are already on a freezing desert this wouldn’t be much of a problem though 😉
Post Production
Done and dusted with the shooting part? Does it really look like a surreal film when you flip through the images on your camera? Oh well then let’s make it into a super image now, shall we?
Open the first image in your favorite image editing software and edit it to your heart’s content. Got that star gleaming through nicely? Great job. At this point do not care much about the foreground, just focus on the stars. When you are happy with the edit, select all the other images and sync the edits you made to the first image. Export the files as Jpegs on to your desktop.
Now download the program called StarStaX, it is available for both Mac and Windows and is absolutely free. This would help us combine all the separate images into one beautiful magnificence. Here is a video to guide you through the steps:
Once you are done with the stacking process reopen the image in Photoshop and mask the foreground using a layer mask. This would give you the best of both worlds and you will have a perfect image. If you still want to tinker with the editing a bit you can but don’t go overboard with it. Keep it looking as realistic as possible.
Bonus Tips
- Since you are going to shoots hundred of images in frigid remote conditions always carry a few extra fully charged batteries and memory cards. You really don’t want all the effort you went through to get there in vain.
- For White Balance, you can set it to Auto. It really doesn’t matter since you would be shooting in RAW anyway and therefore can easily change it later in post.
- If you have to shoot on a moonlit night, shoot in the opposite direction of the moon. This is like making the best of a bad situation. Choose a night devoid of the moon if at all possible. Darkness is your friend.
- Make sure to weed out any bad frames where a cloud came by to say hello or an airplane made a surprise appearance. Keep it clean.
- Cover the viewfinder to avoid any accidental light leakage into the camera. Just use a t-shirt or a hat.
- If you use a DSLR using the mirror lockup will further reduce any chance of vibrations causing blur in the images.
- Instead of a single long exposure if you use many images to create a composite star trail image you can also use the same images to create a kickass timelapse video. It is the icing on top I tell you….
- For anyone living in the southern hemisphere, you want to look for the Sigma Ocantis (South Star), which would stay steady just like the Polaris. Use the app I suggested earlier to find it in the sky.
- Before you start shooting double check all your settings and make sure the composition is good and the camera is level. Take the last point seriously you do not want a few hundred crooked pictures at the end of an inhumanly cold three-hour long wait.
- Remember to take a few dark frames shots to use later for noise reduction. Dark frames are nothing but the same shots you took all night but just with the lens cap on. You can use them when stacking the images in StarStaX.
- Cold nights usually have their fair share of condensation as well. A clever trick to avoid lens misting is to leave your camera outside for sometime before you start shooting. This prevents massive temperature difference and causes less condensation later on.
All Done
That is all you need to know to create amazing star trail images and video. So go get to a remote spot in the wilderness and create some jaw-dropping pictures. These images never fail to inspire awe. If you have any other questions, shoot them to me in the comments below and I will get back you.
Thank you for reading this loooong article. I was necessary though since there was so much to talk about. I hope you liked it. Do share your images with me, I would be extremely happy to see them.
And like always, keep shooting amazing.
