Tell me if this sounds familiar…
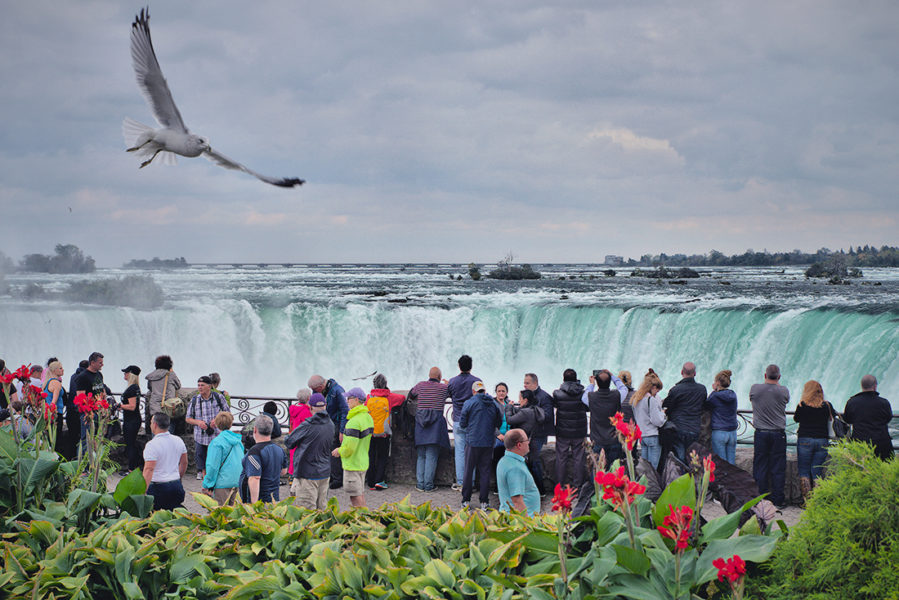
You are at one of the most ridiculously famous spots on earth and just want a photograph of it, clean and simple, except there is one problem.
A BIG one.
The entire area is swarming with tourists. There is no freaking way of sneaking in one fraction of a second without them. They are everywhere and forever.
Even a few days ago when I used to look at the work of some of the world’s most renowned photographers, I always felt that there was something that I was missing.
“I have been to the Taj Mahal and stood at the same spot from where this image was taken but my images look nothing like theirs”, I always thought. In my defense, it was not for the lack of trying ;I was just no match for the people I compared myself with.
Then suddenly one day I put my finger on it. There are no people in these shots.
It was as if the photographer somehow managed to circumvent the security and entered the Taj on a day when it was closed for the general public.
Almost none of the photos the photographer took had any tourists in them. This is what I was missing all along.
How the hell did he do that?
Maybe he had some special permission or something. Or maybe he actually did go over the wall.
In any case, I can’t have the same setup as he did. No matter when I go and how I shoot it, there will ALWAYS be people in them.
People who add nothing and whom I do not want in the images.
And this is true for ALL the famous places on earth.
Let that sink in.
So is it all doom and gloom for us mere mortals without special privileges?
Truth be told, I found a way around this. And it uses Photoshop.
Don’t you worry, I am not going to suggest cloning and masking out each and every person in the image. That would be a really tall task and many people wouldn’t be able to do it. Not to mention the enormous time suck that it would turn out to be.
I have a much easier way to do it, where all the heavy lifting is done by your camera and the computer.
Sounds interesting?
So let’s dive right into it…
Blueprint Of The Path Forward
The idea is so simple that you would, probably by the end of this post, think why did you not come up with this.
First and foremost, we require a bunch of images from the same position.
And I mean every word in that sentence. Greater the number of images we have, the better the chances of having a really detailed and clean image in the end.
Locking the camera off on a tripod with manual settings is the most advisable scenario. If you cannot carry the tripod inside the premise for any reason, try and keep the camera steady as much as you can.
Lastly, you want to shoot each image with at least 30 seconds in between. This is just to allow the tourist in the frame to move around.
This is very important. Shooting a burst round of 10 photos is NOT going to work.
Speaking of work, this is the only part where you have to work a little hard. Once you get a few solid shots under your belt, Photoshop will take care of the other half and it would be a breeze.
Oh, I forgot to tell you how this works.
Since we are taking a group of images all from the same position with some time interval, the monument or landmark we are trying to photograph is the only thing in our images that is static and not moving.
The people/tourist (for that matter anything that moves) changes position in each subsequent image and hence would be different.
What we are trying to do is ask Photoshop to analyze all the frames at once and then cut out the portions from each image which are not consistent in all the images.
So if there is a tree in your frame and people are walking in front of it; Photoshop looks at the images and finds that in 9 of the total 10 images you took, the tree was there in the same position. Only in the 3rd frame ( I just picked a random number here), the tree was obstructed by a person who was walking in front of it. So Photoshop keeps the tree intact and cuts out the person.
Makes sense?
Think of it as finding the middle ground. Keep what is consistent in most of the images and cut out the dynamic parts.
Fire Up Photoshop
Now that we have cleared up our methodology, we can get down to do the actual work.
It really helps if you can collect all the images of the bunch in one neat folder somewhere.
Once Photoshop opens, navigate as follows: File > Scripts > Statistics
Select the folder where you have arranged all the images and then click away.
Remember to tick “Attempt to align layers automatically” and put in “Median” for the Choose stack mode field.
Now Photoshop will open up all the images under one document as layers and then clean up the parts which moved from one frame to the other. The final document should also have a rectangular symbol at the bottom which signifies that it is also a smart object.
Clearing out tourists from the photo…Done!
Photoshop magic to the rescue once again. And that wasn’t so hard, was it?
Fine Tuning The Details
Photoshop CC, the latest version does an excellent job of creating a good clean image from the bunch of photographs you throw at it.
But as I explained to you the process earlier, this method removes ANYTHING that moves. So if you have clouds in the sky or water bodies or flying flags in the shot they will inadvertently also be excluded.
In my experience, since every shot in the bunch looks different when it comes to the section of the frame which has the sky or the waterbody, Photoshop has a really hard time finding something steady to work with and the resulting final image is a mess.
All it manages to create are weird artifacts in those sections.
Fixing these problems is however easy as pie.
Here is how you do it.
Doubleclick on the layer icon. Since it is a smart object, a new document with all the individual layers will open up.
Now all you have to do is keep turning off one layer at a time and see which image has the water/sky/flag that looks the best.
Once you are happy with one of them, select the layer and then use any tool to make a selection around it. Depending on what you are trying to select, you may use the Polygon Lasso Tool or the Magnetic Lasso, all good choices.
Press Ctrl + C (Windows) or Cmd + C to copy the selection.
Come back to the original document. The first image which Photoshop created using the Median method and press Ctrl/Cmd + Shift + V to paste. Your selection should now be placed in exactly the right place.
Just make sure that you do not crop the photo before you cut and paste the selection. That might create a positional mismatch when pasting the new selection.
The new selection that you paste on the original document is placed on a new layer. In case you want to make even finer corrections to the details you can always use a layer mask and a suitable brush.
All that remains to be done is to crop it if you like and edit your ‘tourist-free’ image like a normal image now and you are done.
Wrap up
This technique of removing tourists from vacation photos using the power of Photoshop is probably the easiest and the most accurate.
The real work that has to be done here is to just take a bunch of images from the same position. A tripod is definitely recommended but if you cannot use it for any reason, try and improvise. Use a wall or some sort of support to keep the camera still and it should work just fine.
The rest of the process is just clicking some buttons and cut pasting a portion if needed!
It really couldn’t be easier.
It, however, needs to be mentioned here that this technique only works when you have a stable and unchanging scene to photograph. In other words, the subject that you are trying to shoot should be static in nature.
Images with a dynamic subject cannot be cleaned out using this method since the basis of removal using this technique is change itself. Anything that moves is cut out and the unmovable is kept in place.
That is all you need to know about removing people from photos. I hope this technique helps you in cleaning out the images and make them look even more unique.
Keep shooting beautiful.
