The two were never meant to be together in one image…ever! But thanks to the brilliance of Ryan Brenzier, they are now together and are making a splash all over town.
Wondering what I am talking about? How about some buttery smooth bokeh and a wide-angle of view.
Still, confused?
Okay, let me explain then.
2 + 2 = 22
Like everything else in this world, camera lenses have their own sets of pros and cons. Some lenses are good for low-light situations (fast lenses), some are good for faraway subjects. Some shoot really wide, others are weather-sealed.
Typically semi-telephoto lenses with focal length ranging from 50mm to 100mm are used to shoot portraits.
These focal lengths have almost become the industry standard for shooting images of people and for good reasons. They produce really good results.
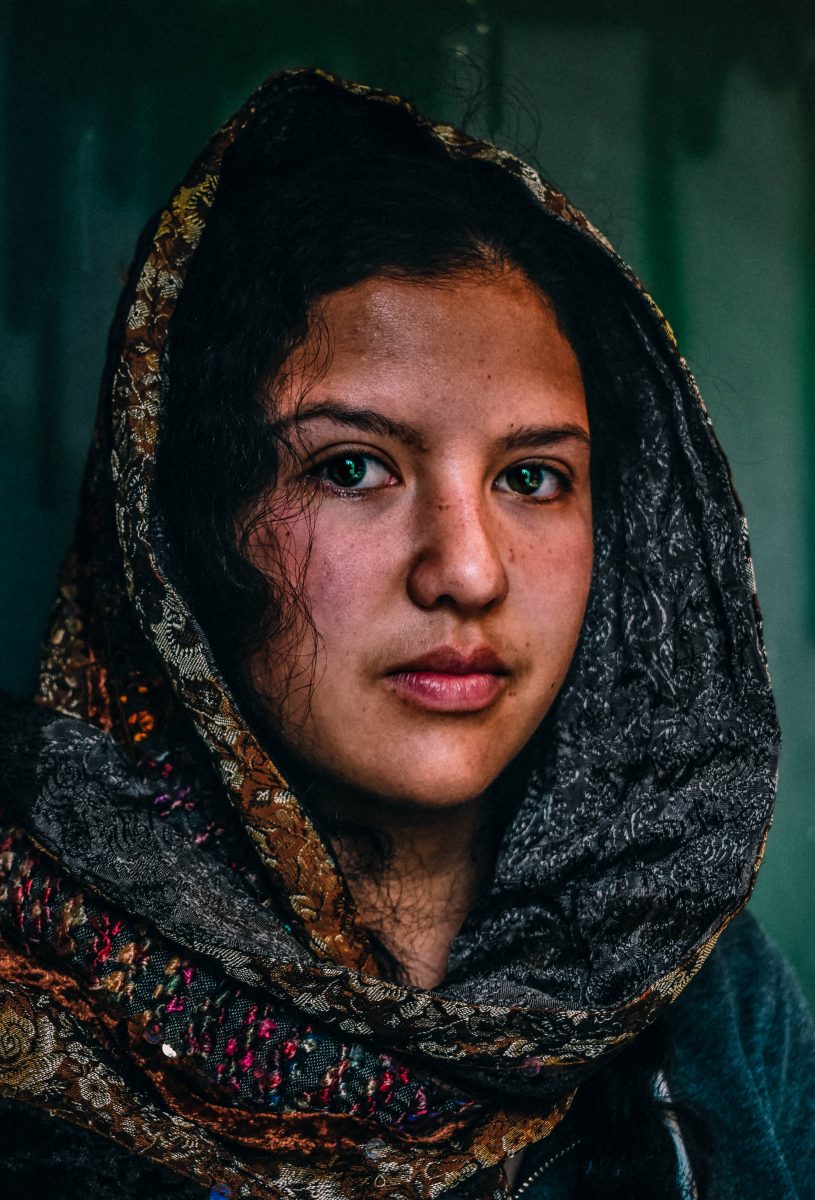
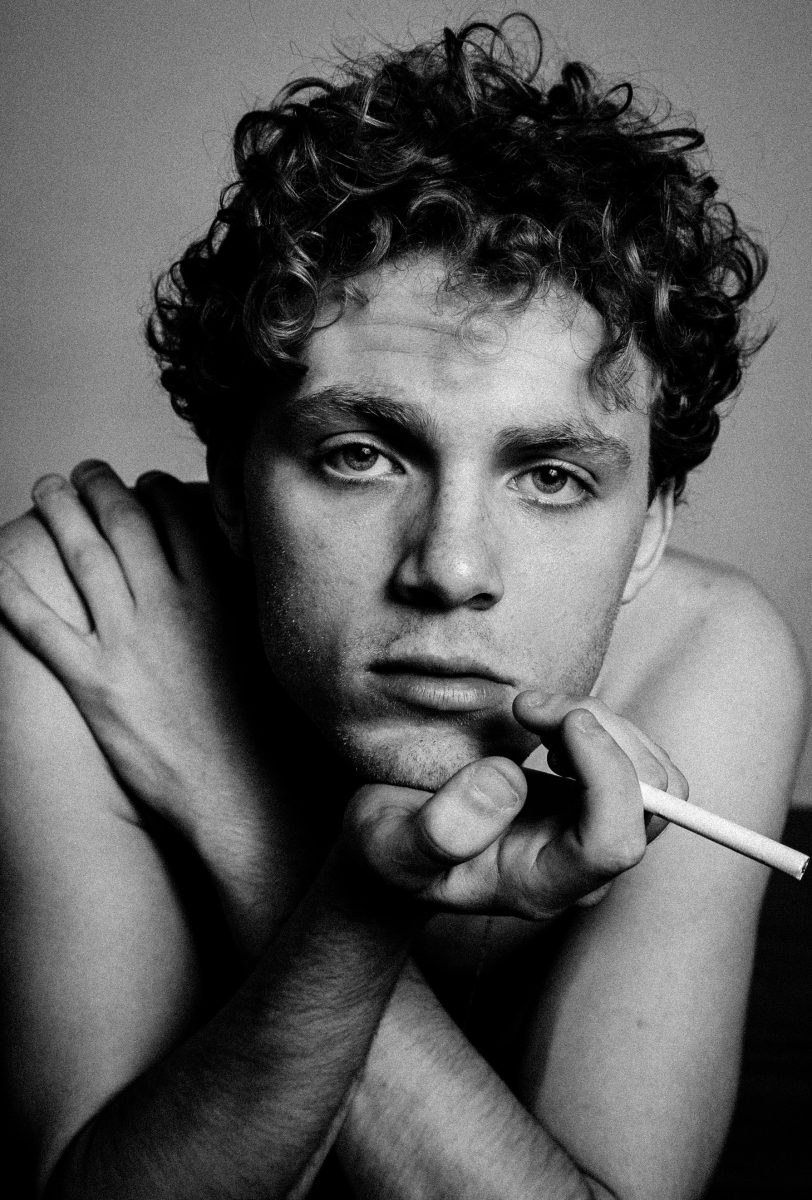 As you can see, the sharpness is on point, the bokeh (background blur) is smooth and consistent and the overall aesthetics of the images are really nice.
There is a lens in this category for every budget, ranging from ₹7500 ($100) to ₹1,50,000 ($2000). The 85mm prime and the 70 to 200mm zoom lenses, however, seem to be everyone’s favorites.
But there is one small drawback in all this goodness. You can never shoot very wide.
You see by definition, telephoto lenses have a narrow field of view. This is great when you want to shoot something very very far away but when it comes to a person standing just a few feet away from you, it may become a problem.
Longer the focal length used, further apart the photographer and the subject have to stand from one another. And no matter what you do, you can only have a small part of the scene in the frame in one image.
Plus since almost the same set of lenses are used for nearly all portraits, it becomes a little too familiar on the eyes.
So Why Not Shoot With Wider Lenses?
Well, you absolutely could shoot portraits with wider lenses but they too have shortcomings of their own which outweigh the positives they bring to the table when it comes to shooting portraits.
Firstly, wider lenses offer very little lens compression. This makes the background seem really far away and distant from the subject, isolating it from everything else in the frame.
Note: Isolation is NOT the same as subject separation. The latter is a desirable quality to have.
Secondly, wider lenses have a tendency to distort the image. Now, this is strictly dependent on the focal length you use. Shorter the focal length, more distorted the image would be. This makes things closer to the camera seem unnaturally large and things even a small distance away seem very small.
I guess you get the picture now.
For portraits, longer lenses are overall better than wider lenses but the sense of confinement owing to a narrow field of view is a major shortcoming.
So how do we deal with this?
The Portrait Panorama
The answer was so easy that it kept hiding in plain sight for so long.
It is the same technique that broke photographers like me used for ages to make images look wide and expansive even when they were taken using a kit lens. Click a bunch of images and stitch it into a giant panorama.
So why is this so special again?
The real advantage of shooting portraits as part of a panorama and not as a single shot is that you could get the best of both worlds.
Using a long lens (telephoto lens) to shoot a portrait, as we did always, we could preserve all the good things longer focal lengths have in store for portraits but since we are shooting a panorama now, we could also make the final image look a lot wider and expansive than the narrow focal length of the lens would allow on its own.
In short, we use the panorama technique to overcome the one major shortcoming longer lenses had for portraits, narrow field of view.
The Brenzier Method: How To Shoot
Let’s get the gear out of the way first.
As we already talked about, for this method to work, you need a lens with a long focal length. You could use any lens you want in the 50mm to 100mm range. If you are a beginner with just the kit lens, just turn it to its longest focal length, generally it’s 55mm or 105mm anyways, so it fits well.
I have a soft spot for prime lenses, so in case you have a 50mm prime, use that.
Camera Settings
The settings you need for this are very simple too.
The purpose of this whole exercise is to get as much of the bokeh (background blur) as possible and use the panorama to create a wider perspective.
Whatever lens you use, use the smallest aperture value. So if you use the 50mm f/1.8, shoot at f/1.8 for the maximum amount of bokeh.
You could certainly use a larger aperture value to include more of the scene within your depth of field but remember that comes at the cost of decreasing background blur that we are fighting so hard to get into our image.
While you use a small aperture value, one important thing you need to keep a check on is the focus of the image.
A small aperture value implies a razor-thin depth of field. This means any movement either by you the photographer or the subject who you are shooting will result in the image being out of focus. You need to be very wary of the focus while you take the images.
For the shooting mode, use the Manual Mode. This is only to ensure that the camera settings remain the same throughout the whole panorama. Any changes or inconsistencies within the set of images is going to stick out like a sore thumb in the final image.
Make it a point to take a few test shots to make sure that the settings are exactly where you want them to be. Double-check your exposure using the camera histogram and focus using focus peaking if you have it on your camera.
Visualize
The first rule of shooting a panorama is to find a scene that is as still as possible.
Remember that the final stitched-up image made up of many images should look like it is a part of a single image. It would be extremely hard and difficult to convey that if a single object appears multiple times in various parts of the final image.
In simple words, if you have anything that moves within the entire scene, that is going to cause problems for sure. Try and get the moving object out of the frame or recompose the shot.
And not just the scene and the elements in them, you too need to be as stationary as possible while shooting.
So before you start shooting (and this goes for any panorama), give it a second and try to visualize the image that you want and find the best position to get that from. Make sure that no shot is obstructed in the entire course of shooting.
It is a good practice to just look through your camera and go through the entire scene once before you actually start shooting. By doing this simple exercise, you should have a better understanding of the scene and the process you need to adapt to shoot it in the best way.
Shoot The Talent First
Okay, now that the scene, your camera settings, and your positions are locked and loaded, let’s get to the next stage.
Position your talent in the scene and take an image.
At this stage, just look to get the portrait of the subject right. Do not think of the panorama now. Just make sure that the facial expression, pose, lighting, etc. of the prime subject of the image is as good as it can be.
Only when you are happy with the portrait, move on to shoot the rest of the scene.
Happy with the portrait you got there? Okay then, moving on…
Start with any one end of the scene and shoot and follow a single direction. Make sure to have at least a 20% overlap between any two adjacent images. This will help to locate the image correctly within the scene later when you bring them into post-processing.
Just to remind you again. While shooting the panorama, move as little as possible.
Not Too Excited Now
Don’t get overboard with the number of images for the panorama though. Nine to ten images should be sufficient enough for any decent panorama.
More images you take now, more time and energy it is going to take to edit and process them later.
So unless you intend to print a billboard big enough to cover the face of an entire building, refrain from shooting too many images. It would just slow you down later.
Post Processing
There is not a lot to be done in post-processing if you shoot your images right. Just editing and stitching the images together.
Don’t worry about the editing software much. Whatever post-processing software you usually use should suffice for this as well. My suggestion would be to use Lightroom for the edits and Microsoft ICE (it’s absolutely Free) for the stitching-up job.
If you prefer using Lightroom for all of the steps, you could use the Photo merge function for the stitching-up.
Start off by editing the images. I would advise you to do this in Lightroom since it is very easy to just sync the edits to all the images with one click.
Yes, the rule of consistency applies here as well. ALL your images need to look similar to work as parts of the same image. So whatever edits you make on the global scale will have to be applied to all the images in the set.
Local edits which only apply to a small part of the image such as the eye of the subject or the skin tone need not be synced.
Lastly, just stitch together your images into one and you are good to go. You can use this wonderful tutorial by Astrordinary Imaging as a tutorial for Microsoft ICE.
Conclusion
That’s it guys. That is all you need to know to make a killer portrait panorama aka the Brenzier Method.
Go use this method to make some truly unique panoramas of your friends and family and wow them with the results.
If you still have some question, please feel free to post them below and I will be happy to answer them for you.
Keep shooting beautiful.
