Just got your new camera and are now rearing to go shoot the world, aren’t you?
Well, hold your horses there for a minute, my friend.
I know it is hard to stop yourself at this point but if you could just give me five minutes (no more), I would prepare you just right so that you avoid making the most common mistakes and adopt a good overall policy while shooting which is going to save you eons of time and a LOT of frustration throughout your one-eyed life.
So without wasting any more time, let’s begin.
The Very Basics Of Photography
No matter what camera you have today and what you upgrade to in a couple of years’ time, the fundamentals of photography will remain the same. They NEVER change.
Hence, it is of paramount importance that you know your basics so well that you can recite them backward.
Talking about photography basics, the very first concept that comes to mind is the notion of exposure. In simple words, how to expose a photosensitive material to light so as to be able to record a two-dimensional image. Here is all you need to know.
Exposure Triangle
The exposure triangle is the foundation of all photography, period.
Invest your time in learning this right and you will have a beautiful time with your camera for the rest of your life.
Okay now, let’s begin.
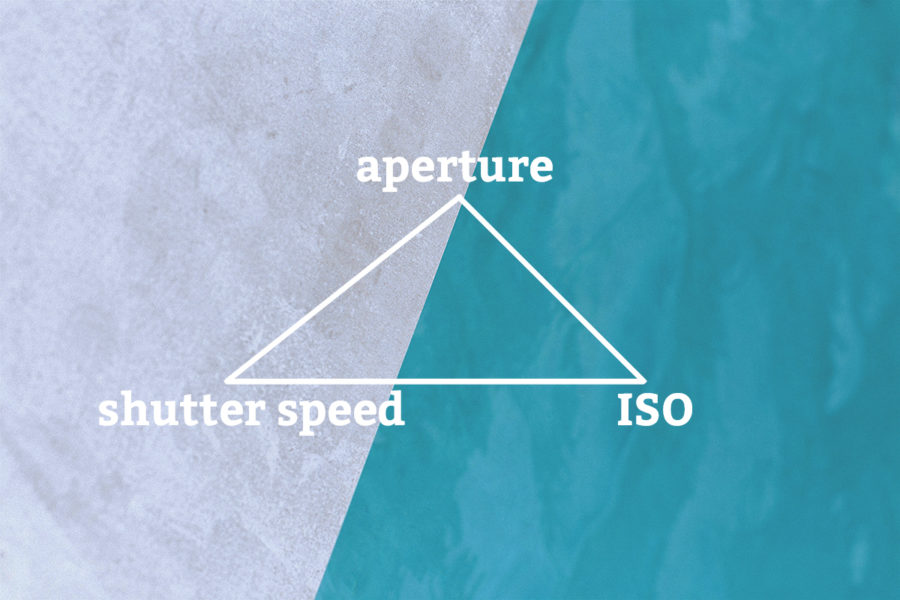
As you already know, the Exposure Triangle is made up of the three pillars of photography. They are namely:
- Aperture value: Determines the size of the opening inside the lens which lets in light into the camera
- Shutter speed: Duration for which the shutter of the camera is kept open
- ISO value: Degree of sensitiveness of the film/image sensor to the incoming light
Please don’t worry if these are new concepts that you are hearing for the first time. They are friendlier than they look at first instance. You need not be a physicist to understand any of this. Just give it some time to simmer in your head and you will be just fine.
For every image that you take, you need to specify these three parameters for your camera. Depending on the values that you input, the camera handles the incoming light differently.
For example, the values that you select for shooting a photograph of your house may be:
- Aperture value: f/4
- Shutter speed: 1/500th of a second
- ISO value: ISO250
It is absolutely fine if you do not know what these numbers represent. Just know that they look something like this. I will take care of the rest.
Each change that you make with any of the components of the Exposure Triangle has an effect on the final image. To keep this post short and easy, we are not going to discuss how exactly right now. There are some key concepts that you should be aware of before you deal with this.
Suggested Readings:
- Exposure Triangle Understanding Aperture, Shutter Speed & ISO
- Camera Aperture | A Comprehensive Guide For Beginners
- Understanding Shutter Speed | How It Works And Affects Your Images
- The Last Guide About ISO You Will Ever Need
Memory Cards
I know, I know memory cards do not rack up as the most interesting things in photography but nevertheless, you definitely would need a few of them to actually record your images and videos.
I don’t know for sure if you have had the chance to look at the various SD cards available in the market these days but just to give you a heads up, it is an absolute mess.

The manufacturers have left virtually no stones unturned in the quest of confusing and deliberately misleading users. That’s you and me!
A hundred different symbols coupled with numbers and letters have made it virtually impossible to find the card you actually need.
But you needn’t worry so much, I have got you covered. Just read up Understanding Memory Cards | How To Select Your Perfect Card and you will be off to the races in no time.
Only one piece of advice. Get at least two cards, to begin with. If your camera supports redundant recording, i.e, recording the photographs and the videos to two cards simultaneously, try and use that as much as possible.
Autofocus
The name “Autofocus” for me is a slight misnomer. At best, it is partially true.
And this is why I say this.
Although the name suggests that the focusing component of the camera is going to be taken care of automatically (without any user input), which is true, it doesn’t draw enough attention to the fact that to get it working correctly, the photographer needs to program the system right first.
Scroll through the autofocusing submenu on any camera and you will find a panoply of features and options to choose from. These are all there to help the photographer pre-direct the camera about the conditions of the present shoot.
The autofocusing settings for a low-light shoot are going to be very different from a shoot in bright conditions. Faster subjects would need the autofocusing module to be set very differently than relatively slower/static subjects.
Long story short, yes the autofocusing will focus on the subject automatically when you instruct it to but the reliability and the quality of the focus will largely be dependent on the chosen set of settings.
The better the photographer understands that underlying principles that govern the autofocusing system inside his/her camera bodies, the better he/she would be able to narrow down the options for the camera which would, in turn, result in the camera performing substantially better.
Here is exactly what you need for this:
The Only Guide You Need To Master Digital Camera Autofocusing [Part 1]
The Only Guide You Need To Master Digital Camera Autofocusing [Part 2]
P-Mode
The P-Mode stands for Program Auto Mode.
It is almost the same as the vanilla Auto Mode, differing in one crucial aspect. Unlike the Auto Mode, the P-Mode allows the photographer to change settings on the camera.
This is how that works. Let me also contrast this with the Auto Mode so that you see the difference more clearly.
In the Auto Mode, the camera makes ALL the decisions for any given shot. Say you are photographing a fast subject such as a bird. You pick up your camera, point it towards the bird, and half-press the shutter button. The camera, based on its predefined algorithms decides on a set of exposure settings and then proceeds to take the image as you press the shutter button fully.
As the photographer, you cannot make any changes to the settings the camera deems fit to take the shot. You cannot change the aperture value, shutter speed, or the ISO value the camera chooses.
Now, this would have been fine except for a giant glaring fault. The camera has NO idea about what it is actually looking at. A bird, a building, a meteor double the size of the earth? It is the same for the camera. All it cares about is the exposure of the image and it gets it at any cost.
I don’t have to say this out loud to let you know that this is NEVER good.
The P-Mode, on the other hand, as I said is a better version of the Auto Mode. Although it still aims to get the exposure correct, it doesn’t hamstring the photographer at all. You as the photographer still remain the prime decision-maker and have the ability to override any choice the camera makes.
Continue reading about P-Mode: P Mode | How To Make It Work For Faster Better Images
Rule of Thirds
Let’s talk a little composition now.
Composition, in a nutshell, refers to where and how you place the elements of your scene in the frame.
The rule of thirds is a very basic guideline to help you compose better-looking images, fast. One important thing to note here is although it is called a “rule”, this is a basic guideline at best. So, do not think for a moment that doing anything other than what the “rule” specifies makes your image an inferior one.
No hard and fast rules are applicable for art and that extends to photography as well.
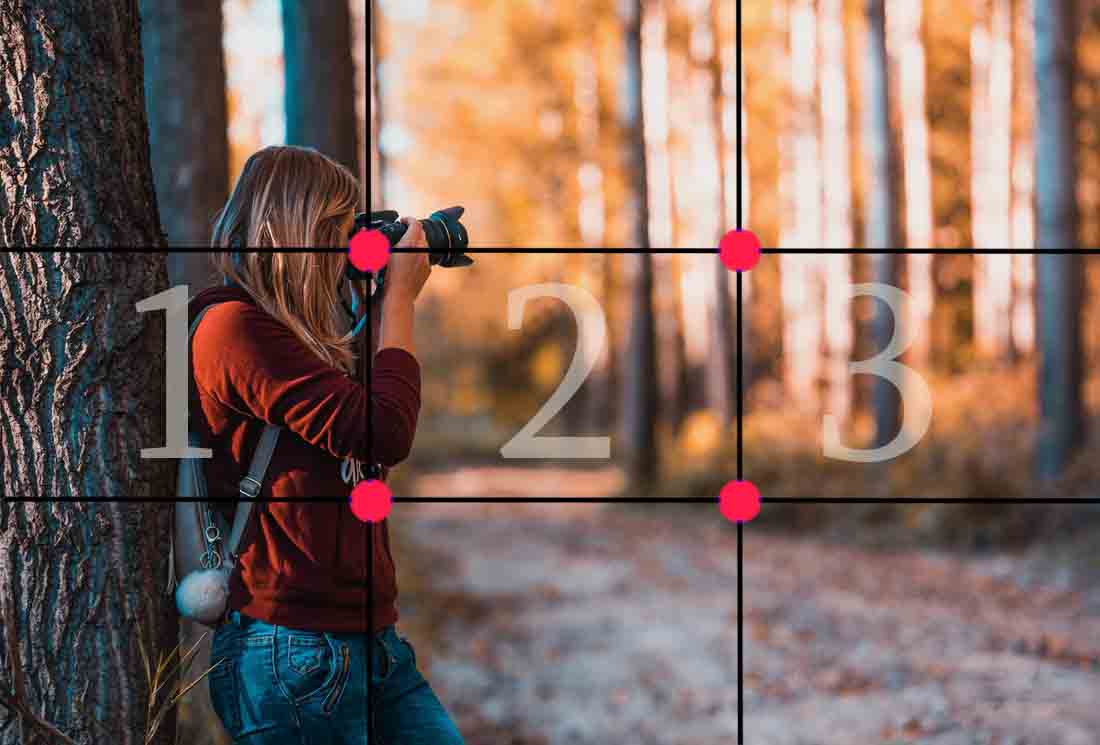
The Rule of Thirds is very simple in essence. It simply divides the entire frame into nine equal parts using a pair of horizontal and vertical lines. The “rule” suggests placing the elements of interest (this can be the primary subject or any other interesting element in the scene) at the point of intersection of the vertical and horizontal lines (red dots in the image above).
Since you are new to photography, I would suggest you follow this simple little rule and understand the small nuances of it before you go and break it.
Take it as a rule of thumb, whenever you break any so-called “rule”, it should be deliberate and with a specific intent not as a product of error.
Suggested reading: Rule Of Thirds As Applied In Photography | Explained
Reciprocal Rule
The two biggest problems amateur photographers tend to face when they step away from the infamous “Auto Mode” are:
- Dark Images
- Blurry Images
The reciprocal rule provides a quick and easy fix for the later.
The effectiveness of this “rule” is in its simplicity. It suggests using a shutter speed value that is roughly the reciprocal of the focal length used to take an image.
Confused?
Okay, let me simplify.
Say you have the 18 to 55mm f/3.5 to 5.6 kit lens on and are shooting fully zoomed in, i.e, at 55mm. The reciprocal rule recommends using 1/55th of a second shutter speed to avoid any camera shake.
If using the same lens you shoot wide at 18mm, the recommended shutter speed would drop to 1/18th of a second.
Easy, right?
Longer the focal length you use, the faster the shutter speed needs to be to avoid camera shake and vice versa.
Note here that 1/55th of a second is a faster shutter speed than 1/18th of a second.
Suggested Reading: Reciprocal Rule | A Simple Way To Avoid Blurry Images
Shooting Videos
Yeah, let’s get to the rage of the town now. Shooting videos.
Very few people these days buy a camera with only photography in mind. Almost all of them want to shoot some video with it. Yes, it may only be just home videos but nevertheless, they want it.
Knowledge about the basics of photography does really help in getting a head start in videography but in certain aspects, it is a completely different ball game.
Key concepts in videography such as frame rates, chroma sampling, and codecs are not discussed in the realm of photography at all.
In short, you need to know a few extra things to be able to shoot basic videos using your new DSLR or Mirrorless camera.
Just read this and you will be all set for you first shoot How To Start Creating Videos With Your Compact Camera | Starter Guide.
Focus And Recompose
Focus and Recompose is a quick little technique used to focus quickly on your subject a little more reliably.
Camera bodies these days come with an insane amount of focus points. Yes, by focus points I mean those little red dots that glow inside your viewfinder when the focus locks.
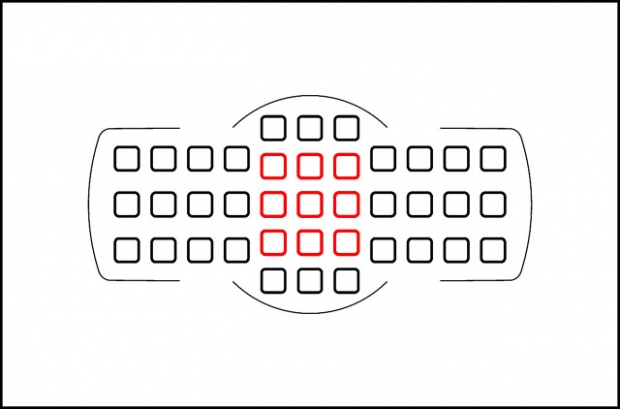
It may seem at first that all these points are the same and provide the same level of focusing ability but that is not the case.
There are primarily two types of focus points:
- Normal Type
- Cross Type
Without going into much detail here, let me just tell you that cross-type autofocusing points are better and are more capable than regular focus points. Using the Focus and Recompose technique, we try to leverage this to make sure that we get a solid focus lock before we record the image.
The centre autofocus point of nearly any camera body is almost always a cross-type autofocus point. The objective of the Focus and Recompose technique is to use this centre point to actually focus on the subject rather than allow the camera to randomly choose a point which is nearest to the subject in the frame but which may or may not be a cross-type.
Suggested Reading: Focus And Recompose Technique | How To Use It The Best
Camera Diopter
Do you wear glasses?
If the answer is yes, you may find the camera diopter to be an absolute godsend.
The camera diopter is tasked with the simple job of adjusting the viewfinder of the camera depending on if the photographer is nearsighted or long-sighted up to a certain degree.
What that means, in essence, is that by just adjusting the diopter on your camera, you can see through it clearly without the assistance of your glasses. How cool is that?
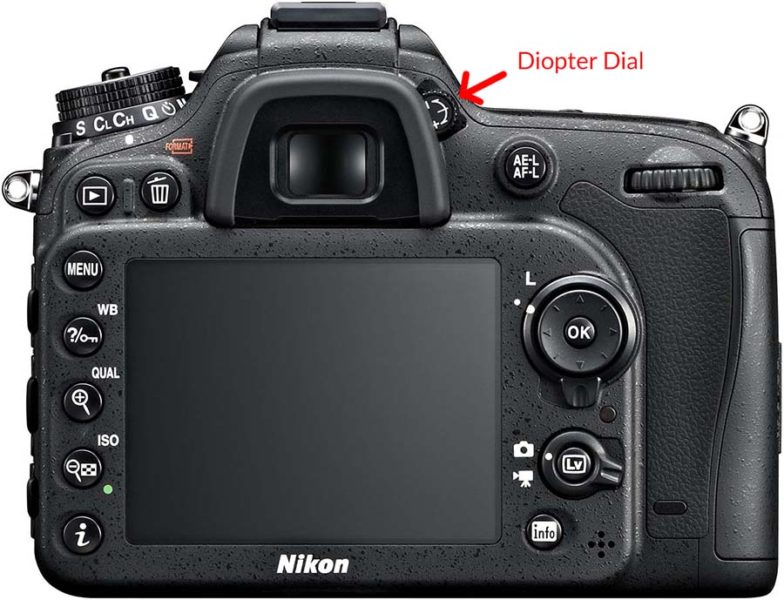
A word of warning though. If you have proper 20/20 vision or if the diopter of your camera is not calibrated properly, the viewfinder may seem blurry or hazy. This is exactly why everything looks weird when you wear powered glasses that you do not need.
Give this post a quick read and you are set: Camera Diopter | What All Photographers With Glasses Should Know
Lens Hood
The cylindrical piece of black plastic that comes with your lens is called the lens hood.

It is attached to the front of the lens and its primary function is to prevent stray rays of light hitting the lens at odd angles. This may not seem like a very important function to have but in practical scenarios, the lens hood plays a crucial role in making the image look the best it can.
As an added bonus, the lens hood also doubles as a bumper for your lens. This allows the lens to be without the protective lens cap yet ready to take a shot and be shielded by the hood from accidental bumps and falls to a certain degree.
Suggested reading: Lens Hood | All You Need To Know
Blurry Background With Any Camera
Okay, let’s now discuss one of the first things new photographers wish for when they get their first semi-pro or pro camera body. It’s the ability to throw the background into an artistic blur and at the same time make the subject of the image as sharp as possible.
Actually there is not much to discuss here. All you need to do is use the smallest aperture value possible and you are good to go.
So in case, you have a kit lens that has a variable aperture value of f/3.5 to 5.6, you need to shoot using f/3.5 and that should, in theory, give you a good amount of lens blur.
What? Is it not happening?
Well, that may be because f/3.5 is not good enough to make the background as silky smooth as you want. Although the aperture value plays the most prominent role in creating a good looking background blur, it is not the only factor. Subject distance (how far the subject is from the camera) and the relative distance of the background from the subject all play a key role in creating a good blur.
It’s not the case that you cannot create a good blur with just f/3.5, you just need to harness all the factors to the maximum to make a noticeable difference. Read this for a complete step by step guide: How To Get A Blurry Background With Almost Any Camera.
Sunny 16 Rule
Finally, this is a small step in the direction of moving out of automatic camera settings and taking control.
The Sunny 16 rule works very much like the Reciprocal rule that we discussed earlier. Only in this case instead of trying to avoid a blurry image, the aim is to get a well-exposed image.
So how does this work?
First and foremost, this rule is intended to be used on a sunny day for subjects which are directly in the sunlight (not in the shade). The idea is very simple. To ensure a well-exposed image, set your aperture value to f/16 and then use the reciprocal of the ISO value you choose as the shutter speed for the camera.
That flew over your head?
Okay, again.
Step 1: Set the aperture value to f/16
Step 2: Choose an ISO value, say ISO200. The Sunny 16 rule suggests using the reciprocal of the ISO used as the shutter speed. So use 1/200th of a second as the shutter speed and that should ensure correct exposure.
Note: Keeping the aperture value fixed at f/16, if you change the ISO value to say ISO400, you would have to adjust the shutter speed to 1/400th of a second too, to accommodate for that adjustment according to the rule.
Suggested reading: Sunny 16 Rule | The Easy Way To Master Exposure In The Sun
Conclusion
That is it, guys. That is my time.
These are all the basic concepts you would need to be aware of before you embark on a shooting spree. Learning them will, for sure, make you a smarter, better photographer who knows his/her fundamentals well and is comfortable with them.
Research each one of them as much as you can, learn about them, and watch a few YouTube videos. They will surely serve you back and pay rich dividends in the long run.
If you have any further questions about anything at all, please post them in the comments below and I would get back to you as soon as possible.
Keep shooting beautiful.
